Не так давно состоялся релиз Fedora 41. В этом обновлении мы получили GNOME 47 с возможностью настраивать акцентный цвет, несколько полезных функций в файловом менеджере Nautilus, новый эмулятор терминала и улучшения установки драйверов Nvidia c Secure Boot.
В этой статье будет рассмотрена настройка Fedora 41 после установки. Я опишу основные действия, которые я делал для настройки своей системы для того чтобы сделать рабочее окружение более удобным.
Содержание статьи
Настройка Fedora 41 после установки
1. Обновление системы
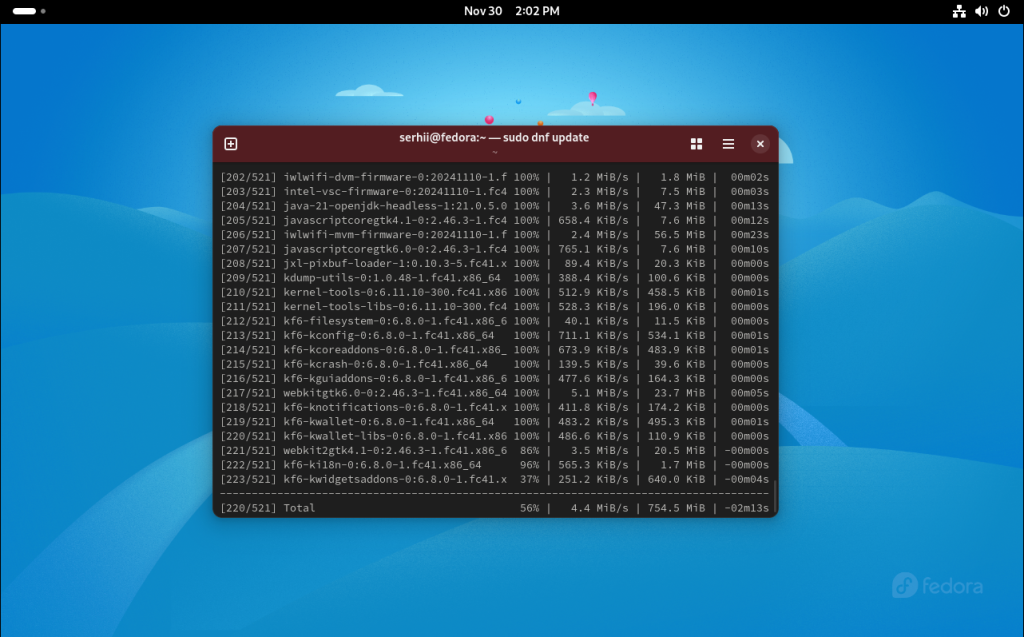
Первым делом необходимо обновить систему. Обновить пакеты из официальных репозиториев можно следующей командой:
sudo dnf update
Во время обновления вы скорее всего увидите предупреждение "warning: posix.wait(): .fork(), .exec(), .wait() and .redirect2null() are deprecated, use rpm.spawn() or rpm.execute() instead" оно не влияет на установку обновлений и его можно игнорировать. Больше информации об этом можно найти здесь.
2. Настройка дополнительных репозиториев
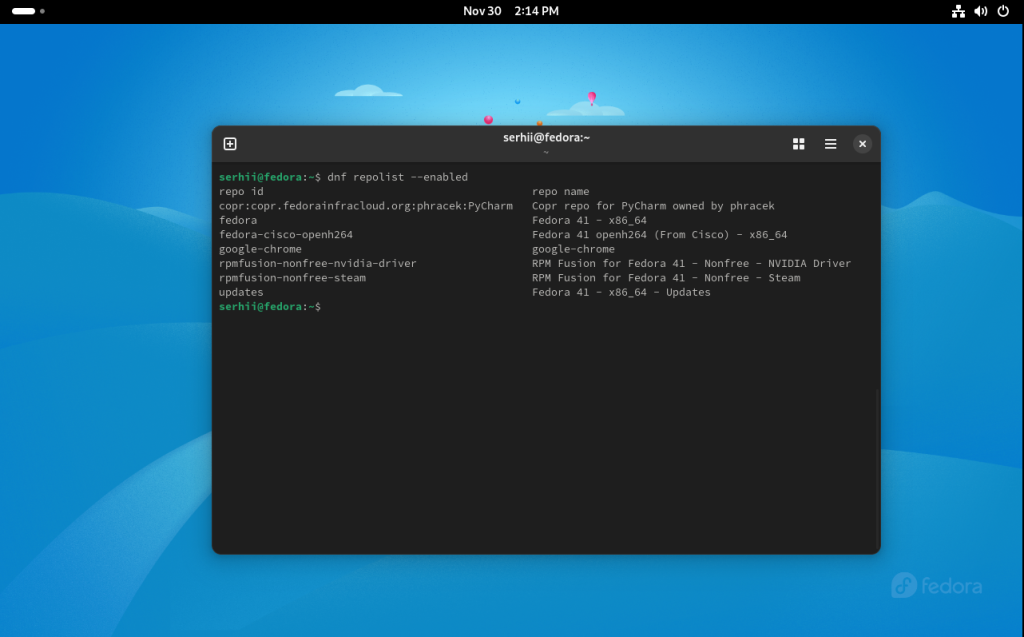
Если вы хотите иметь доступ к большему количеству пакетов, то можете добавить репозиторий RPMFusion. По умолчанию, если вы выбрали опцию Enable Third-party Repositories во время установки, Fedora содержит дополнительные репозитории для установки Google Chrome, PyCharm, Nvidia и Steam, а также Flathub. Посмотреть список включённых RPM репозиториев можно с помощью команды:
dnf repolist --enabled
Для добавления RPMFusion Free и NonFree выполните такие команды:
sudo dnf install https://download1.rpmfusion.org/free/fedora/rpmfusion-free-release-$(rpm -E %fedora).noarch.rpm
sudo dnf install https://download1.rpmfusion.org/nonfree/fedora/rpmfusion-nonfree-release-$(rpm -E %fedora).noarch.rpm
Если вы не выбрали что нужно включить сторонние репозитории при установке, то Flathub тоже надо добавить вручную:
flatpak remote-add --if-not-exists flathub https://dl.flathub.org/repo/flathub.flatpakrepo
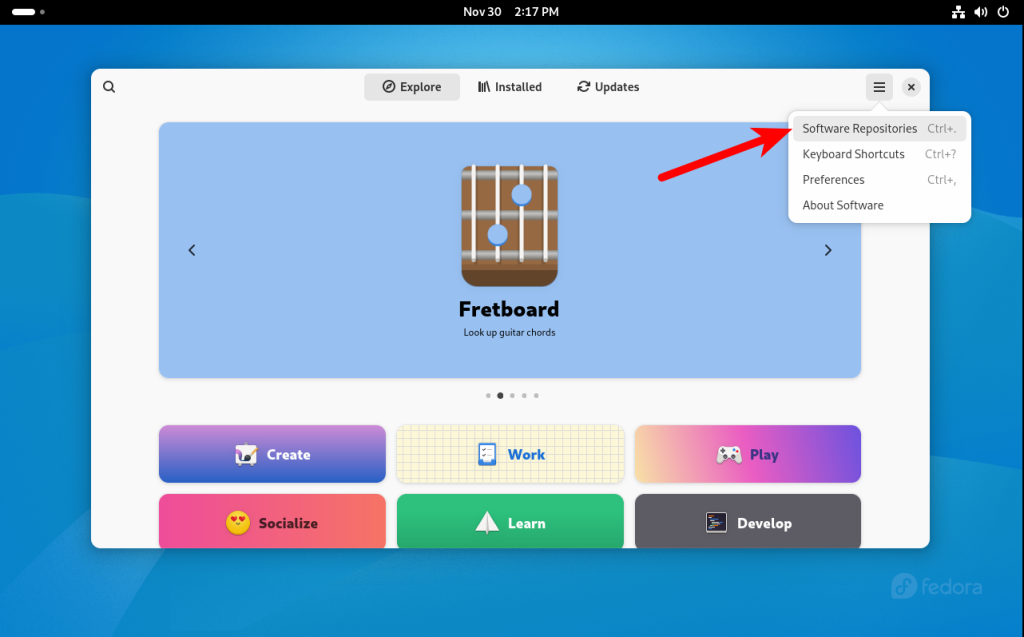
Кроме того, уже добавленными репозиториями удобно управлять с помощью приложения Software. Нажмите кнопку с тремя полосками и выберите Software Repositories:
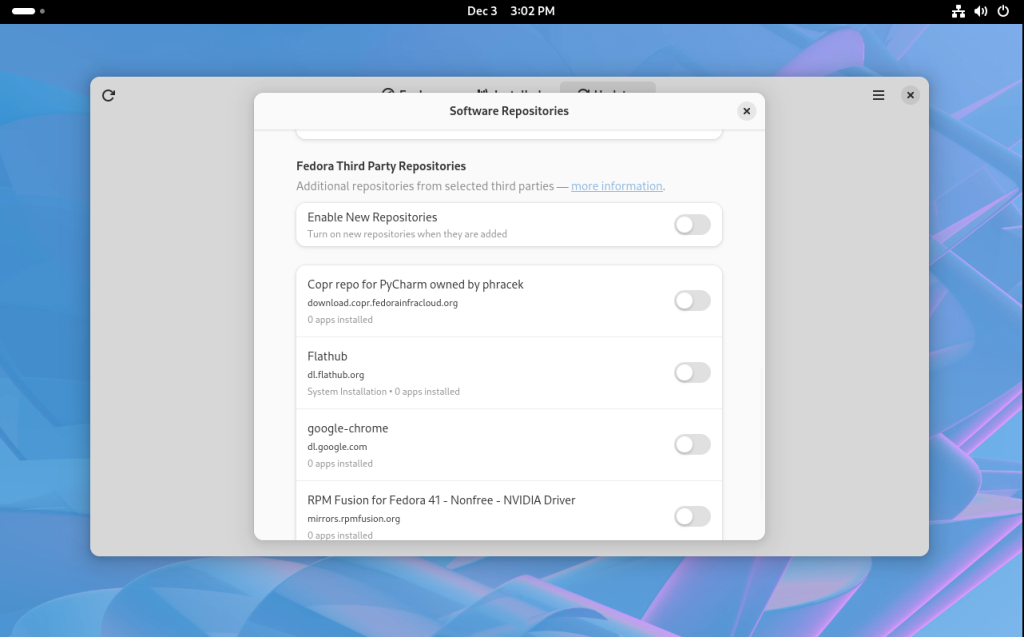
Здесь можно отключить уже добавленные репозитории или включить предустановленные сторонние репозитории и FlatHub. Для этого пролистайте вниз к пункту Fedora Third-Party Repositories:
3. Настройка рабочего стола
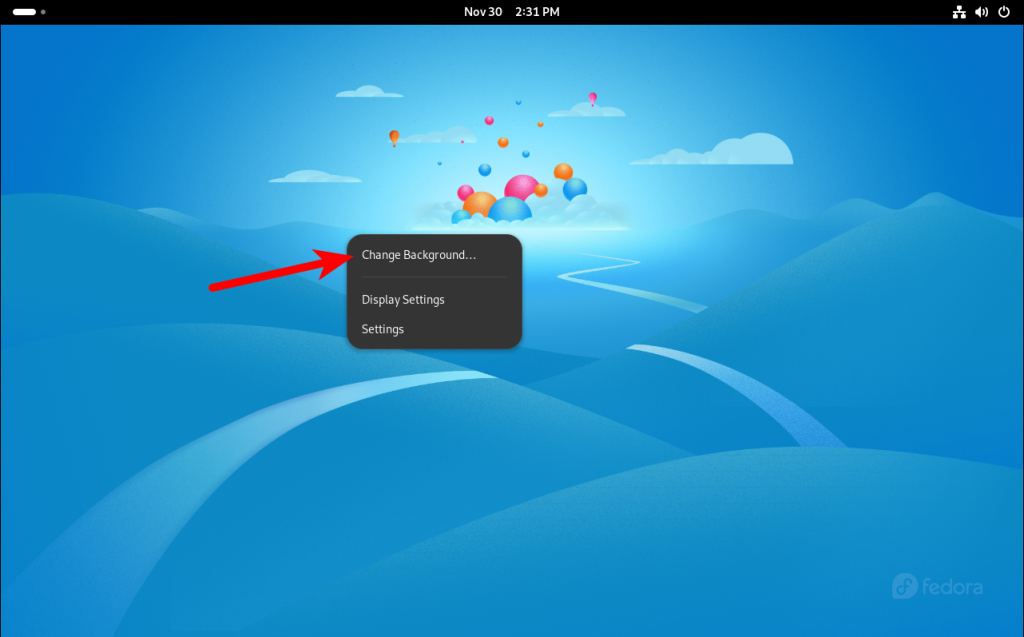
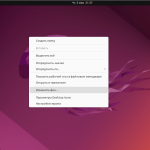
Для того чтобы изменить фон рабочего стола кликнте правой кнопкой мыши по в любом месте и выберите Change Background:
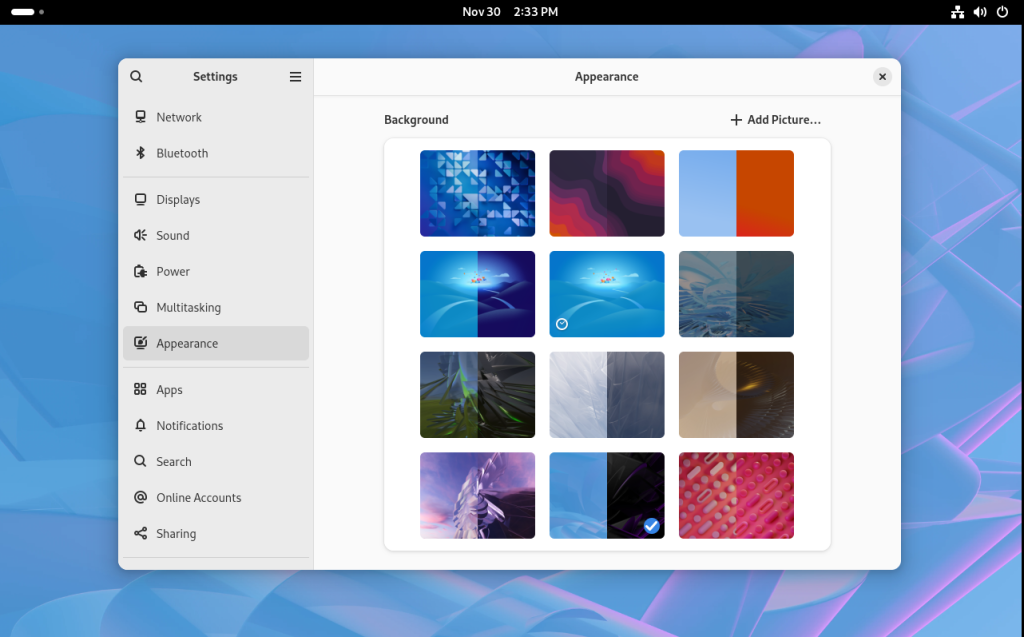
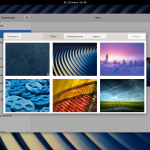
В самом низу в разделе Background можно выбрать изображение фона:
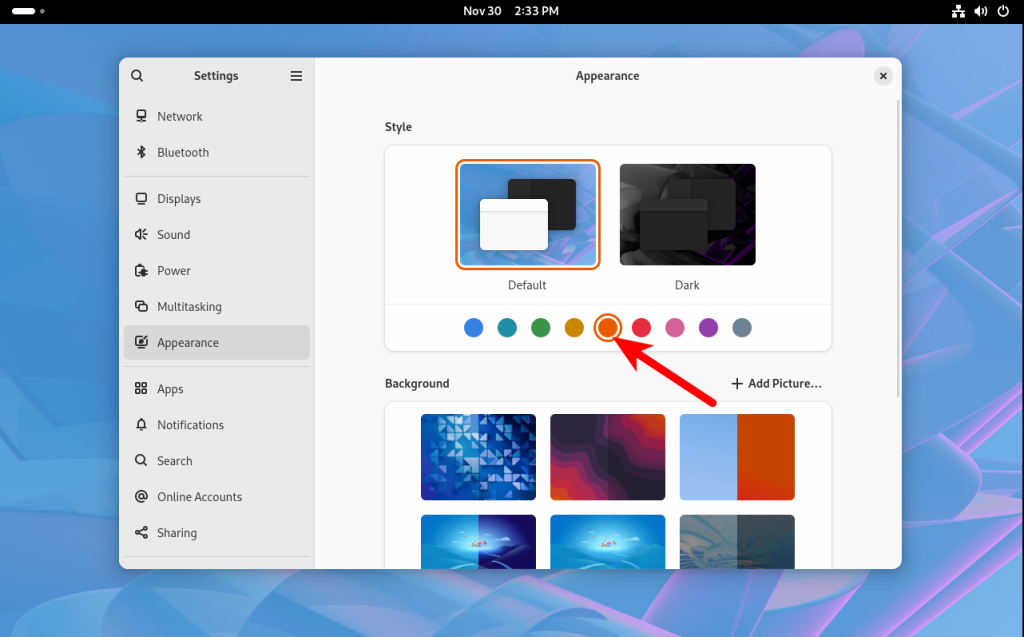
Также здесь можно выбрать акцентный цвет:
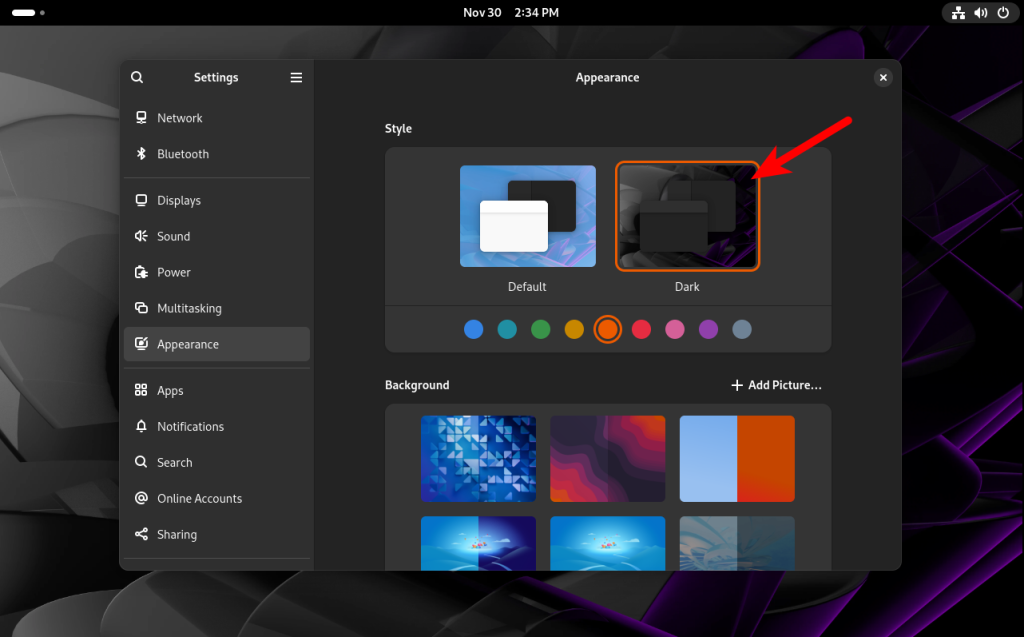
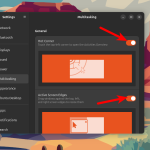
А также включить темную тему:
Для активации темной темы также можно использовать команду:
gsettings set org.gnome.desktop.interface color-scheme prefer-dark
4. Настройка терминала
Теперь в Fedora по умолчанию поставляется эмулятор терминала Ptyxis разработанный на основе VTE. Это означает что он выглядит примерно также как и Console, только теперь здесь поддерживаются профили и контейнеры. Поддержка контейнеров означает что при открытии терминала он автоматически будет подключаться к контейнеру. Но эта функциональность больше актуальна для Read-only дистрибутивов.
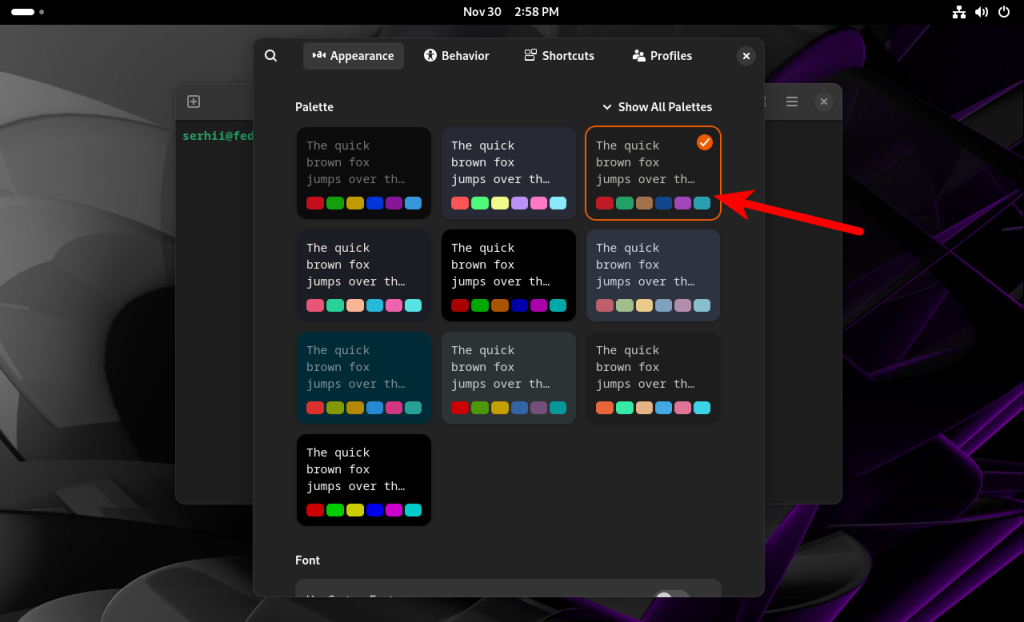
Нажав кнопку с тремя полосками и выбрав Preferences вы можете настроить внешний вид и поведение терминала. В разделе Palette можно выбрать одну из предустановленных палитр:
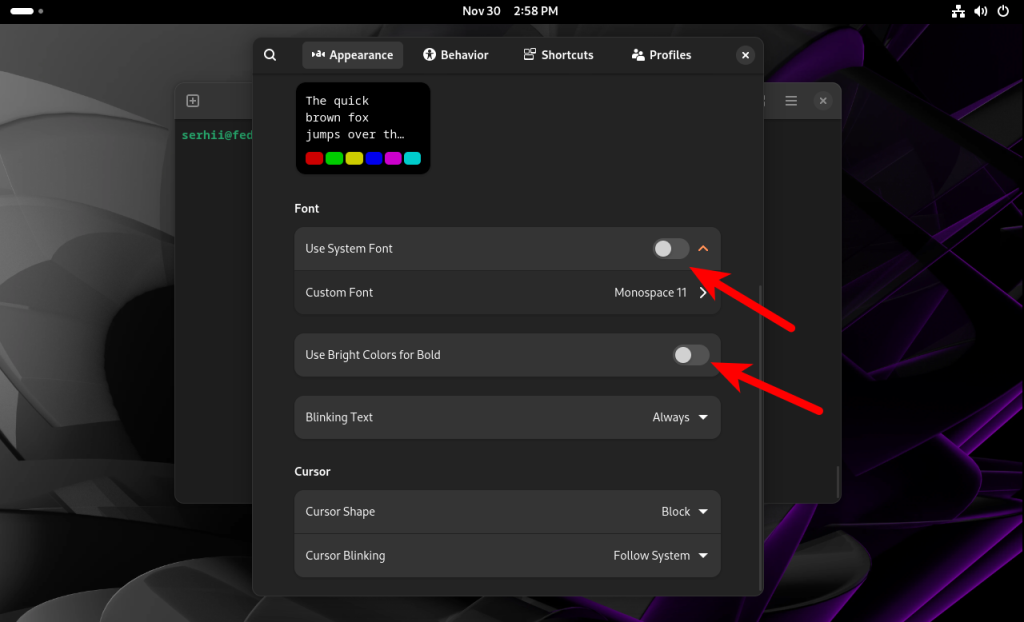
Ниже, в разделе Font можно изменить шрифт по умолчанию и выбрать его размер:
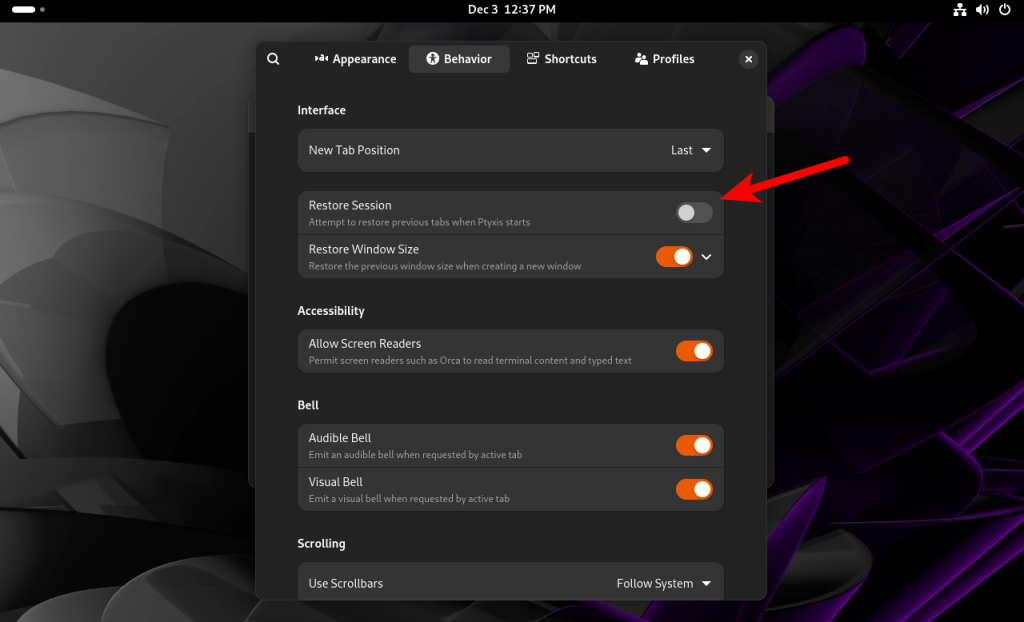
Также можно отключить использование ярких цветов с помощью опции Use Bright Colors for Bold. Ещё в разделе Behavior можно отключить Restore Session, для того чтобы при следующем запуске вкладки из предыдущей сессии не восстанавливались:
Для отключения восстановления сессии также можно выполнить:
gsettings set org.gnome.Ptyxis restore-session false
5. Настройка Nautilus
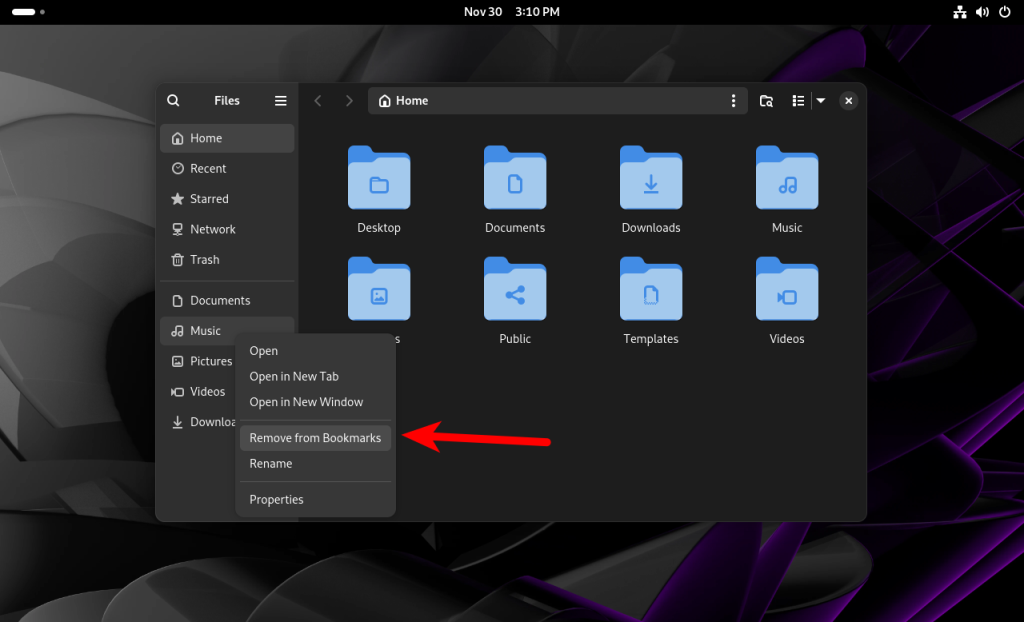
Файловый менеджер тоже можно немного настроить. Во первых теперь можно удалить лишние закладки. Например, для того чтобы удалить закладку Music кликните по ней правой кнопкой и выберите Remove from Bookmarks:
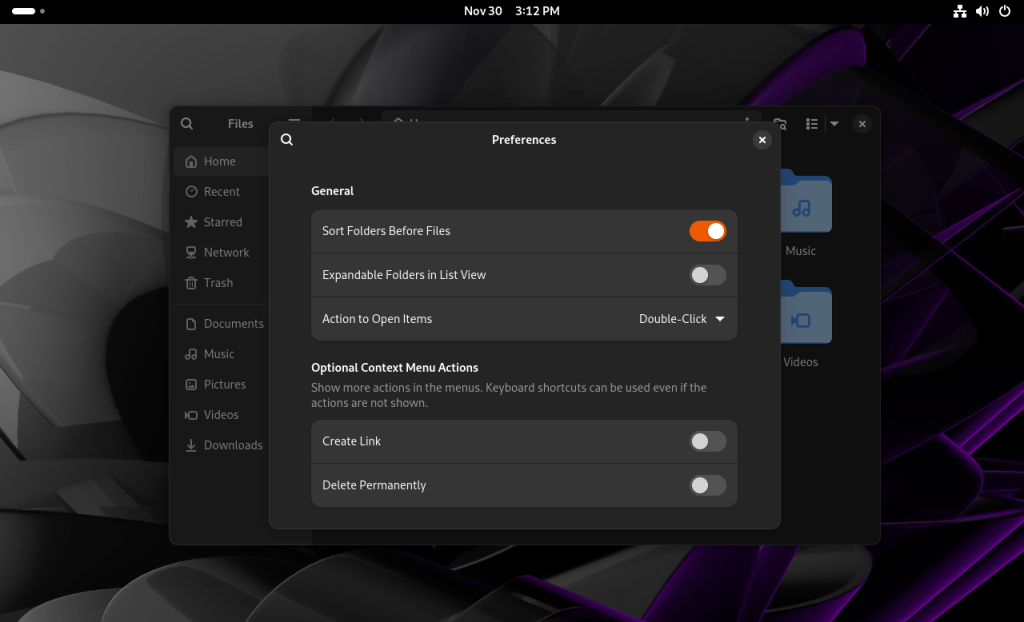
Также вы можете настроить сортировку так, чтобы папки отображались выше файлов. Для этого кликните по кнопке меню, выберите Preferences и включите опцию Sort Folders Before Files:
Или выполните команду:
gsettings set org.gtk.gtk4.settings.file-chooser sort-directories-first true
6. Шаблоны в Nautilus
В Windows есть довольно удобная функция, когда в контекстном меню на рабочем столе или в папке вы можете выбрать Create, выбрать тип файла и получить новый файл. В Nautilus тоже так можно, но для этого нужно добавить шаблоны файлов в папку ~/Templates в вашей домашней папке. Например, давайте создадим шаблон файла txt:
touch ~/Templates/new_file.txt
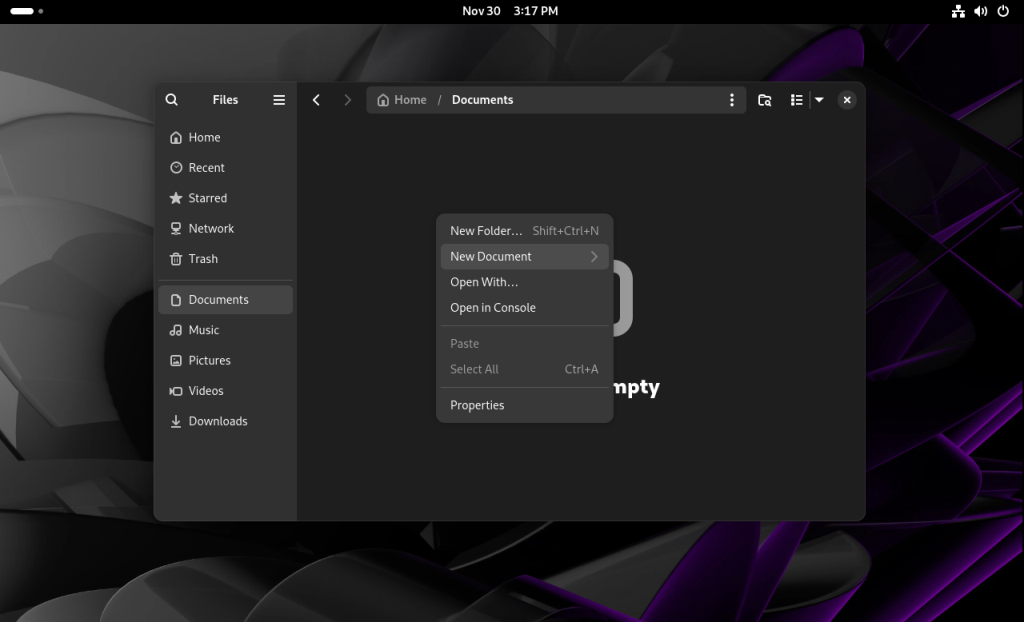
После этого в контекстном меню появится пункт New Document:
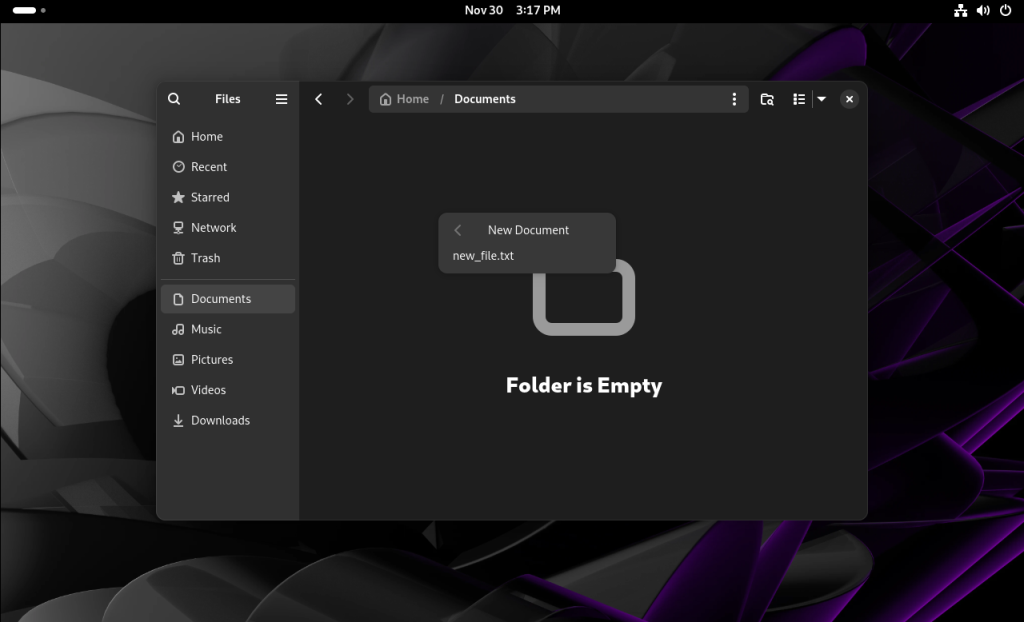
И в выпадающем списке будет только что созданный шаблон. После клика по которому будет создан файл в текущей папке.
7. Отключение режима сна
После определённого времени неакивности по умолчанию компьютер будет переходить в режим сна для экономии энергии. Для того чтобы это отключить запустите утилиту Settings, перейдите в раздел Power и выключите опцию Automatic Suspend.
Или вы можете воспользоваться командой:
gsettings set org.gnome.settings-daemon.plugins.power sleep-inactive-ac-timeout 0
Однако это ещё не все. Эта настройка не влияет на экран входа. Поэтому если вы включите компьютер и не авторизуетесь на протяжении 15 минут компьютер всё равно будет засыпать потому что сейчас вы поменяли настройки для своего пользователя, а экран входа принадлежит пользователю GDM. Для того чтобы поменять настройки и для него, выполните команду:
sudo -u gdm dbus-run-session gsettings set org.gnome.settings-daemon.plugins.power sleep-inactive-ac-timeout 0
Больше информации об этом тут
8. Отключение блокировки экрана
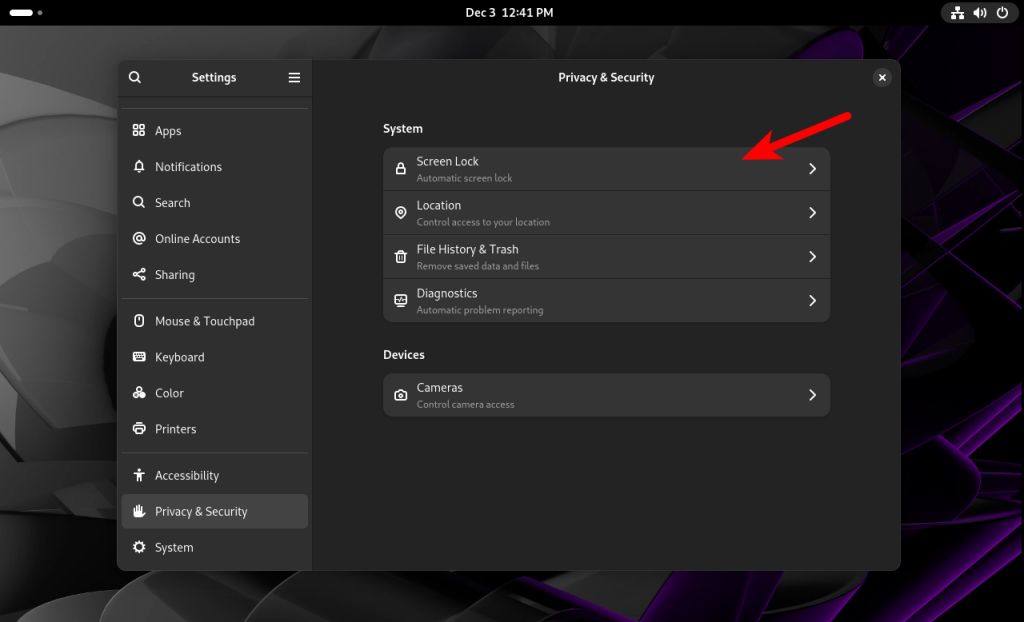
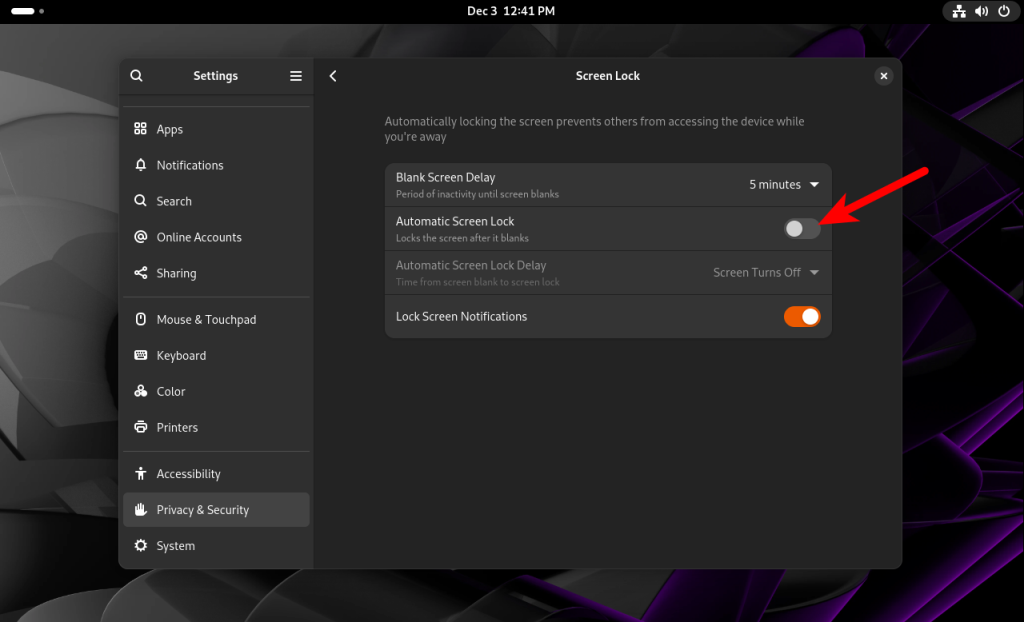
По умолчанию экран блокируется автоматически через 5 минут с момента когда вы не используете компьютер. Для того чтобы это отключить откройте утилиту Settings, перейдите в Privacy & Security и выберите Screen Lock:
Здесь нужно выключить опцию Automatic Screen Lock:
Или выполните команду:
gsettings set org.gnome.desktop.screensaver lock-enabled false
9. Автоматическая очистка корзины
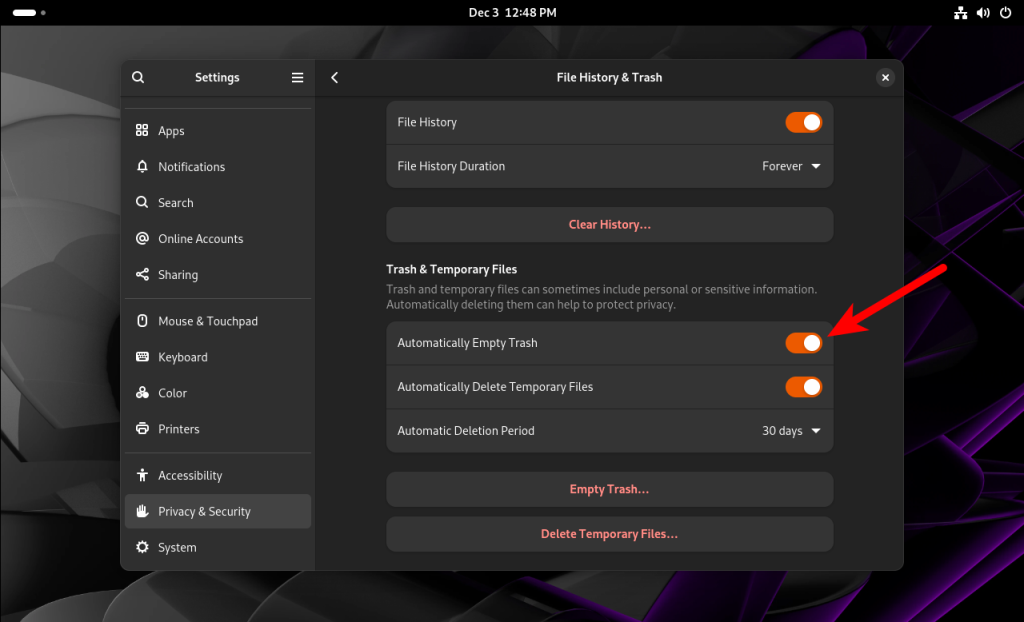
По умолчанию корзина не очищается и вам надо удалять файлы отправленные туда вручную. Но это можно исправить. В том же разделе настроек Privacy & Security выберите File History & Trash и в разделе Trash & Temporary Files включите опцию Automatically Empty Trash:
Также здесь вы можете выбрать через какой период после удаления файлы будут удаляться из корзины в разделе Automatic Deletion Period.
Ещё включить автоматическую очистку корзины можно командой:
gsettings set org.gnome.desktop.privacy remove-old-trash-files true
10. Установка Extension Manager
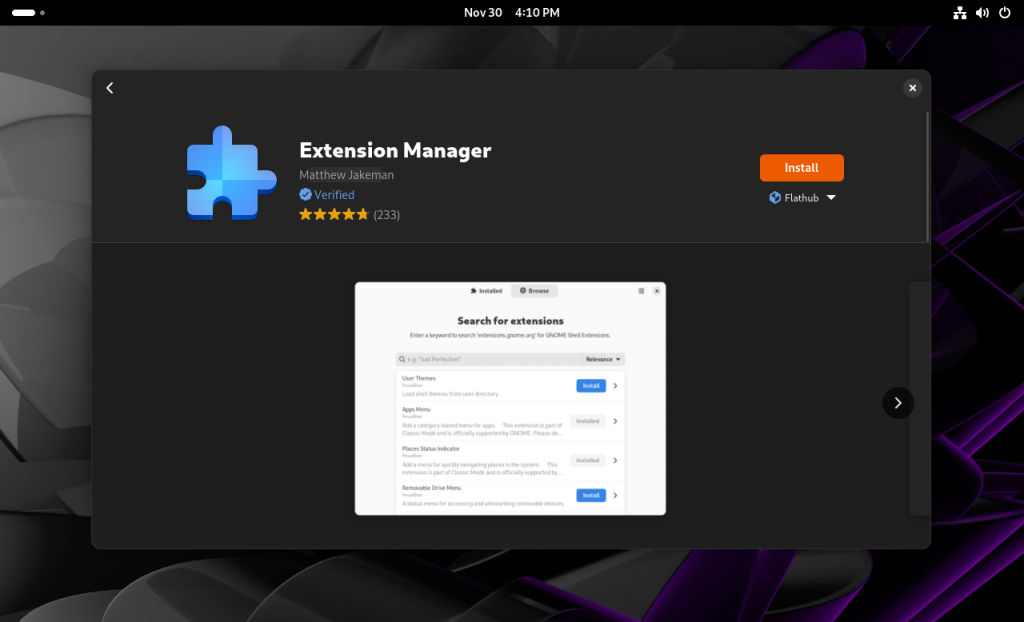
Раньше для установки расширений нужно было установить специальный пакет коннектор и расширение для браузера. Но теперь вы можете использовать отдельное приложение Extension Manager для того чтобы управлять расширения и устанавливать их в одном месте. Это стороннее приложение, поэтому устанавливать его надо из Flathub. Например, с помощью утилиты Software:
Также вы можете использовать следующую команду:
flatpak install flathub com.mattjakeman.ExtensionManager
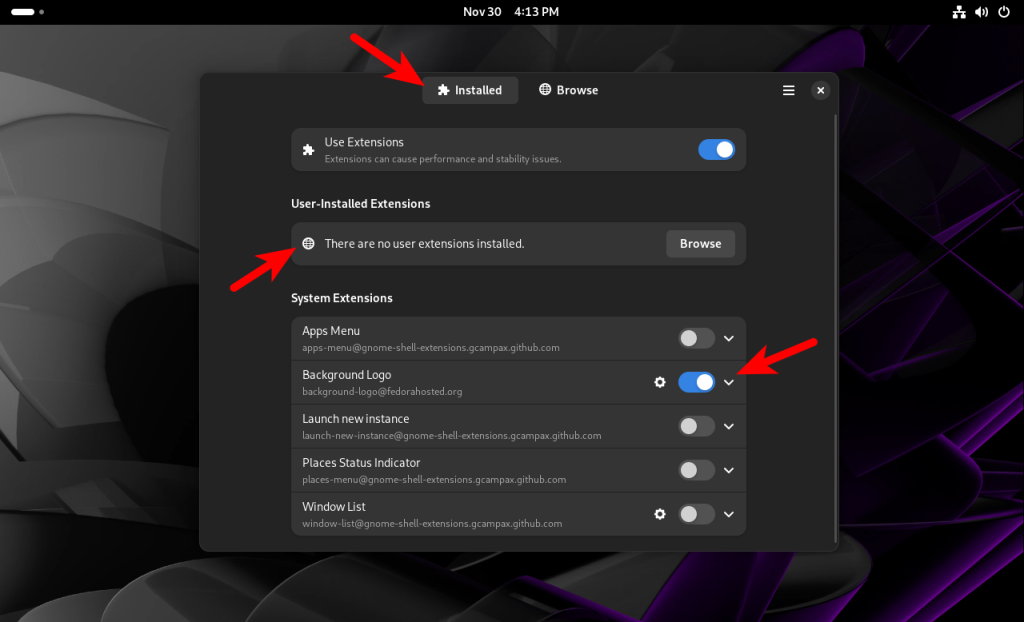
После запуска приложения на вкладке Installed можно управлять установленными расширениями, например, менять их настройки:
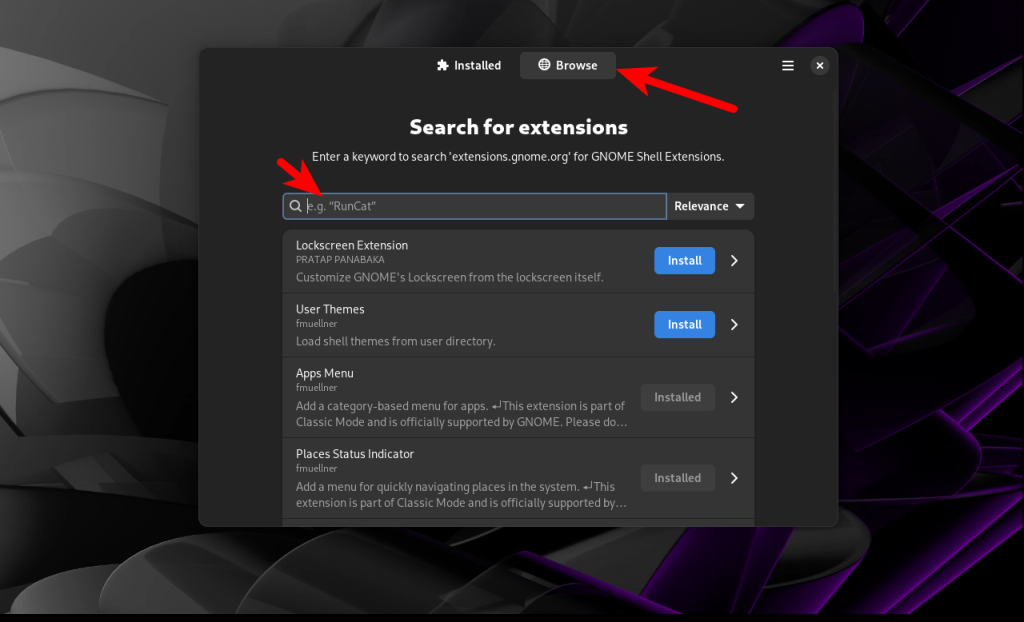
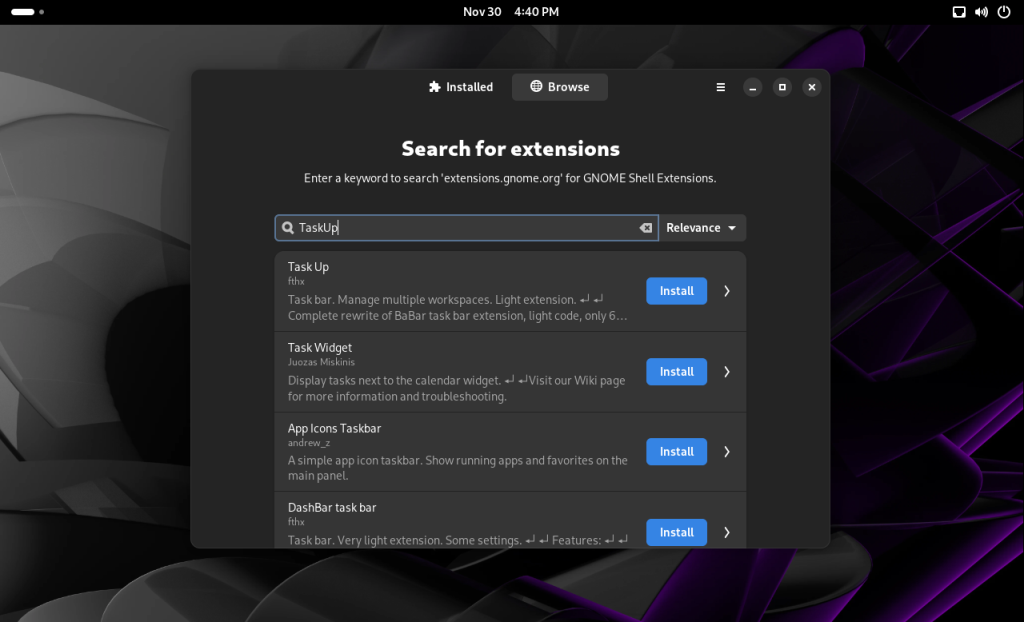
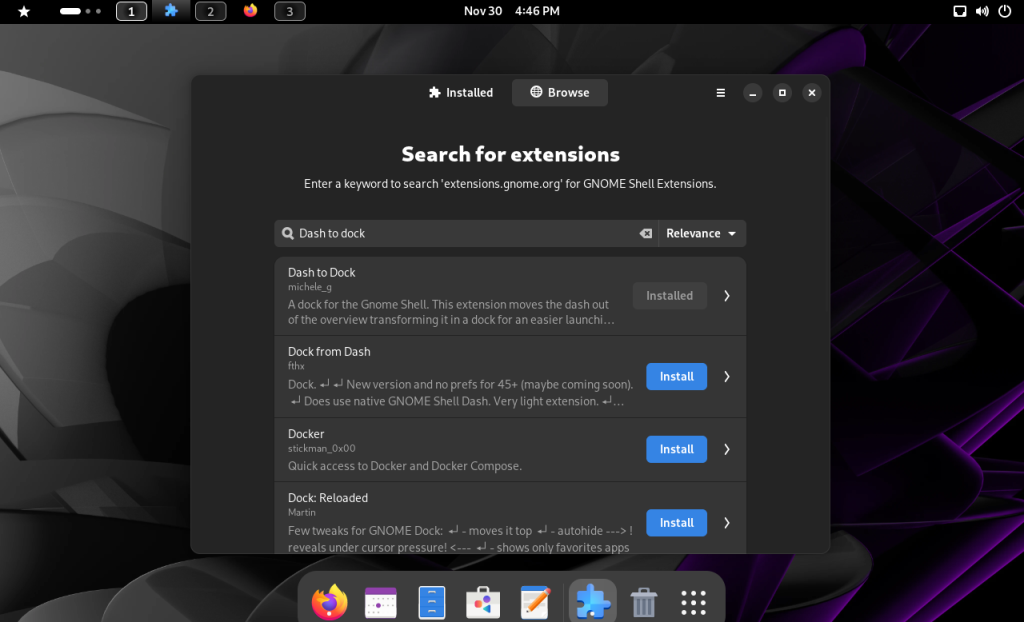
А на вкладке Browse загружать новые расширения с gnome-look.org. Наберите название расширения в поиске, затем нажмите кнопку Install.
А после этого подтвердите установку в диалогом окне и расширение будет установлено.
11. Установка Gnome Tweaks
Утилиту Gnome Tweaks можно использовать чтобы управлять некоторыми настройками GNOME, например, здесь можно поменять тему оформления, иконок, включить или отключить определённые функции, например, вернуть кнопки Minimize и Maximize для окон. Его можно установить с помощью GNOME Software или выполнив следующую команду:
sudo dnf install gnome-tweaks
12. Открывать окна по центру
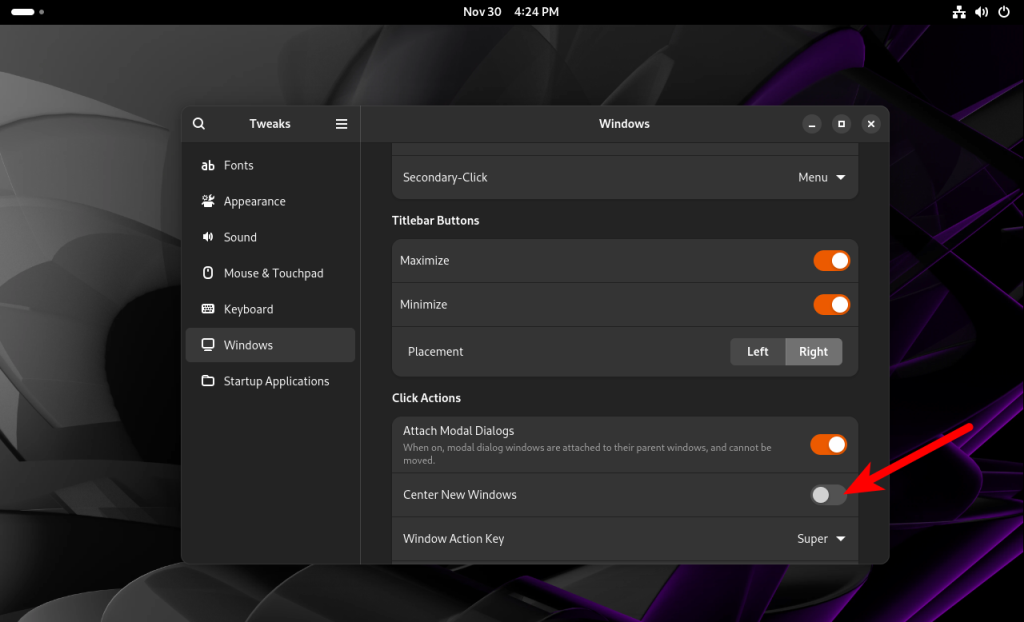
По умолчанию окна открываются в левом верхнем углу. Если вы хотите чтобы они открывались по центру откройте Gnome Tweaks, перейдите на вкладку Windows и включите опцию Center New Windows:
Или выполните команду:
gsettings set org.gnome.mutter center-new-windows true
13. Вернуть кнопки свернуть и развернуть
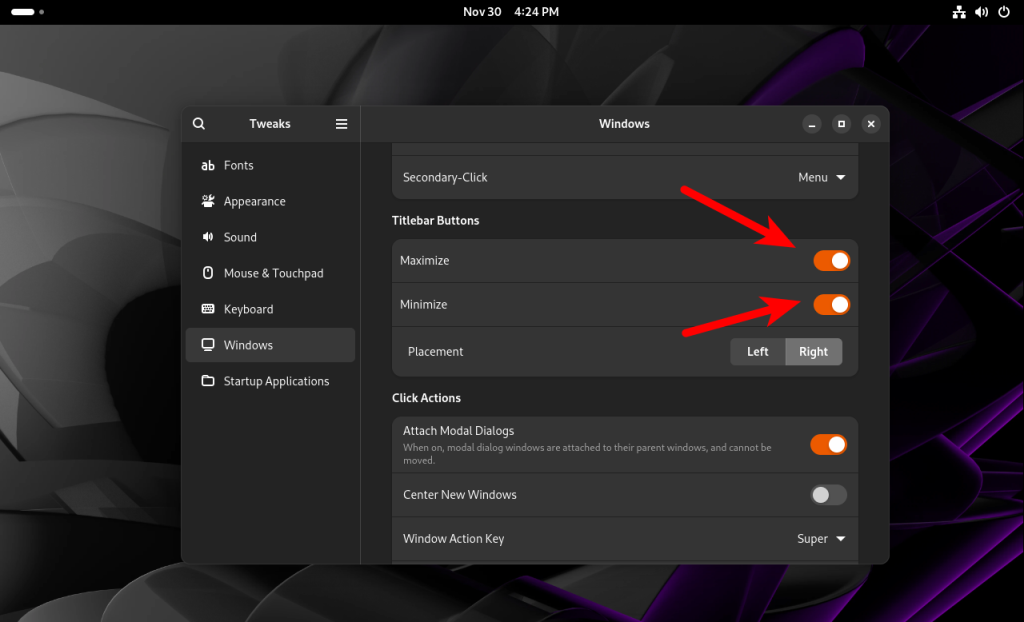
Здесь же можно вернуть кнопки Minimize и Maximize с помощью соответствующих пунктов меню:
Или можно использовать команду:
gsettings set org.gnome.desktop.wm.preferences button-layout appmenu:minimize,maximize,close
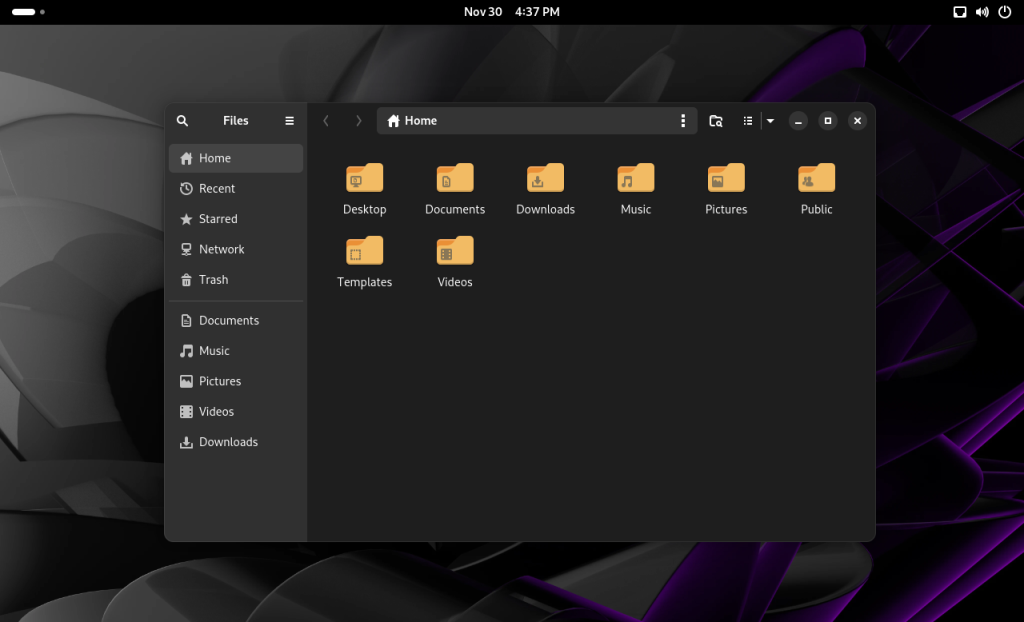
14. Поменять тему иконок
Если вам не нравится стандартная тема иконок для папок GNOME вы можете её изменить. Например на тему иконок от Numix. Для установки темы выполните команду:
sudo dnf install numix-icon-theme
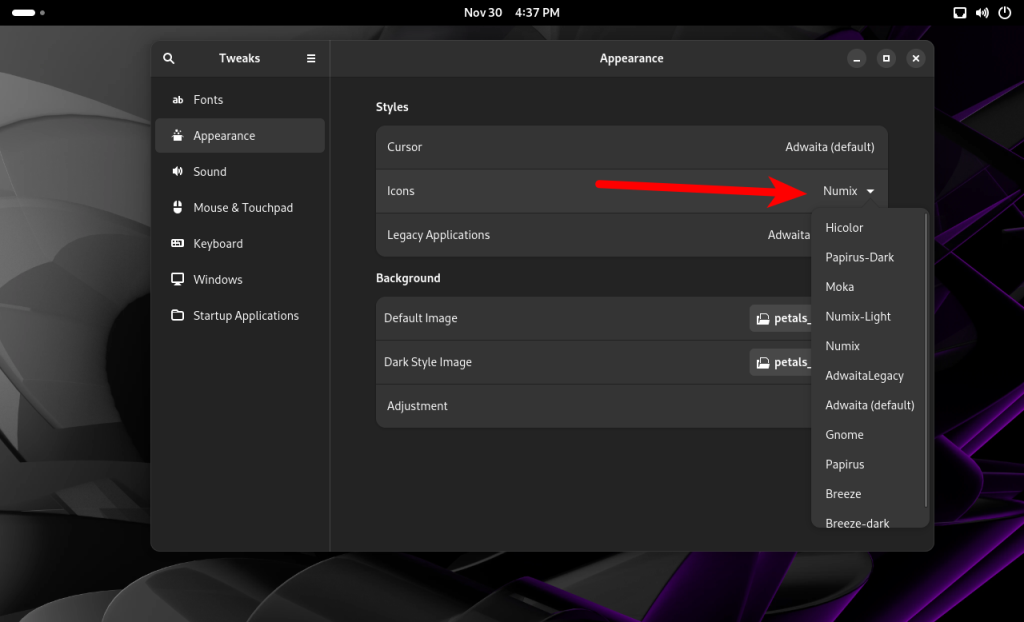
Затем на вкладке Appearance в GNOME Tweaks выберите установленную тему иконок:
Вот так выглядит результат:
15. Вернуть индикаторы приложений
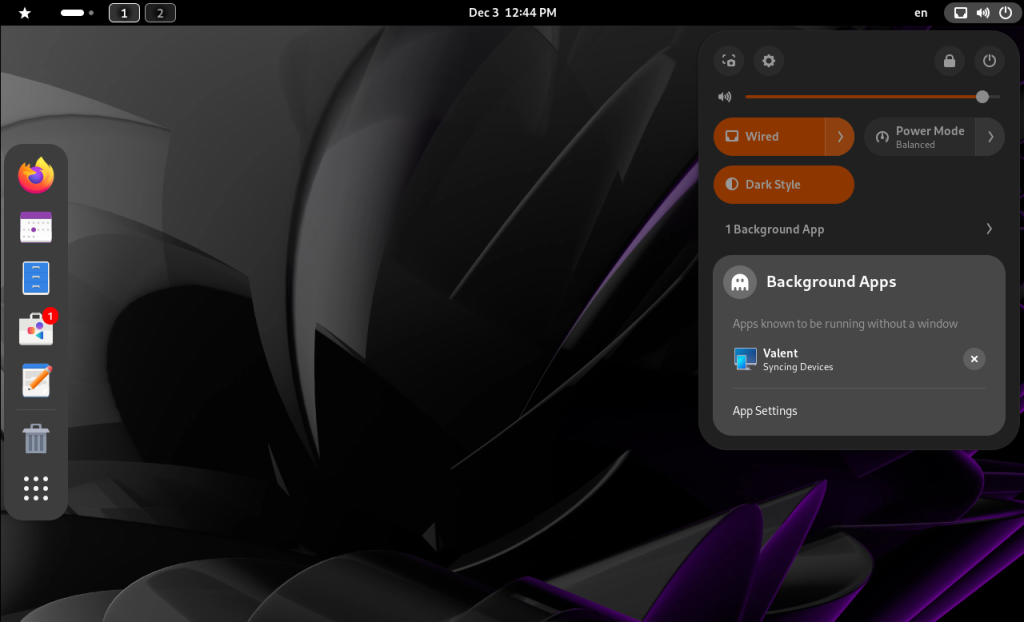
В GNOME уже довольно давно был отключён системный трей и иконки запущенных приложений никуда не выводятся. Для программ которые не имеют открытых окон можно использовать раздел Background Apps в меню быстрого доступа:
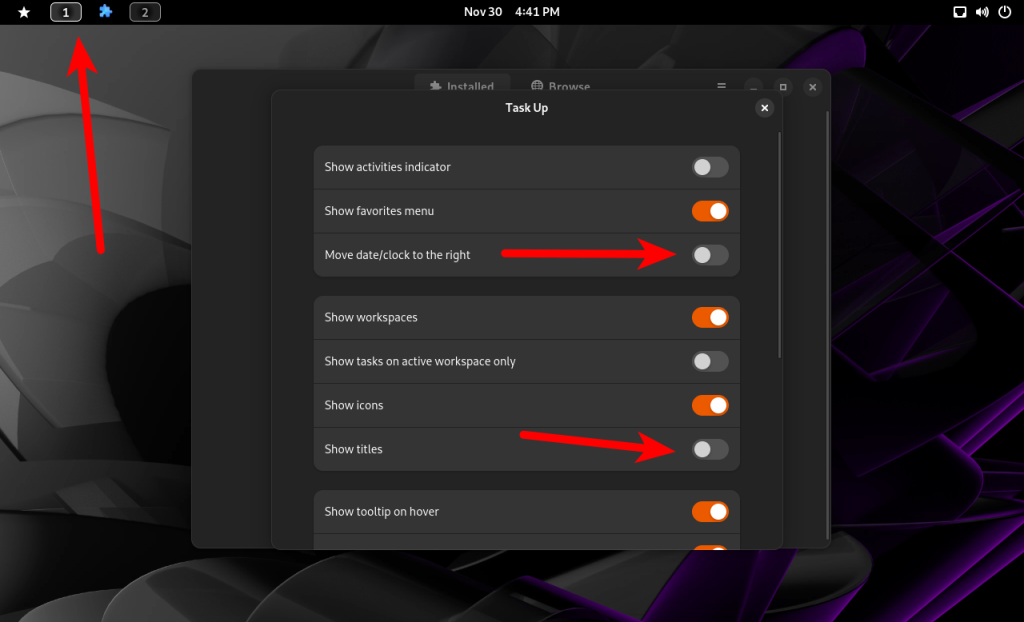
Все остальные программы можно разворачивать с Dock панели. Если вам этого не достаточно, то можно установить расширение TaskUP. Расширение возвращает значки открытых приложений на панель.
В настройках расширения я отключил Show Titles и Move Date/Clock To the Right. После этого индикаторы приложений выглядят вот так:
16. Настройка панели Dash
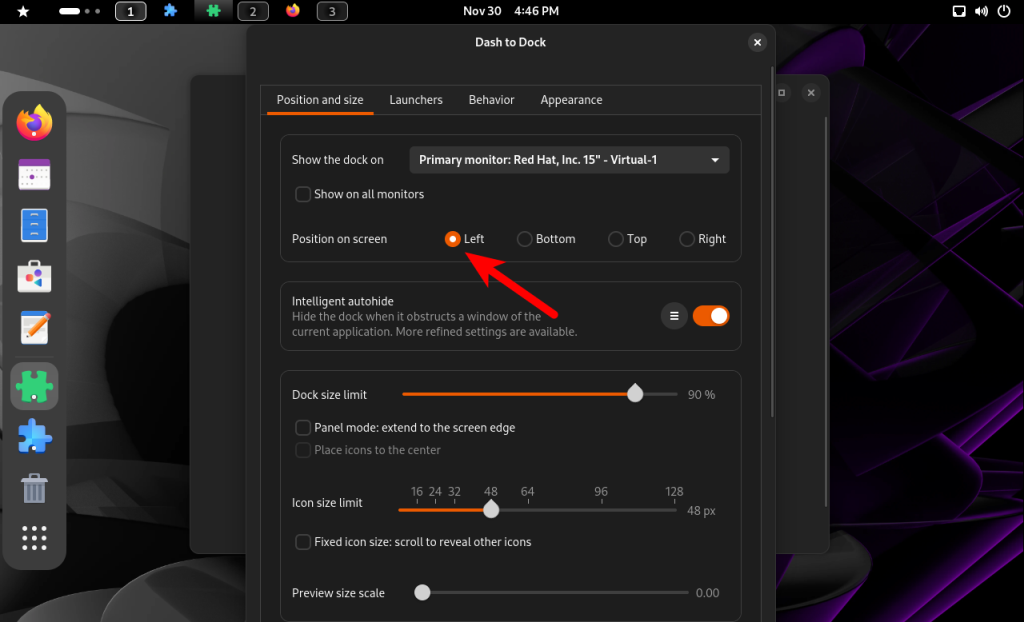
По умолчанию панель запуска приложений отображается только на экране обзора. Но с помощью расширения Dash to Dock вы можете сделать так чтобы она отображалась всегда:
И, например, переместить её влево:
17. Дополнительные раскладки клавиатуры
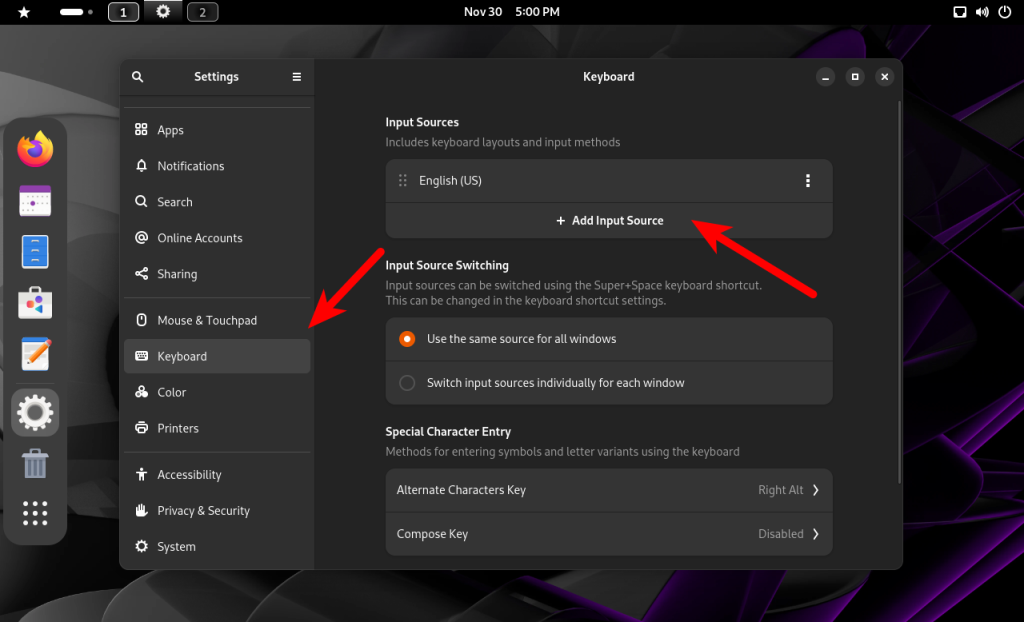
Если вам нужно набирать текст на нескольких языках, то вам понадобится несколько раскладок клавиатуры. Для того чтобы добавить новые раскладки откройте утилиту Settings и перейдите в раздел Keyboard. Здесь в разделе Input Sources можно нажать + Add Input Source и добавить ещё раскладки:
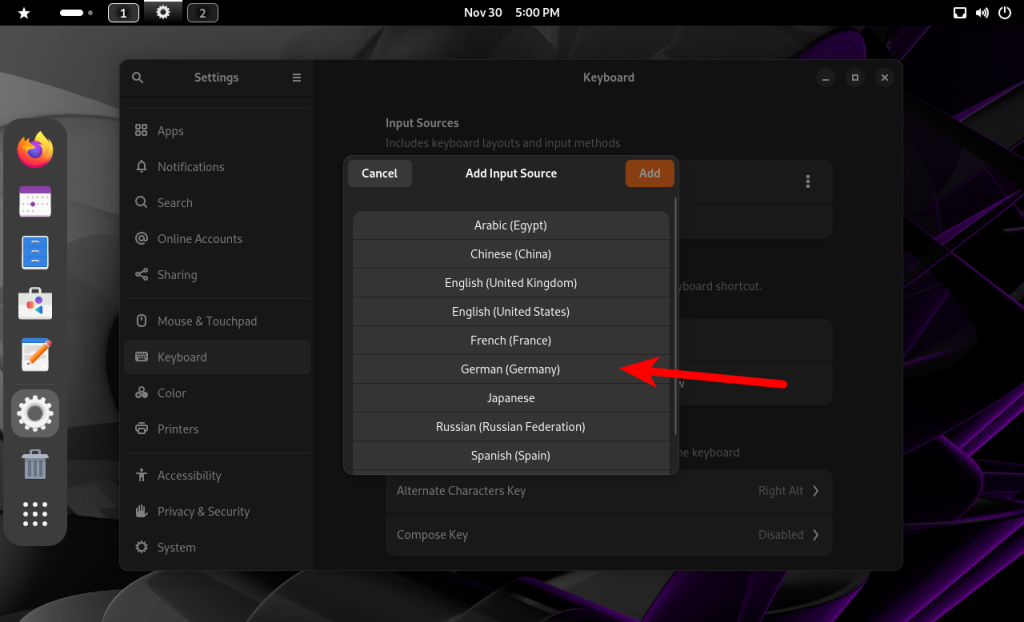
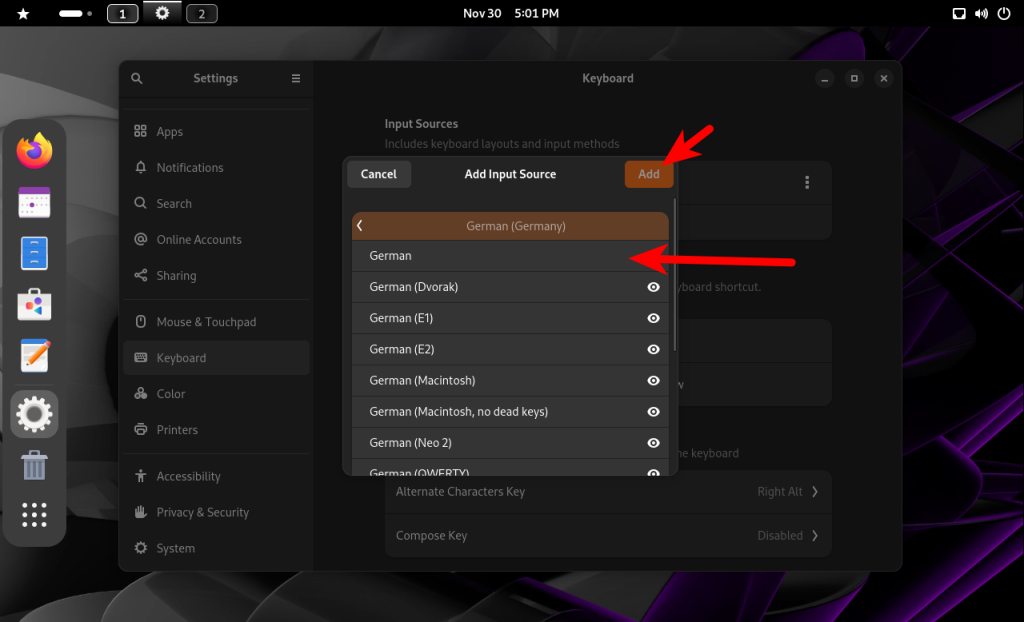
Например, немецкую. Здесь вам нужно выбрать группу раскладок:
А затем непосредственно раскладку и нажать кнопку Add:
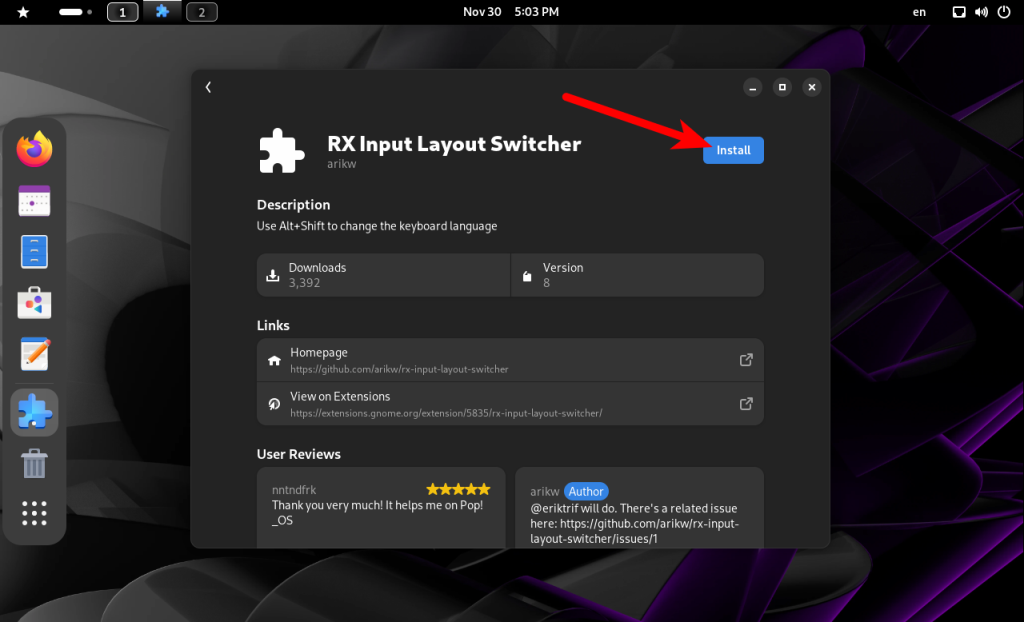
Также если вы хотите переключать раскладки с помощью клавиш Alt+Shift то вам понадобится расширение GNOME - RX Layout Switcher:
18. Установка мультимедиа кодеков
Для воспроизведения мультимедиа желательно установить дополнительные кодеки и плагины, которые не поставляются по умолчанию. Прежде чем это делать нужно установить репозиторий RPMFusion. Если вы этого ещё не сделали вернитесь к шагу 2.
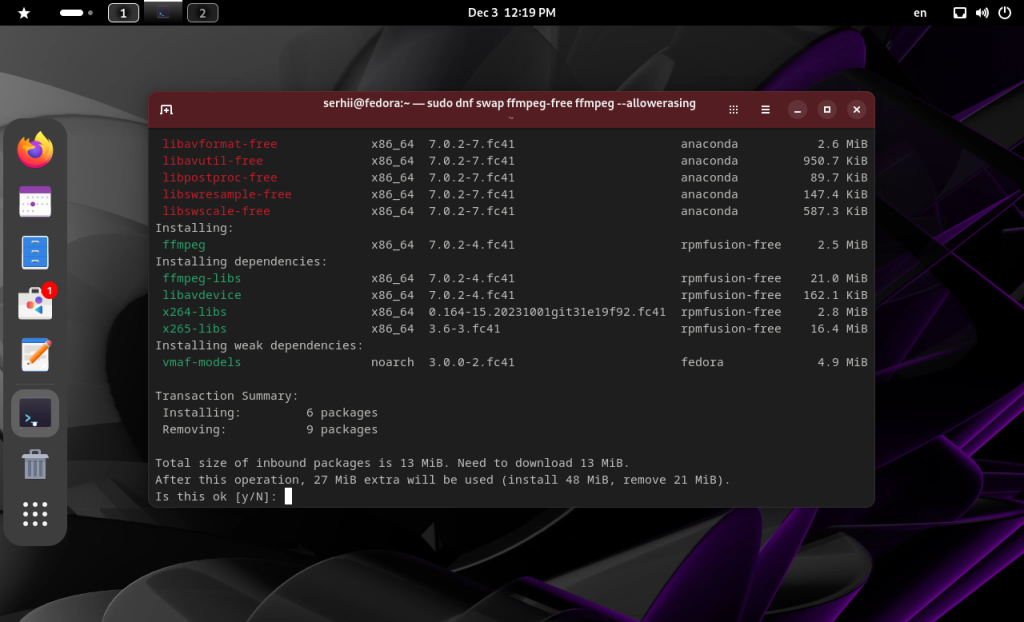
По умолчанию Fedora поставляется с пакетом ffmpeg-free, который содержит только свободные кодеки. Его нужно заменить на аналогичный пакет со всеми кодеками из RPMFusion. Для этого выполните:
sudo dnf swap ffmpeg-free ffmpeg --allowerasing
Затем желательно обновить пакеты, которые зависят от ffmpeg:
sudo dnf update @multimedia --setopt="install_weak_deps=False" --exclude=PackageKit-gstreamer-plugin
Для поддержки аппаратного ускорения при просмотре видео нужно для AMD нужно выполнить:
sudo dnf install ffmpeg ffmpeg-libs libva libva-utils
sudo dnf swap mesa-va-drivers mesa-va-drivers-freeworld
sudo dnf swap mesa-vdpau-drivers mesa-vdpau-drivers-freeworld
19. Установка нужных приложений
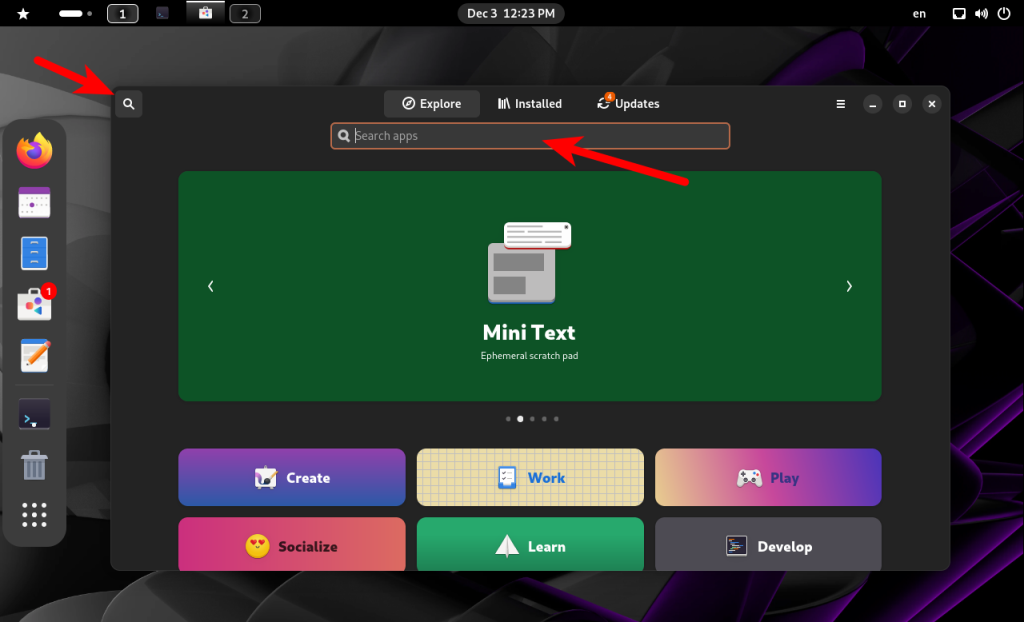
Практически все необходимые приложения в Fedora можно установить из GNOME Software. Часть установится из официальных репозиториев, часть из RPMFusion, а те, которых нет ни там ни там из Flathub.
Вот список приложений которые можно поставить:
- VLC - один из лучших медиа плееров
- Gimp - редактор изображений
- Obsidian - программа для заметок в Markdown
- Parabolic - приложение для загрузки видео из интернета
- Mission Center - аналог диспетчера задач
- Flatseal - управление правами и настройками для приложений Flatpak
- Transmission - торрент клиент
- KeePassXC - менеджер паролей
Также можно установить несколько полезных консольных утилит:
- ncdu - позволяет найти самые большие файлы и освободить место
- rg - поиск по содержимому файлов, вместо grep
- htop - диспетчер задач в терминале
- tmux - терминальный мультиплексор
- unrar - утилита для распаковки rar
- p7zip - утилита для распаковки p7zip
sudo dnf install ncdu rg htop tmux
20. Запуск терминала по Ctrl+Alt+T
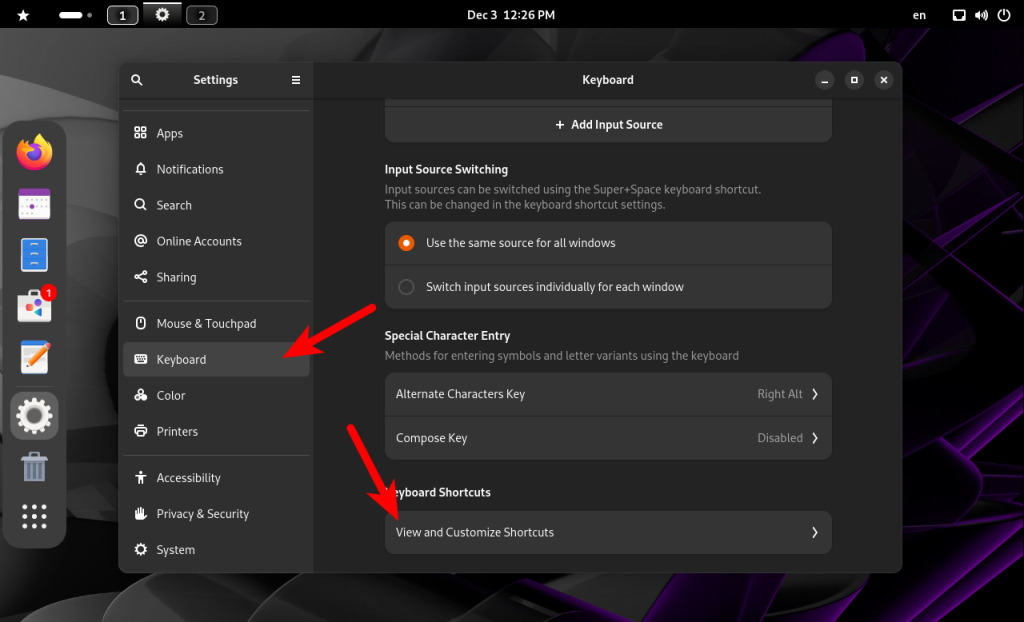
Если вы хотите запускать определённое приложение по сочетанию клавиш, например, запускать терминал по Ctrl+Alt+T как это делалось в Ubuntu, то это довольно просто сделать. Откройте Settings, затем Keyboard, затем View and Customize Shortcuts:
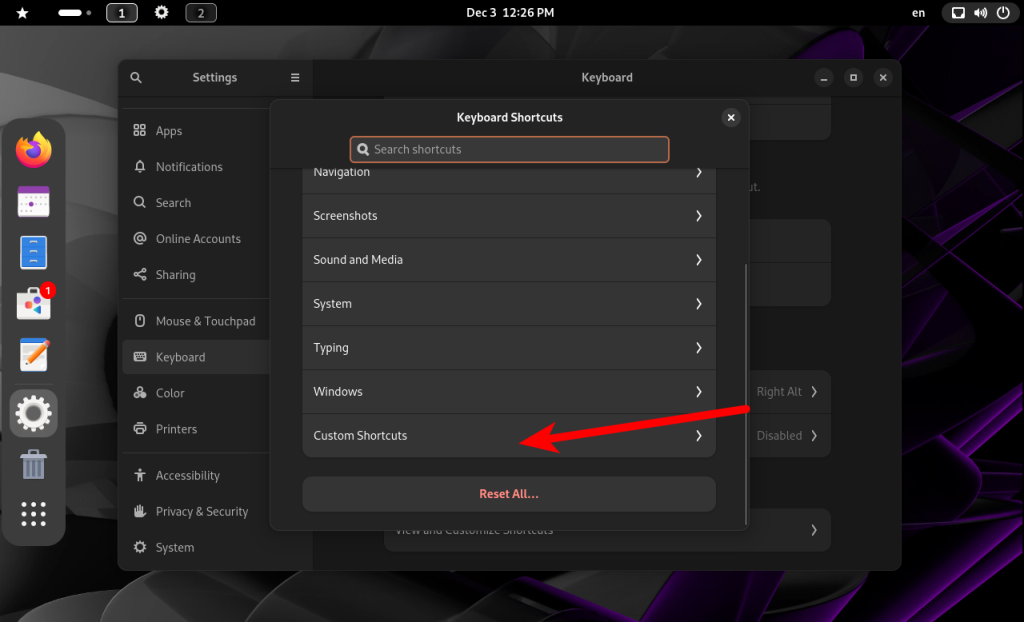
В открывшемся списке надо выбрать Custom Shortcuts в самом низу и в диалогом окне нажать Add Shortcut:
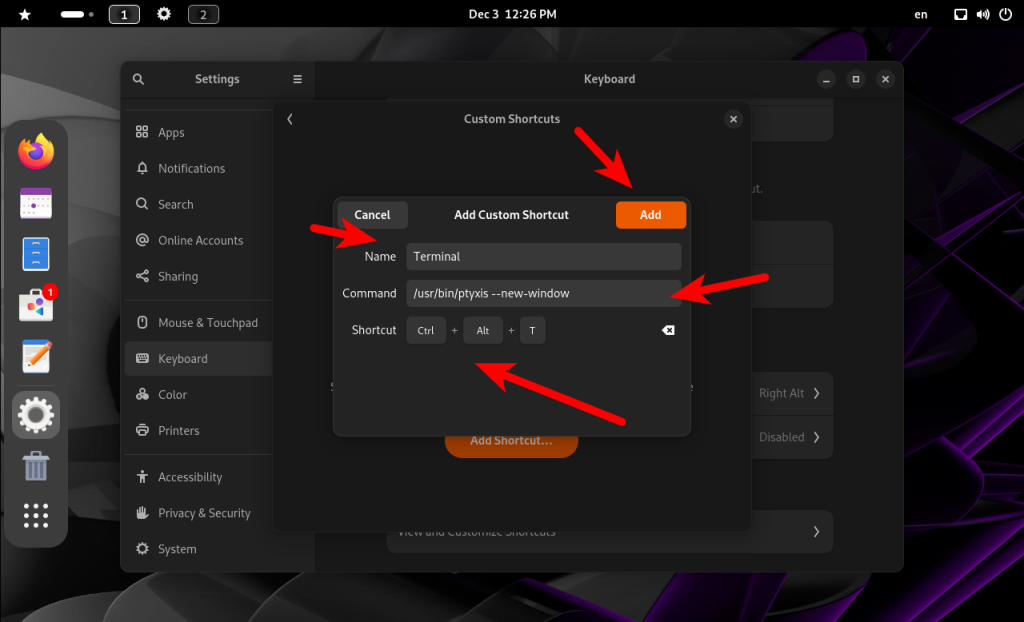
Далее остается указать имя сочетания клавиш, команду и выбрать само сочетание. В случае с Pytxis к команде /usr/bin/ptyxis нужно добавить опцию --new-window, для того чтобы при каждом нажатии Ctrl+Alt+T открывалось новое окно:
Выводы
В этой статье мы рассмотрели как настроить Fedora 41 после установки. Как видите хоть и дистрибутив по умолчанию готов к использованию, но всё ещё есть что настраивать. А какие настройки делаете вы? Пишите в комментариях!

Супер! Как всегда, интересно и доходчиво! Я недавно перешёл на Fedora, но натолкнулся на проблему, которую пока не решил до конца: там по-другому реализован сервер RDP, в отличие от Ubuntu (22,24) - экран не тормозит на клиентской машине, кнопки управления окнами есть, прилипание к краям работает, но(!!) с части windows- и linux- клиентских машин подключиться просто не удаётся ((. Можете описать процесс настройки RDP на Fedora 41?
Use Remmina
Рады что вы вернулись!
Спасибо. В закладки.
Здравствуйте, можно вернуть прозрачность консоли https://gist.github.com/andypiper/f75c25d91548af03fe586a19f35c9742
Спасибо что продолжаете работу.
Полный вперёд.
Для меня самое главное - это драйвера для дискретной видеокарты и port proton