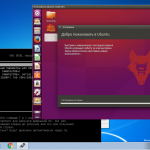
Допустим, вы прочли в интернете несколько статей и заинтересовались свободной операционной системой Linux. Возможно, даже поставили ее себе на виртуальную машину или загрузились в Live-режиме и попробовали, как все выглядит и работает. Вам понравилось, и теперь вы хотите установить ее себе на компьютер и начать пользоваться. Но при этом терять уже установленную Windows не желаете, чтобы в случае непредвиденной ситуации можно было вернуться в полностью рабочую систему, да и любимые игры и нужные программы всегда будут под рукой. Есть возможность установить Linux и Windows 10 или 11 на одном компьютере. В свое время для меня, как и для многих других пользователей, это было идеальным вариантом.
В этой инструкции мы рассмотрим, как установить Linux рядом с Windows 10 или 11. Все будет выполняться на примере Windows 11, но этот способ будет работать и для более ранних версий, таких как Windows 7 и 8.
Я предполагаю, что у вас уже есть установленная Windows, вы нашли и определились, от какого диска отделить немного места для Linux, только не знаете, как правильно это сделать. Здесь вы получите подробный ответ на этот вопрос. Поскольку большинство систем с Windows 10, а тем более Windows 11 поставляются с UEFI в статье будет рассмотрен именно этот вариант установки. Но если у вас классический BIOS то установка будет мало чем отличаться.
Содержание статьи
- Немного теории
- Подготовка диска в Windows
- Загрузка с USB в Windows
- Подготовка диска в Linux
- Установка Linux рядом с Windows 10
- Выводы
Немного теории
Для установки операционной системы Linux рядом с Windows 10 вам понадобится создать несколько дополнительных разделов диска. Как минимум один, а лучше два. Linux не принято устанавливать на один раздел как Windows, хотя такой вариант возможен. Linux настолько гибок, что позволяет разместить систему, файлы пользователя и настройки на разных разделах. Это очень выгодно во время переустановки. Вы переустанавливаете систему на системном разделе, а все ваши файлы в домашней папке и настройки рабочего окружения останутся на месте.
Вот эти разделы:
- Системный - для системных файлов;
- Домашний - для ваших личных файлов.
Минимальные требования объема под системный раздел в различных дистрибутивах варьируются от десяти до тридцати гигабайт. Но этого хватит для установки самой системы и нескольких дополнительных программ. Если же вы собираетесь использовать много программ и игр, особенно если они занимают много места, необходимо взять еще 30-60 гигабайт про запас. Я рекомендую использовать под системный раздел Linux так же, как и для диска C Windows, 50-100 гигабайт.
Раньше я рекомендовал делать ещё и раздел подкачки. Но в современных дистрибутивах обычно для этих целей используется файл вместо отдельного раздела. Если вы новичок, то можете оставить всё как есть.
Подготовка диска в Windows
1. Резервное копирование
Чтобы установить Linux рядом с уже использующейся Windows 10 или 11, нужно будет "отрезать" пространство от системного диска. Поэтому перед решительными действиями важно создать резервную копию системы или хотя бы важных файлов. Если все пройдет хорошо, ничего страшного не случится ни с файлами, ни с системой, но из-за какого-либо сбоя, например, отключения электричества, файловая система может быть повреждена. Вы и сами по невнимательности можете сделать что-то не так и удалить не то, что нужно.
Поэтому, если будете работать с системным диском, скопируйте важные файлы на внешний носитель, и, если есть возможность, создайте резервную копию операционной системы с помощью соответствующего пункта панели управления:
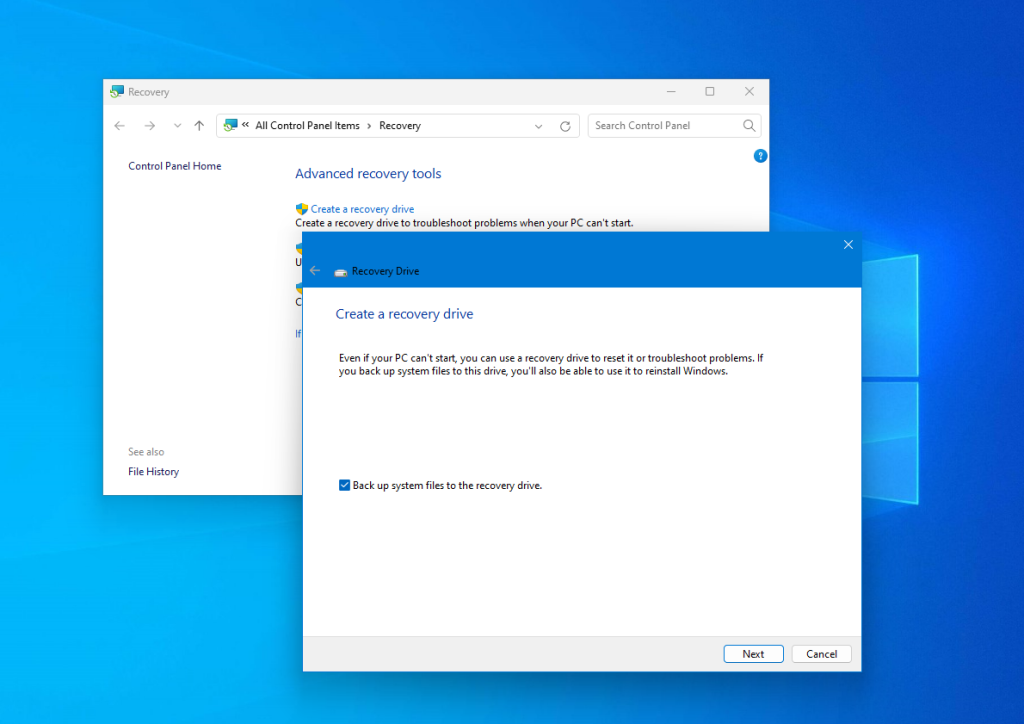
Вы также можете использовать сторонние инструменты для создания резервной копии системы. Например Acronis или Clonezilla. При работе с не системным разделом, например, D, E, F и т д, достаточно просто скопировать файлы оттуда.
2. Уменьшение раздела Windows
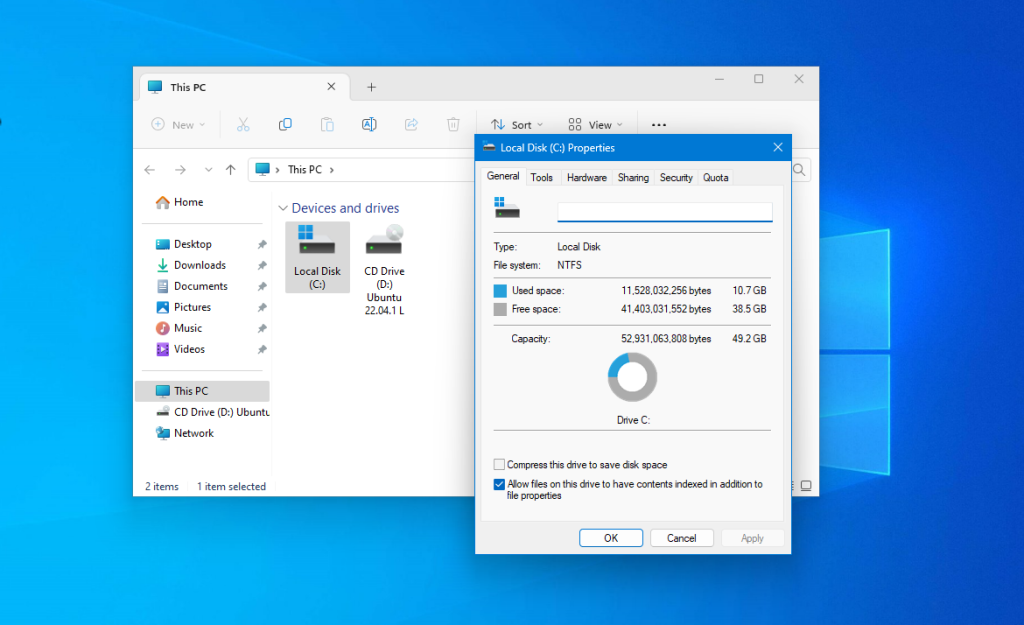
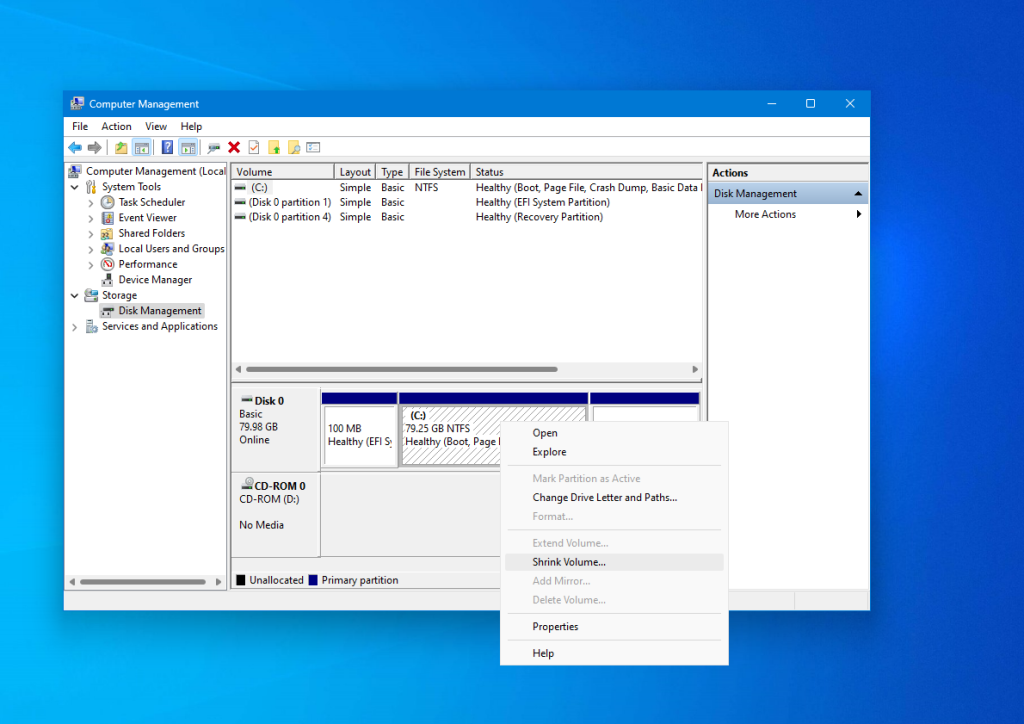
Теперь переходим непосредственно к подготовке диска для установки Windows и Linux. Проще всего это сделать с помощью стандартной утилиты управления дисками в Windows. Прежде всего, вы можете открыть мой компьютер и посмотреть характеристики своего диска C или другого диска, от которого вы хотите отделить пространство:
Кликните правой кнопкой по значку "This PC" на рабочем столе и откройте пункт "Manage":
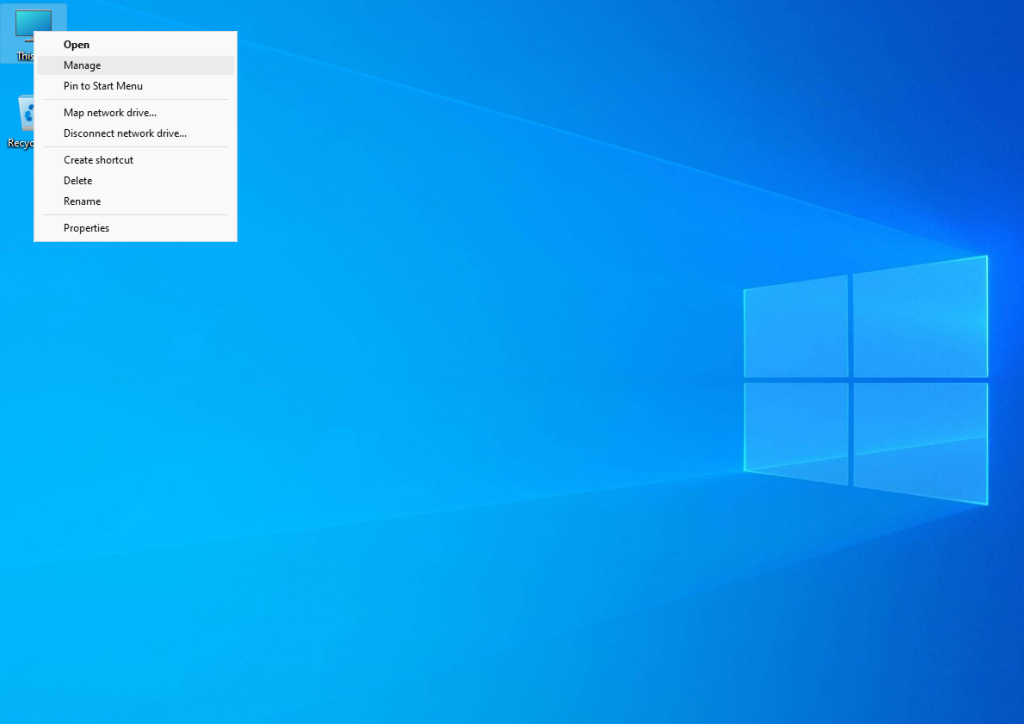
Дальше нам нужна утилита Disk Management:
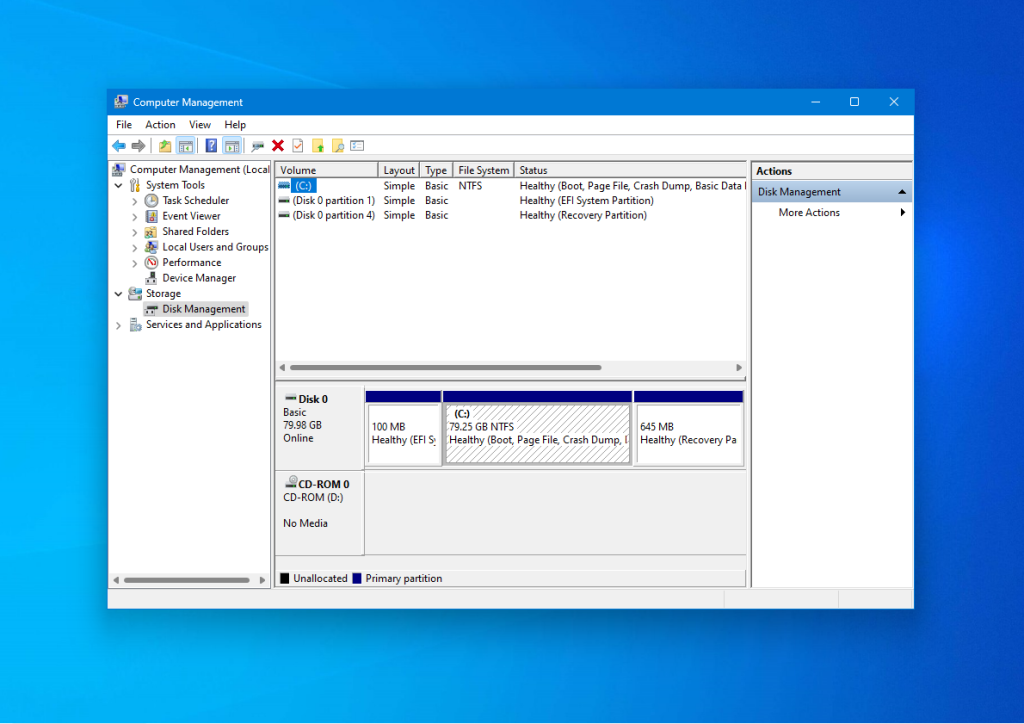
Здесь внизу окна мы видим список дисков и системный диск C на диске 0. Если у вас есть ещё дополнительный диск для файлов то он будет иметь метку D или E. Дальше я приведу пример как отделить дисковое пространство от диска C. Для других дисков всё аналогично.
Кликните по нужному диску правой кнопкой и выберите опцию Shrink Volume:
Откроется вот такое окно, в котором нужно ввести размер создаваемого тома в поле Enter the amount of space to shrink in MB и нажать кнопку Shrink:
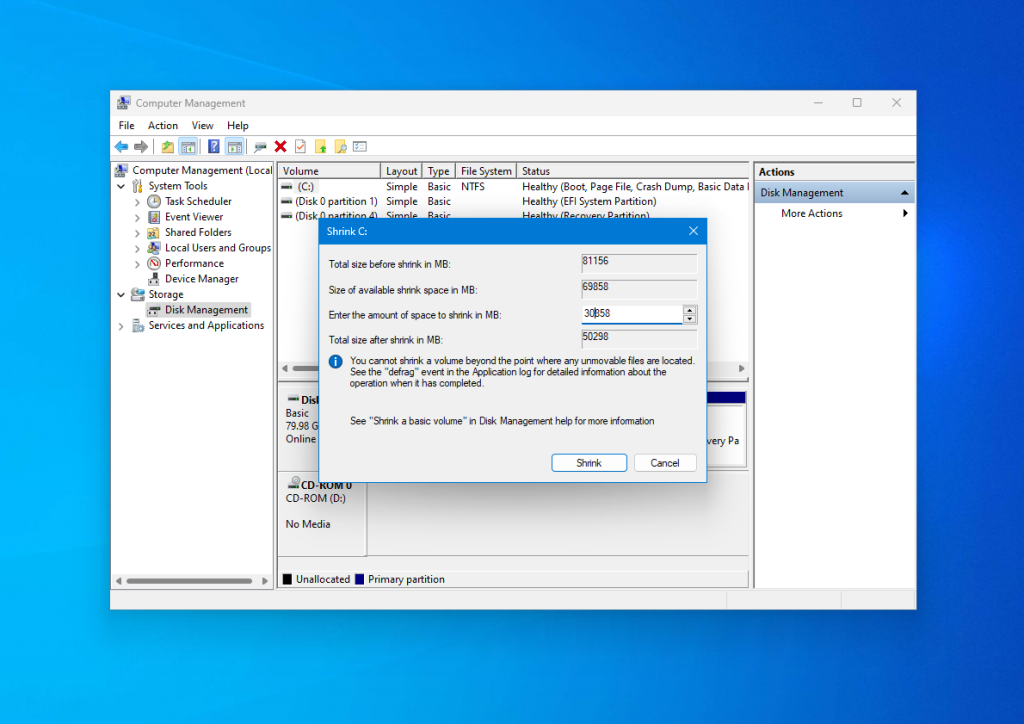
Обратите внимание, вы не можете указать размер больше, чем количество свободного места на диске. Поэтому сначала освободите место, если еще этого не сделали. После этого появится не размеченное пространство, из которого можно создать нужные разделы.
Вот и все. Теперь у вас есть место для установки Linux рядом с Windows 10. Выполнять дальнейшую разметку диска в утилите Windows не вижу смысла, поскольку все опасные операции, которые могли повредить систему, мы уже сделали, а разделы для Linux лучше всего и настраивать средствами Linux.
Загрузка с USB в Windows
Большинство компьютеров на которые установлена Windows 11 или Windows 10 используют уже современный интерфейс управления загрузкой UEFI. А это значит что при определённых настройках Windows у вас могут возникнуть трудности с входом в интерфейс BIOS и выбором нужного устройства для загрузки. Но можете перезагрузиться в BIOS прямо из Windows. Для этого откройте Settings, затем System, затем Recovery, найдите там Advanced Setup и нажмите Restart Now:

После перезагрузки выберите Troubleshoot -> Advanced Options -> EFI Firmware Settings:
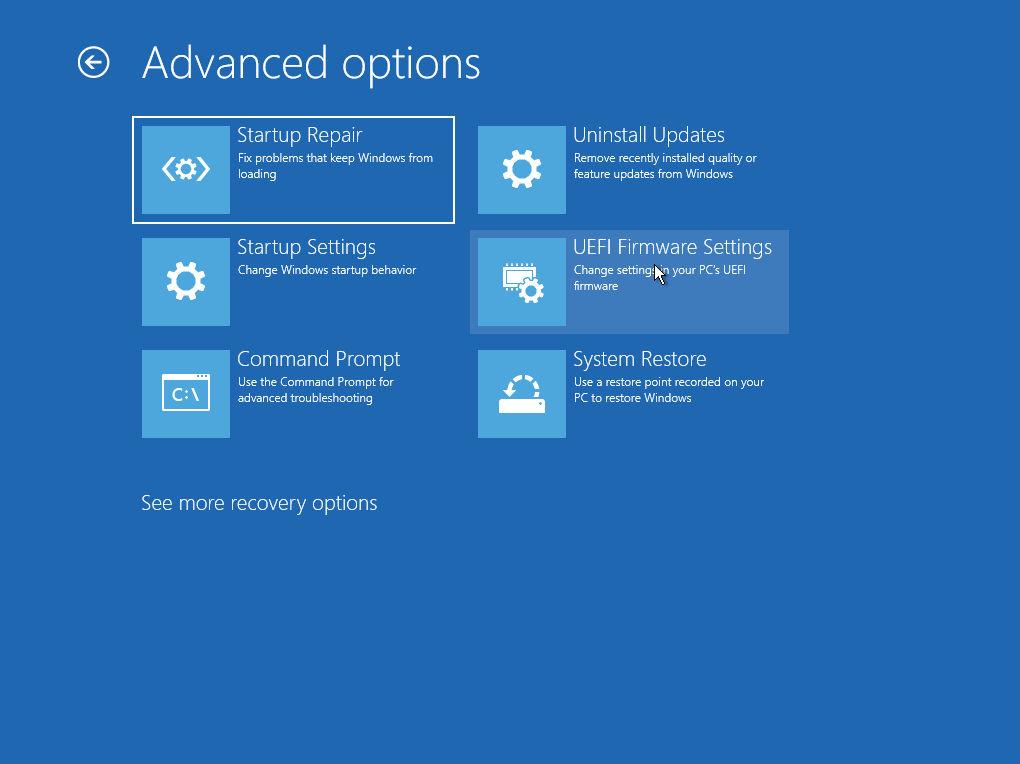
А уже тут вы можете выбрать с какого устройства нужно загрузить систему и загрузить образ с Linux.
Подготовка диска в Linux
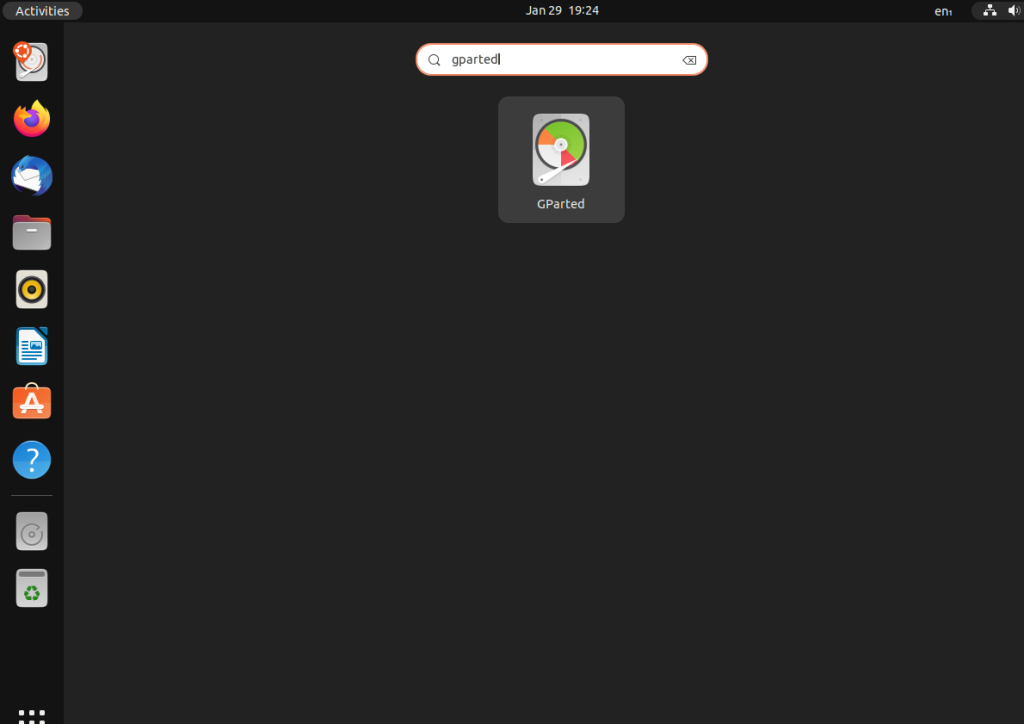
Это не следующий пункт установки Linux вместе с Windows. Это альтернативный вариант разметки диска без использования Windows. Если вы по каким-либо причинам не хотите использовать стандартную утилиту Windows для выделения нужного пространства, это также можно сделать с помощью любого LiveCD дистрибутива Linux с предустановленной программой для управления дисками Gparted. Например, того же Ubuntu.
Загрузитесь с диска Ubuntu, в главном меню системы наберите Gparted:
Откроется вот такое окно программы для управления дисками в Linux:
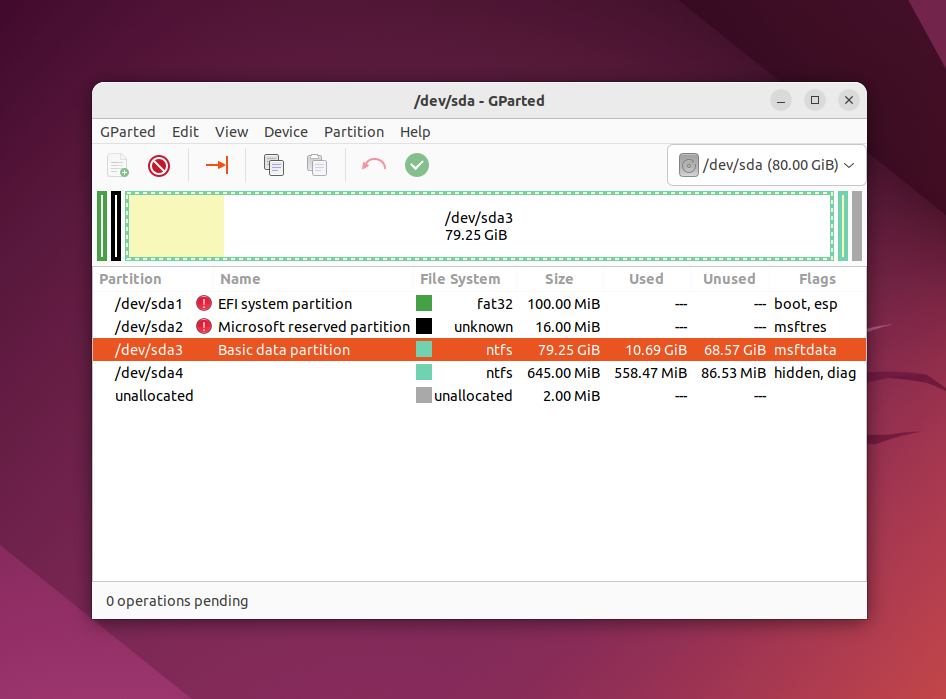
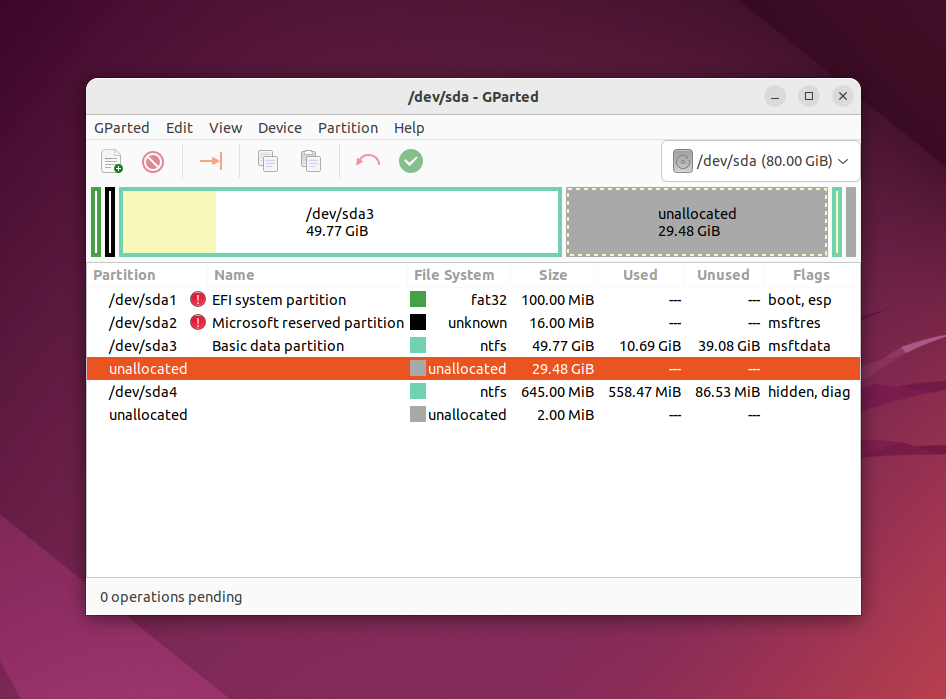
Здесь важно заметить, что разделы диска в Linux называются иначе чем в Windows. Здесь диски - это просто адреса файлов в виртуальной файловой системе dev. Позже вы поймете, что это такое, а сейчас важно только, что имя каждого раздела начинается с /dev/sd. Дальше идет буква, означающая физический диск (sda, sdb, sdc, sdd и так далее). За ней цифра, что обозначает номер раздела на диске, например: sda1, sda2.
В окне утилиты, кроме имени раздела диска, мы можем видеть файловую систему, размер и свободное место на диске. Теперь по размеру и файловой системе мы можем понять на каком диске у нас расположена система. В этом примере разделов довольно много, но удалять здесь ничего нельзя если вы не хотите сломать систему. Рассмотрим их подробнее:
- /dev/sda1 - раздел загрузчика с файлами EFI;
- /dev/sda2 - раздел зарезервированный Windows;
- /dev/sda3 - раздел с операционной системой Windows, диск C;
- /dev/sda4 - раздел восстановления Windows.
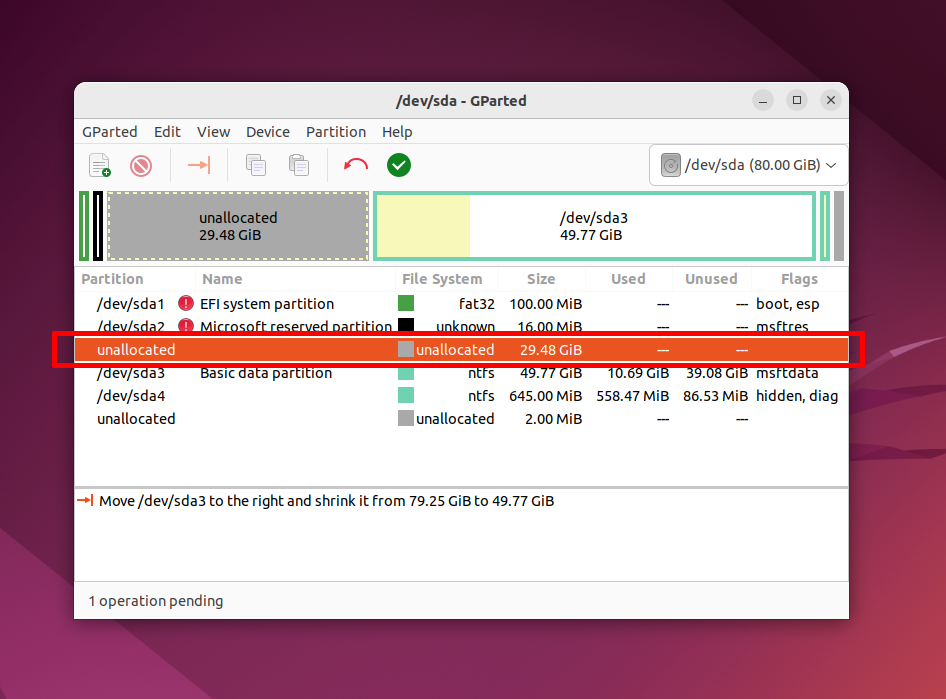
Здесь раздел /dev/sda3 имеет файловую систему NTFS и занимает 79 гигабайт, также как и системный раздел Windows, больше таких разделов нет, а значит именно он нам нужен.
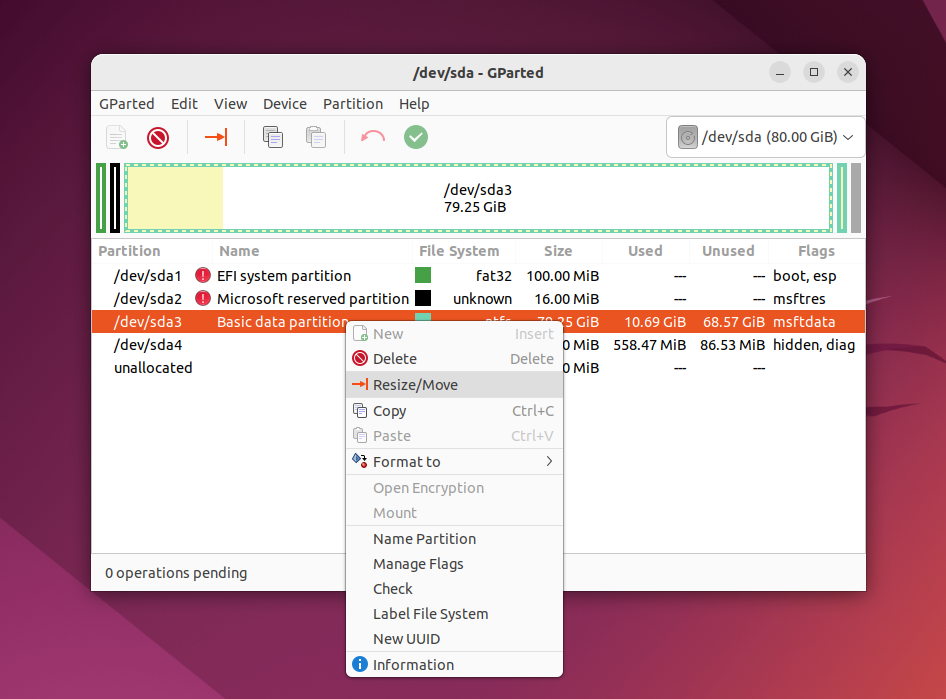
Мы будем делать то же, что и в предыдущем примере. Давайте уменьшим размер раздела /dev/sda3 (C) до 50 гигабайт чтобы на освободившимся пространстве выполнить установку Linux на Windows. Для этого кликните по разделу правой кнопкой и выберите пункт Resize/Move:
В открывшемся окне можно ввести нужный размер вручную в поле New size или воспользоваться ползунком:
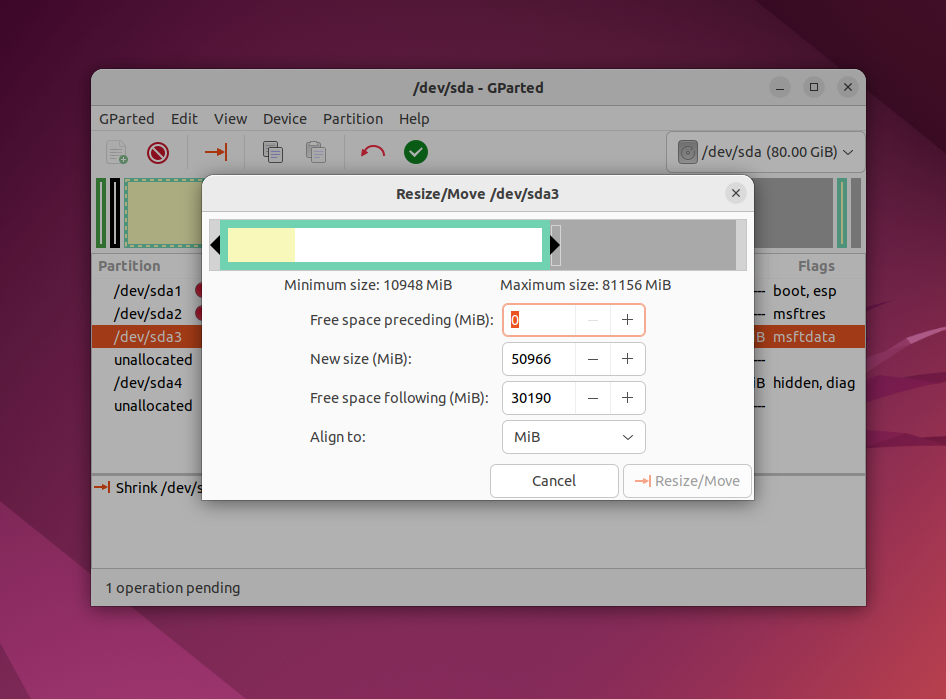
Затем нажмите кнопку Resize/Move. В результате вы увидите свободное пространство, но реальных изменений на диске еще нет.
Обратите внимание, что так как это системный раздел, нельзя трогать начало раздела. Вы можете спокойно уменьшать размер раздела, добавляя свободное пространство после него, но не пытайтесь это сделать до него, вот так:
Так делать не нужно, иначе будет поврежден загрузчик Windows, его очень легко восстановить, но решать эти проблемы в самом начале знакомства с Linux вам, думаю, незачем.
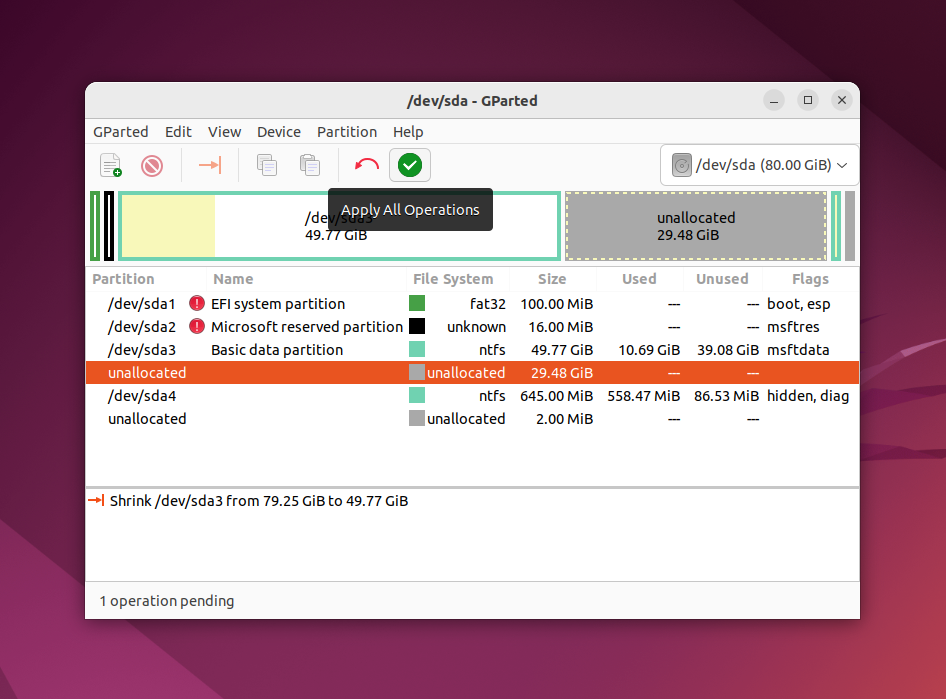
Для того чтобы записать все на диск, нажмите зеленую галочку, или в меню Edit выберите пункт Apply All Operations:
После этого программа попросит подтверждения действия. Обратите внимание на окно. Оно должно выглядеть примерно вот так:
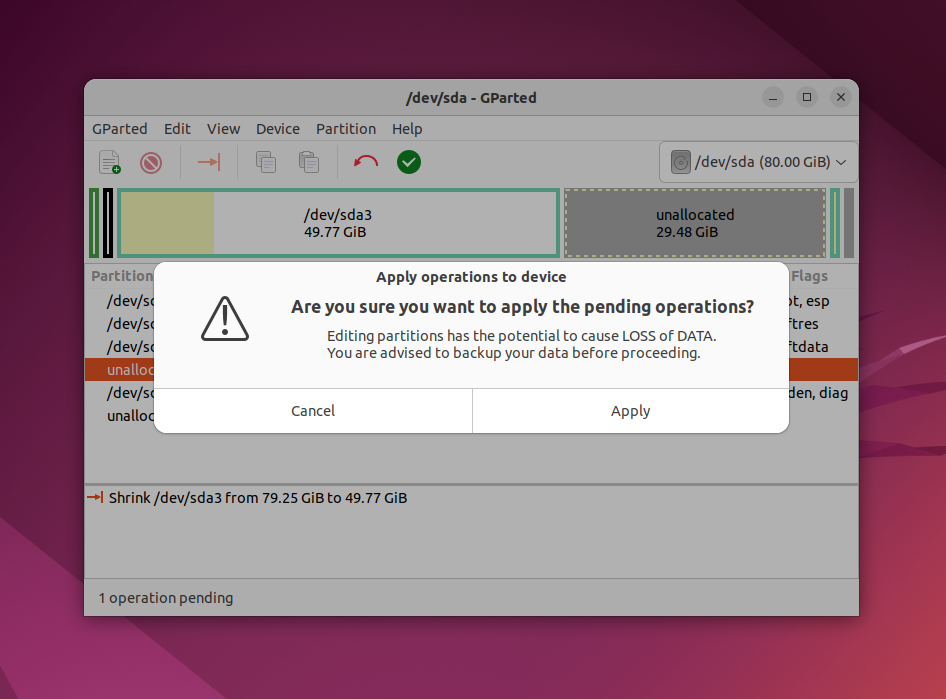
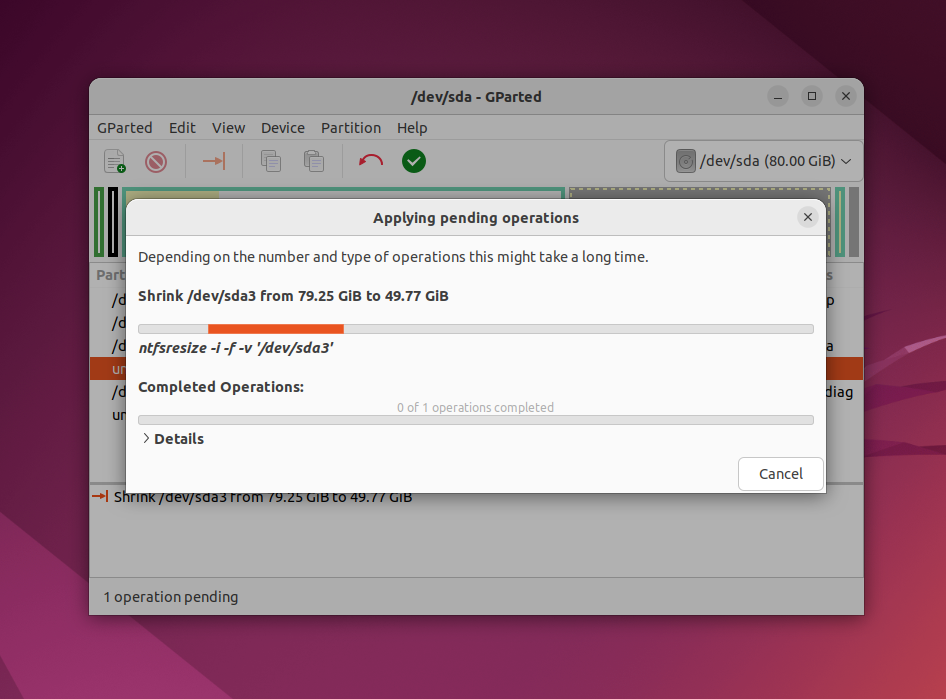
Если же программа предупреждает что вы пытаетесь переместить начальный сектор раздела, то вы сделали что-то не так и следует отменить изменения и начать заново. Процесс изменения размера файловой системы может занять немного времени:
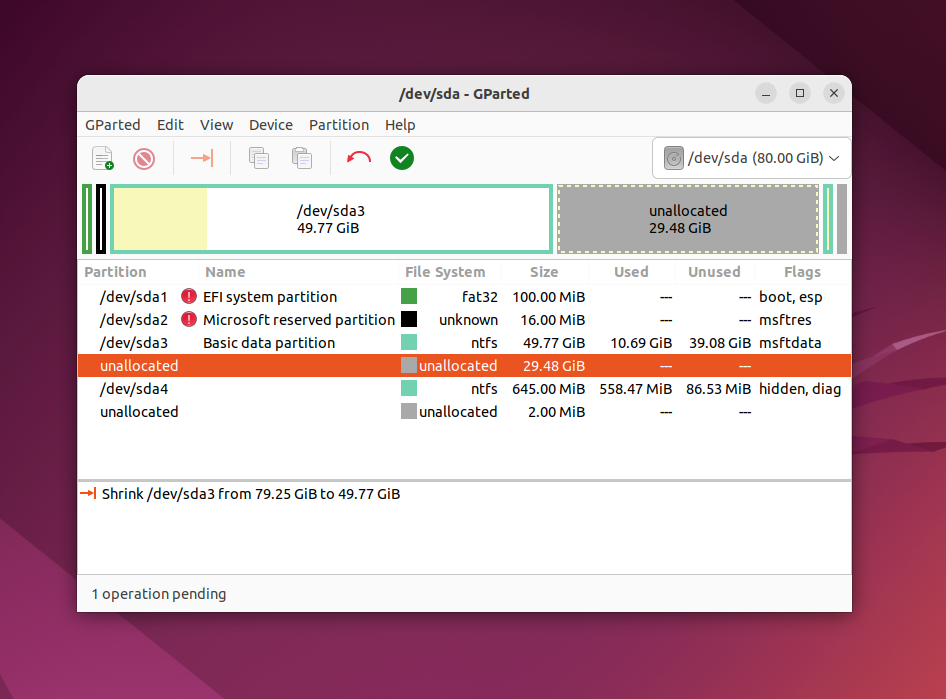
Теперь вы можете видеть, что раздел /dev/sda3 уменьшился, и появилось свободное место:
Создавать разделы для Linux здесь мы тоже не будем, лучше все это сделать во время установки, специально предназначенной для этого утилитой.
Установка Linux рядом с Windows 10
Я не буду здесь подробно рассматривать, как установить Linux, все это уже подробно рассмотрено в моих статьях отдельно для разных дистрибутивов. Рассмотрим только несколько аспектов разметки диска. Вы можете использовать любой дистрибутив, все действия плюс минус аналогичны. Но в качестве примера в этой статье будет использоваться Ubuntu. так как это самая популярная ОС для новичков.
1. Выбор способа разметки
На этапе выбора способа разметки вы можете выбрать Install Ubuntu alongside Windows Boot Manager. По умолчанию выбран именно этот пункт:
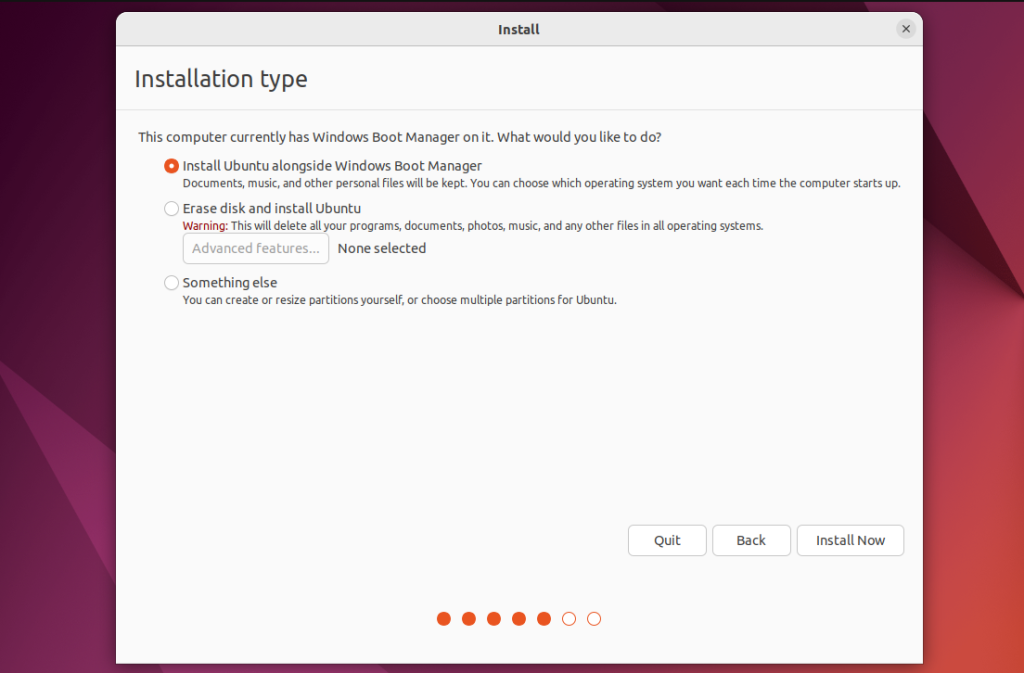
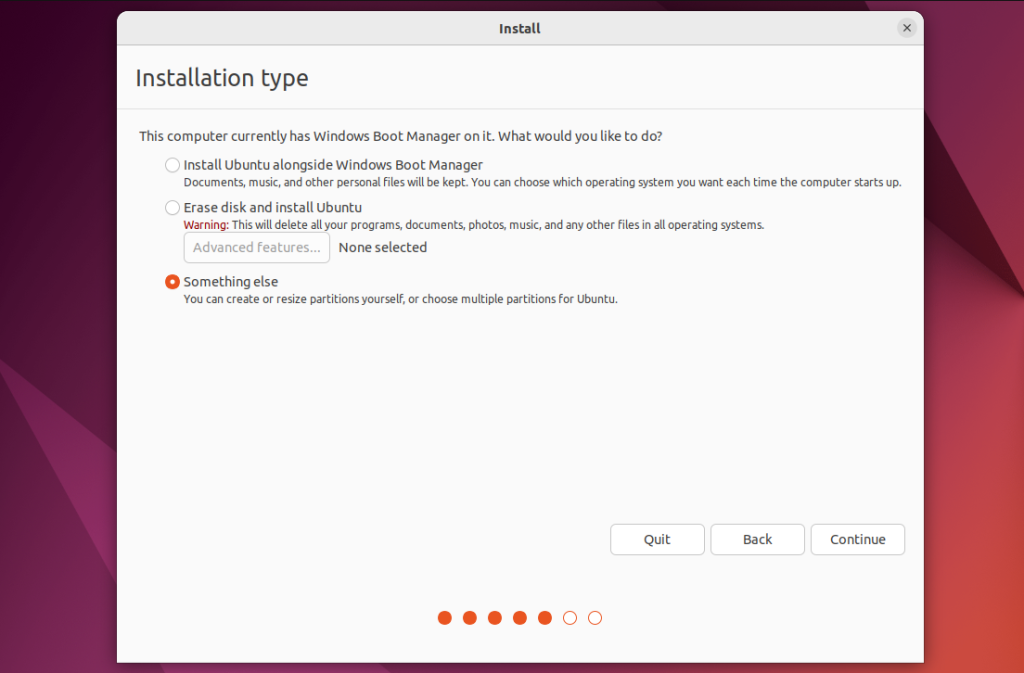
Но я рекомендую выбрать ручной вариант, поскольку так у вас будет больше контроля над процессом установки:
2. Создание разделов
После выбора ручного способа разметки перед вами откроется такое окно редактора разделов:
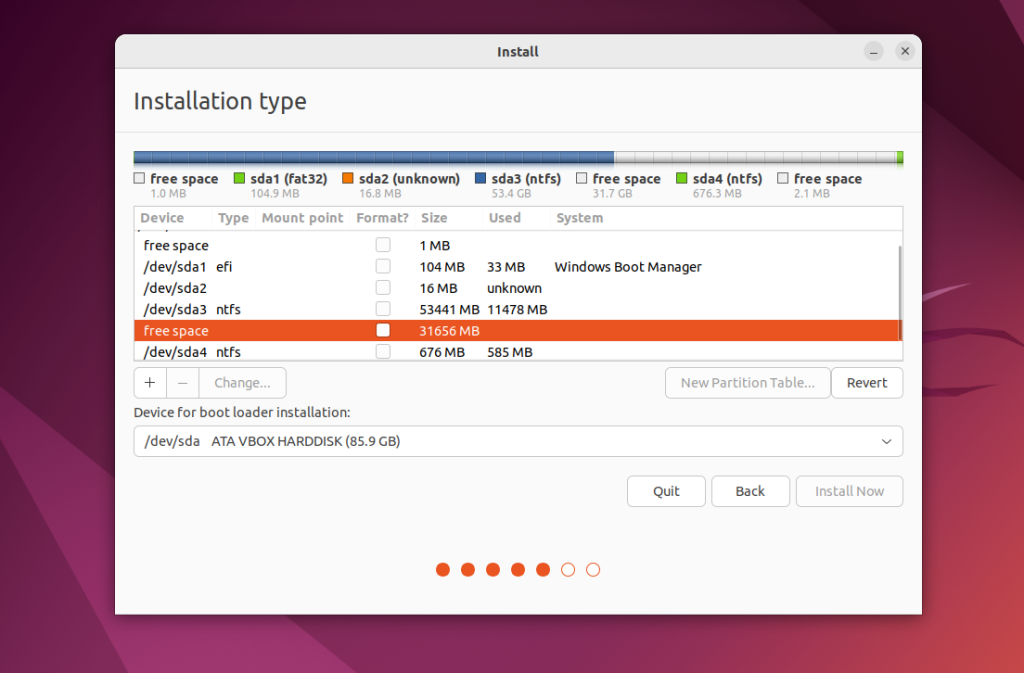
Выберите здесь Free space и нажмите на кнопку со значком плюса для того чтобы создать новый раздел. В открывшемся окне нужно только выбрать размер раздела и точку монтирования. Для корневого раздела укажите не меньше 25 гигабайт места, а лучше 50-100 гигабайт, как я писал выше. Затем укажите точку монтирования /:
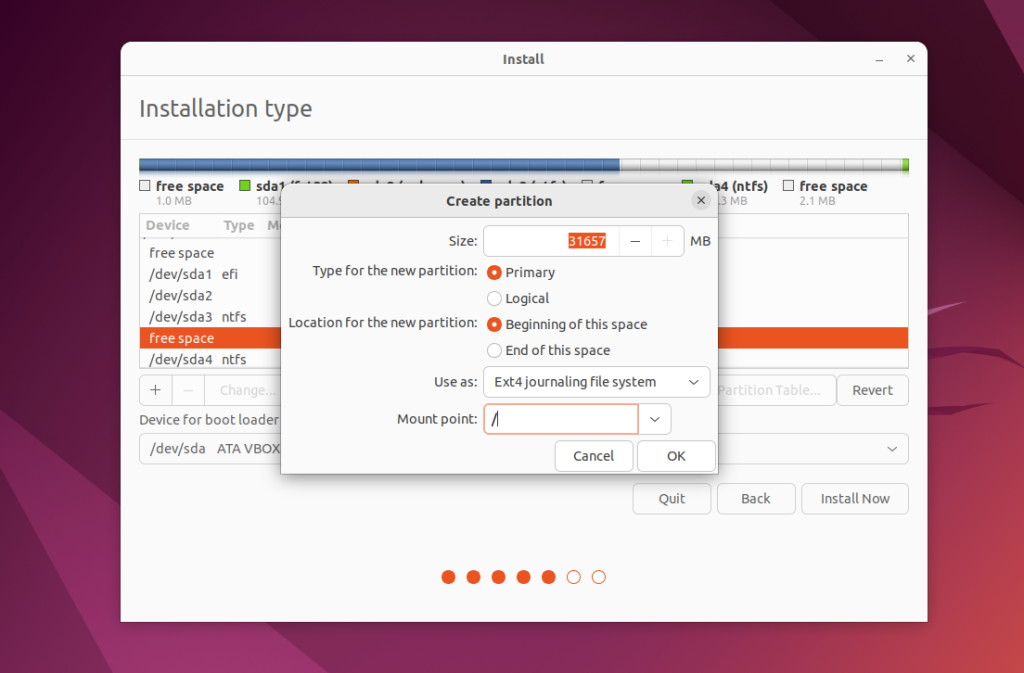
Затем созданный раздел появится в списке:
Домашний раздел создается аналогично, если вы оставили для него место. Только в качестве точки монтирования укажите /home.
3. Установка загрузчика
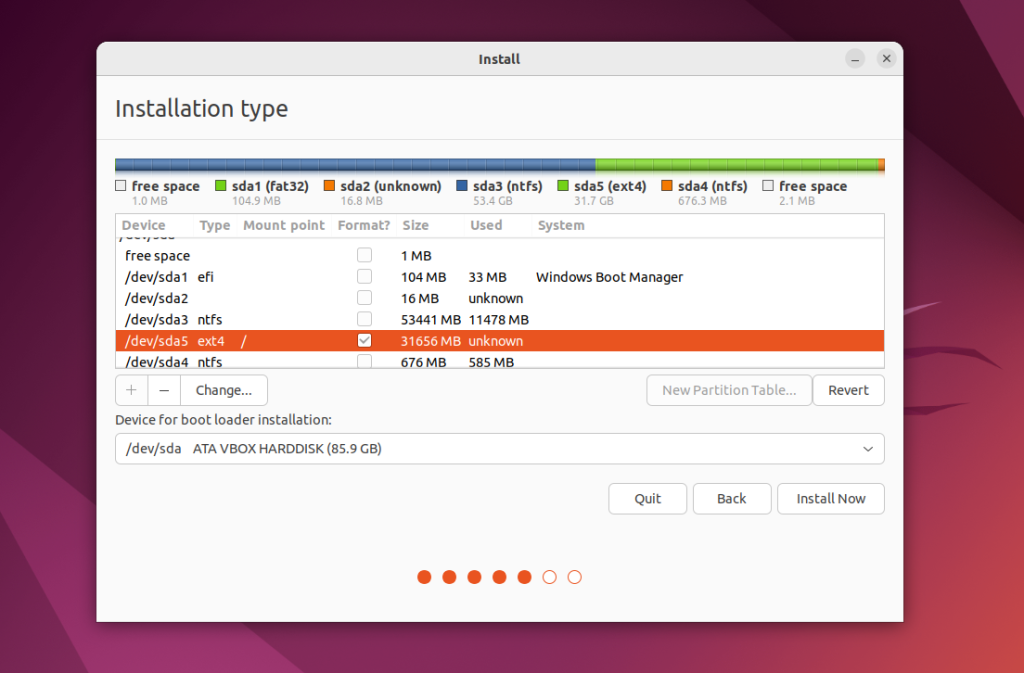
В системах с UEFI важно чтобы в качестве раздела для установки загрузчика был выбран именно EFI раздел или хотя бы диск на котором расположен EFI раздел. В данном примере это /dev/sda1. Выбрать раздел можно внизу окна с помощью пункта Device for bootloader installation:
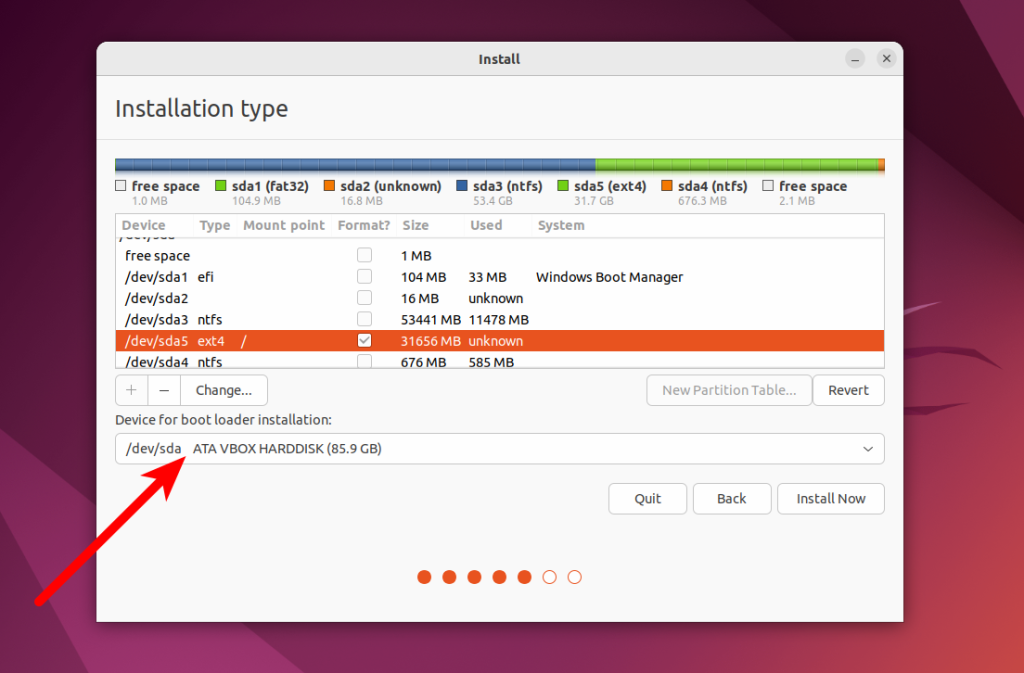
Указывать точку монтирования для этого раздела не обязательно. Обычно Systemd его монтирует автоматически. Если всё сделано верно, то после установки по умолчанию будет загружаться именно загрузчик Grub и в нём уже можно будет выбрать какую систему загружать Linux или Windows.
Что касается не UEFI систем, то можно оставить всё по умолчанию. Там есть несколько способов установки загрузчика в зависимости от используемой таблицы разделов и это всё будет описано в отдельной статье.
Дальше действуйте как обычно - по инструкции для определенного дистрибутива, и установка Linux второй системой рядом с Windows 10 или 11 будет выполнена успешно.
3. Завершение установки
Многих новых пользователей интересует: "Как же загрузить потом мою Windows?" Не беспокойтесь, загрузчик Grub автоматически найдет загрузчик Windows и перед запуском компьютера предложит вам меню, где вы сможете выбрать операционную систему:
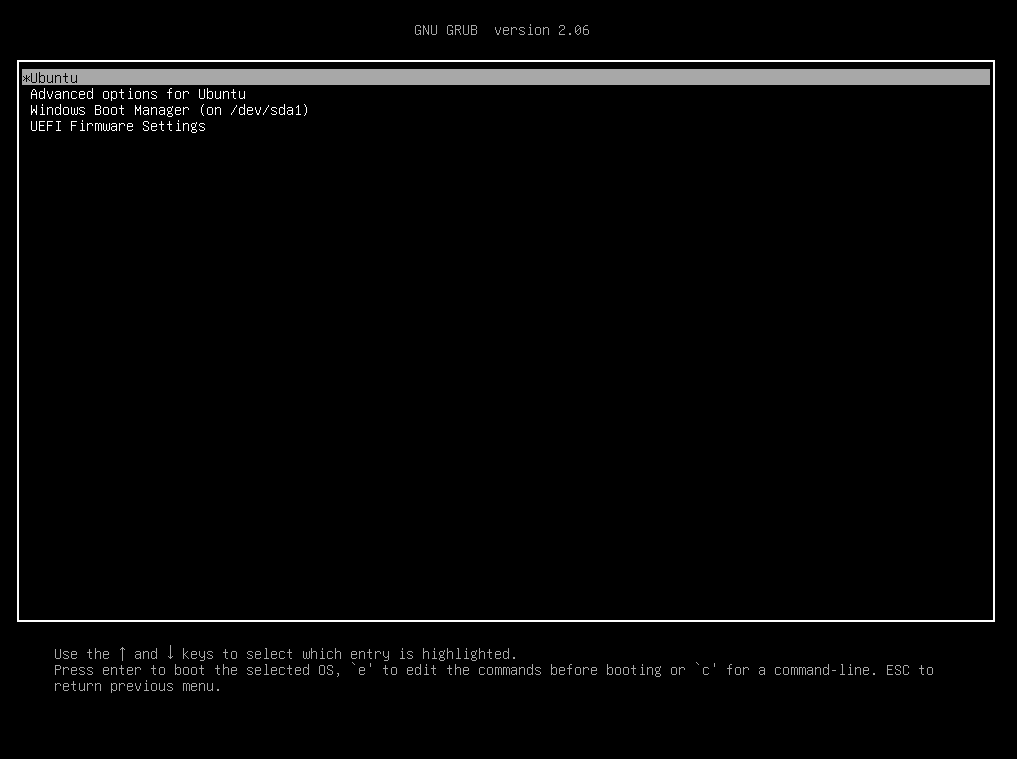
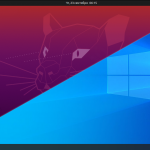
Таким образом, двойная загрузка Windows 10 и Linux будет настроена автоматически.
Если что-то пойдет не по плану, хотя такое вряд ли случиться, вы можете восстановить загрузчик Windows или переустановить Grub с помощью LiveCD. Так что, если все сделано правильно, вы обязательно получите доступ к своей Windows после установки Linux.
Выводы
Сегодня мы рассмотрели, как установить Linux на Windows 10 или 11. Разобрались, как выполнить разметку, как выбрать разделы. Об установке какого-либо определенного дистрибутива Linux вместе с Windows, говорить бессмысленно, так как существует огромное количество дистрибутивов и для всех них основные действия будут похожими. Еще хотелось бы заметить: для комфортной работы Windows с Linux на одном компьютере нужно настроить способ сохранения времени и отключить Windows FastBoot, иначе вы не сможете подключить системный раздел Windows в Linux. Если остались вопросы, спрашивайте в комментариях!
Спасибо! Очень понятно расписали.
Все это вчерашний день.Автор описал все по старинке.Теперь не надо заморачиваться с разделами.При установке выбираете установить рядом с виндовс.Ползунком делаете сколько вам надо под линукс и все жмете установить.Все сделается автоматом.Нвдо только имя и пароль придумать.
дак и комментарий 2016 года)
Хорошая статья. Очень ценно, что заранее показали возможные ошибки. Кстати, первичное выделение свободного дискового пространства лучше делать по первому способу, а потом уже разбивать на нужные разделы в Gparted - просто потому, что Виндовс сразу "в курсе" своих действий с собственным диском, а если сразу уменьшить размер при помощи Gparted то потом винда может заартачиться (не всерьёз, но Chkdsk на всякий пожарный запустит)
Здрасьте, все сделал, но когда GNU GRUB появляется, то нету windows 10, есть только FreeDos. Но при загрузке его, выдаётся ошибка. Помогите срочно!!!!
update-grub пробовал(в терминале)? У меня была такая ситуация, что после установки Linux Grub не видел Windows. После update-grub Windows появился. А еще можно записать Linux на флешу и удалить папку EFI. И заново установить второй системой.
Хорошо написано!И понятно.
Ну, а про восстановление загрузчика GRUB, если затерли виндовым, надо было б тоже упомянуть.
Да, но статья получилась и так слишком большой, поэтому об загрузчиках уже в другой раз.
Раздел swap - Поэтому для данного раздела подойдет объем в два раза меньше, чем размер вашей ОЗУ. Не меньше а БОЛЬШЕ
Говорилось про отсутствие гибернации. Если её нет, то свопа потребляется меньше.
ps. Интересно, я один при первой установке системы дал свопу 110 гб, а корню 2 гб? Потом я удивлялся, а почему диск жмет?
Спасибо за статью. Даже не знал, что в десятке уже никаких проблем с установкой. Все же для спокойствия останусь на семерке.
Очень хочется знать, как происходит обновление. У меня его даже нет, отключил обновы, ставлю отдельно только патчи связанные с безопасностью.
В обновлении заботит вопрос с таблицей разделов: у меня давно семерка и сейчас MBR, при переходе на десятку насколько я знаю файлы не удаляются получается она на MBR ставится? Потому что где не читал вроде только GPT. В общем это так филосовствования, все равно обновлять не буду
Да, десятку можно ставить и на GPT, и на MBR без проблем. А за информацию спасибо, буду проверять.
Вопрос можно?
Начну с того, что у меня 2 диска (один ссд, второй обычный) и на ссд мало места, там стоит винда и свободно 6-10Гб, отсюда я устанавливаю на второй. После разбивки места нажимаю установить и мне предлагает создать загрузчик на ссд. Вопрос: а так можно? (Вин 10, обновленная с 7ки, незнаю тип таблицы, мать М5А97 с UEFI, но на ссд, кроме вин раздела есть только один, который слабо попадает под описанный вами EFI ибо имеет размер 400 Мб и ФС ntfs)
Спасибо за внимание, помогите неразумному.
Вообще, без разницы на каком диске установлен загрузчик. Но логично было бы его делать на том же диске что и Linux. Попробуйте во время разметки выбрать нужный диск для установки загрузчика. Скорее всего у вас MBR, потому что в Windows 7 по умолчанию GPT не используется. Посмотреть какая таблица разделов можно выполнив в Linux команду sudo fdisk /dev/sda, и в интерактивном режиме указав команду p. Программа выдаст либо gpt ибо dos. Вместо /dev/sda ваш диск.
У меня флешка /dev/sda1 помогите!!!!!
Жми не сотрет Винду добавление загрузчика GNU grub
Он выберет свободное пространство
Бред полный, Linux не ставится рядом с Виндой. Если Вам этого уж больно захотелось то только на отдельный Винчестер (жёсткий диск).
Неправда, не нужно новичков пугать. Устанавливается и отлично работает, проверено на личном опыте и не только мной.
Админ подскажи, вот такая проблема: ноут с uefi, стоит 10-ка, два раздела ntfs и 150Gb не размеченной области. в биос ставлю загрузку с флешки на которой ubuntu-15.10-desktop-amd64. флэшка с приставкой uefi. при загрузке сразу что-то вроде этого
GNU GRUB version2.02.beta.2-29
Minimal BASH-like line editing is supported. For the first word, TAB lists possible command completions anywhere else TAB lists possible device or file completios.
grub>
possible commands are: (и пошли возможные команды) что здесь нужно делать?
Похоже флешка записана неправильно, потому что такая ошибка означает, что Grub не может найти файлы загрузчика.
сделал загрузочную флешку не через unetbootini, а через rufus, как было написано в одной из статей на этом сайте, все нормально начало загружаться. Стала ubuntu, но мне не понравилось что она при первом же запуске сказала что запущенна в режиме, я так понял что-то типа safemode, и что-то не будет сохраняться что-то + не нашлось драйверов wireless для моего ноута. снес ubuntu поставил linuxmint до следующего желания поэкспериментировать.
после первого запуска виндовс 10, она затирает загрузчик линукс
UEFI?
Если Форточку ставить поверх Линя - затирает загрузчик в MBR. Что тоже можно восстановить. С бубном и многобормотанием...
Если Линь ставить поверх Форточки (как здесь адм объяснил) - всё встанет ровно и юзабельно.
Загрузчик UEFI более жизнеспособный.
мне тоже неполучилось, загружается только виндовс, хоть делала кратко по статье . кажется что загружчик вобще не определяется
внутри в efi http://bildites.lv/a/2tqvkdvg#9acy6d3d
У меня с Виндовс 10(версия 1903), хотел для разнообразия установить Линукс
рядом с десяткой.Но прочитав статью(хорошо написанную и понятную) при-
шел к выводу: а зачем попу гармонь!.За 10 лет использования Винд.10 я не
сделал столько операций как это надо при установке Линукса.
Ну и слабак)
Ага. Еще скажи, что нельзя установить Windows 7 и Windows 10 на один жесткий. Я сам еще ставил Ubuntu 8.04, первый раз, рядом с Windows XP.
вы не правы.............все ставится.........не путайте людей..........вы сначала практикуйте много////// а потом пишите............две ос работают стабильно...........это я вам из практики говорю......
Пабло, ты опять кокса нанюхался?
Та не, нормально. Я сузу на десятку саморезами прикрутил. И брат Пабло, прекращай курить некачественный табак. )
Поспорить захотел парень
Ставится - проверенно!
Я сначала не хотел ставить лин на С. ССД попилен С, Д, Е. Но Минт на Д - не создавал загрузчик. Зорин - создал. Расширил С до 80 гб, сжал до 40 и на пустое место ставится любой линукс. Больше. При разметке делаю только один раздел (/), после этого уже активна кнопка "Установить..". Ставится и работает. И в биосе - любая очерёдность запуска.
Так что, подвинуть С и на пустое место указать установку, (/) только и Пуск. Правда потом так и не нашёл свопа и хоме не в винде ни в Акронисе.
О, Админ! Спаси-помоги, прошу тебя!
Создал кусок неразмеченой области: https://pp.vk.me/c629217/v629217879/32c2b/1PybiR5mHUM.jpg
Но установщик не видит ни одного раздела, он видит весь жесткий диск, как unallocated: https://pp.vk.me/c629217/v629217879/32c4d/1k6_dLB7m24.jpg
Почему так, как это можно исправить? Надеюсь, ты знаешь ответ)
Вот, может поможет: https://pp.vk.me/c629217/v629217879/32c34/c49vxCH9ewE.jpg
Раньше использовался Arconis или другая сторонняя утилита для разбивки разделов? Скорее всего с таблицей разделов что-то не так, посмотрите решение вот тут.
Спасибо автору за доступность!
ПК. Материнка с UEFI.
Поставил 7-ку, обновился до 10-ки. Готовлюсь ко второй попытке (первая лишила меня загрузчика винды, когда дэбианинсталер отказался сделать Grub) установки рядом Debian.
Хард:
Зарезервировано системой (7-кой при установке на пустой хард) 100 Мб ntfs (основной, активный)
С: 10-ка ntfs (основной)
: 3 неопределённых 10-кой раздела (деланых 2*ext3 + swap акронисом для Debian под 7-кой) (пишет, что все 3 основные)
D: ntfs логический
E: ntfs логический
1. Как-то много основных разделов, нет?
2. Где загрузчик? Куда его ставить? Если руководствоваться статьёй, то это 100Мб резервун, но он не фат32!?
3. Где я мог ошибиться первый раз, отчего не получил Grub от дэбианинсталера?
Разделов не много, в GPT такое можно. Grub не установился потому что нужно явно указать установщику на какой раздел устанавливать загрузчик, если этого не сделать будет выполнена попытка установить его в загрузочную область, которая приведет к ошибке. Здесь из описания не ясно где раздел загрузчика, похоже что его вообще нет и нужно его создать как описано в статье, для большей уверенности скиньте мне скриншот разметки диска в Gparted.
акронисом выделил место под линукс, а затем грузи линукс и в GParted создавай разделы под линукс. тогда се гут будет
Добрый вечер!
Я не могу себя назвать "продинутым пользователем", поэтому решил обратиться к вам за помощью! Хотел установить ОС Linux второй ОС на свой ноутбук (Acer 5552g), ОС Windows 10, нашел кучу материала, разобрался и...столкнулся с одной проблемой. Запустал загрузачную флешку с Linux(пробовал mint 17.3 Rosa и Ubuntu 15.10), запускаю Gparted Linux видит все диски Windows 10, отрезаю нужный мне размер от диска D и собираюсь создать на нем подразделы, кликаю по активному значку НОВОЕ и выпадает окно с надписью:
" It you want more partition you should first create an extended partition. Such a partition can contain other partition. Becaus an extended partition is also a primary partition it might be nesessary to remove a primary partition first ".
Из моих маленьких знаний английского понял что мне надо СОЗДАТЬ РАСШИРЕННЫЙ РАЗДЕЛ, а вот его как раз его создать не получается, потому что ЭТОТ шаг должен быть следующим, должно открыться окно, а его нет.
Далее при установке самой ОС, Mint 17.3 вообще не видит Windows, ПИШЕТ - " НА ЭТОМ УСТРОЙСТВЕ НЕТ ОС. УСТАНОВИТЬ LINUX".
В расширенной установке, диски Windows есть, но на отрезанном куске не активен +, опять добавить разделы нельзя. Ubuntu 15.10 видит основную ОС, но хрень повторяется аналогично.
Подозреваю что в BIOS активен Secure Boot, но сколько не искал в сети как его деактивировать именно с таким Bios - так и не нашел. Строка Secure Boot отсутствует во всех вкладках.
Спасибо! С ув. Анаолий!
Добрый вечер! Дело в том что разметка MBR поддерживает только четыре основных раздела. Таким образом чтобы создать новый расширенный раздел вам нужно удалить один из уже существующих.
Доброе утро! Да я уже понял. У меня как раз и стоит почему то 4 раздела Один очень небольшой раздел,назначение которого я не пойму. Удалять его естественно не рискую. Возможно ли слить его вместе с диском D с помощью "УПРАВЛЕНИЕМ ДИСКАМИ"?
Четвертый раздел, точнее он идет ТРЕТИМ после диска С - раздел востановления, размер 460 мв, вот как раз из-за него и вся проблема!
Нашел и разобрался. В данном разделе находиться образ со средствами востановления Windows 10. Получается так: Либо создать флешку восстановления ОС и удалить данный раздел( в этом случае я смогу восстановить Windows), либо тупо удалить раздел с вытекающими последствиями - невозможности востановления системы.
Спасибо за потраченное на мой вопрос время! Удачи Вам!
Уважаемый Анатолий! Та же проблема, этот файл восстановления а ни удалить, а ни затолкать ни куда ни в С, ни в D! Акронис ДД его окаянного не берёт! Отдать Линуксу весь D - тоже не получается, там резервная копия, в общем завал, нужен второй винт.
Ребята велосипед не выдумывайте статья написана отлично, но совсем юным пользователям очень поможет поиск в ютубе там есть очень качественный материал именно по этой теме, рекламу канала не пропустят скорее всего, но ключевое слова/предложение для поиске ютуба такое же какназвании статьи, а канал как названии оси в целом))) сама пользуюсь только им при установке, осветили и mbr и gpt, рекомендую, материал проверен.
Уважаемый Администратор! Удалось удалить файл восстановления и отрезать часть от D и установить Linux mint 17,3 Rosa, загрузчик так как Вы советовали. Rosa запустилась, но она затёрла загрузчик Windows 10 и заблокировала С! Пришлось всё тупо сносить, увы! Что-то не доработано, а как хотелось альтернативы Windows, быть может подскажете, Ноут HP Pavilion 15, благодарю.
После первой же загрузки из GRUB 2 (linux mint 17.3) Win 10 переписывает его на собственный загрузчик. Как быть?
У вас UEFI?
Да, материнка asrock z77.
Простите за невнимательность "admin": Ваши советы были найдены после внимательного прочтения Ваших постов - bcdedit /set {bootmgr} path EFIubuntugrubx64.efi в коммандной строке винды - я нашел то что искал. Спасибо.
Доброго времени суток Администратор. На ноуте стоит Windows 10. Хочу OpenSUSE второй ОС установить.
Записал ISO-образ OpenSUSE 42.1 Leap на DVD-диск. Посредством Биос запускают установщик, меняю язык..и так пока не дошло до момента разметка.
Не могу оттяпать от разделов Windows 10 с помощью установщика(знаю, что такая функция фактически есть).
1. Установщик не предлагает вариант установки Linux рядом с Windows 10.
2. При попытке оттяпать память у разделов Windows в экспертной разметке - не дает. Можно только раздел Windows 10 форматировать и сделать точки монтирования.
3. Как можно исправить?
4. Решение мое пока такое, в Windows у логического диска с моими файлами оттяпать памяти для Linux. Потом на этот раздел в установщике установить Linux.
5. Что скажете?
Отрезать место от windows нужно с помощью стандартной утилиты управления дисками Windоws, я писал об этом в статье
Доброго времени суток. Я пытался установить Линукс на ноутбук Acer Aspire 5v-552g с установленной десяткой с флешки, но вместо запуска установщика выскакивает уведомление, что запуск с флешки блокируется политикой безопасности. Существует ли какая-то возможность обойти блокировку?
Скорее всего причина в bios попробуйте отключить secure boot или другой дистрибутив, например самую новую версию ubuntu
admin, скажите, а для установки Linux вместо windows 10 на ноутбуке обязательно ли переразмечать жесткий диск? Или можно следовать инструкциям установщика и не заморачиваться? Что будет в таком случае с загрузчиком?
И в случае полного сноса windows 10, я совсем потеряю OEM лицензию для этого ноутбука?
В установщике есть пункт установки рядом с Windows, можете его спокойно использовать, на ноутбук установится две операционные системы. И да при сносе Windows вы потеряете лицензию на ОС, но на сам ноутбук насколько я знаю, лицензия не теряется.
admin подскажите пож-та как можно при установке Ubuntu второй к имеющейся Win10 настроить загрузчик так чтобы по умолчанию загружалась Ubuntu, без вывода каких-либо диалогов и вопросов, а загрузка windows осуществлялась например только по какой-либо зажатой кнопке (типа как вход в БИОС) или по спец.настройке или т.п.
Если два винта то понятно, разнес две ОС на разные винты и в БИОС поставил с какого грузится, а если винт один...
Теоретически такое возможно. Если установить параметр set timeout=0.0 в конфигурационном файле /boot/grub/grub.cfg то меню не будет отображаться. А клавишу для запуска определенного пункта насколько я знаю можно настроить в Grub Customizer.
Перепробовал несколько сборок.
Linux Mint 17.3 не ставится рядом с виндой как mate так и cinnamon.
Установщик просто не видит уже установленный Windows 10. И естественно когда доходит до установки Grub2, выдает сообщение: "Не удается установить пакет 'grub-efi-amd64-signed' в /target/. Без системного загрузчика GRUB установленная система не будет загружаться." Это не зависит от режима Security Boot, можно его не трогать.
Ubuntu ставится все как в инструкции, как Unity так и Mate.
Место на диске подготавливал через управление дисками в Windows. Образ на USB записывал с помощью BootUSB unetbootin-windows-613, идеально для данного случая, а отличии от rufus нет ни каких настоек файловой системы и т.д. По умолчанию FAT32 и UEFI. Выбрал образ и куда писать и все...
admin, спасибо за инструкцию, но может стоит переименовать тему на "Установка UBUNTU рядом с Windows 10"? Судя по скринам Вы ставили именно ее.
Grub Customizer отличная программа для настройки загрузчика Grub. Горячих клавиш я там не нашел, но набора других настроек мне вполне хватило для получение того, что нужно
еще один совет для тех кто столкнется с такой проблемой:
После установки Ubuntu рядом с установленной Windows 10 загружается все-равно только Windows, загрузчик Grub при старте компьютера не видит.
При установке Ubuntu загрузочный раздел выбирал EFI FAT32, в котором уже есть загрузчик Windows. Точнее я не выбирал, установщик сам определил этот раздел как загрузочный, ничего настраивать для этого раздела НЕ НАДО, я только проверил. Перерыл кучу сайтов, чего только не советуют, в основном танцы с бубном вокруг подготовки дискового пространства перед установкой.
НЕ заработало и после восстановления Grub в винде: "bcdedit /set {bootmgr} path EFIubuntugrubx64.efi".
Вcе очень просто: в настройках BIOS (у меня Acer) есть настройки UEFI загрузчика: Security Boot Mode. В этих параметрах, как я понял, настройка база данных доступных файлов с загрузчиками *.efi.
В нужно зайти в параметр "Select an UEFI file as trusted for executing" и выбрать файл EFIubuntugrubx64.efi. Тем самым вы добавите файл загрузчика GRub в базу данных загрузчиков BIOS. Это как раз тот файл, который если что, потом восстанавливается из Windows.
Admin, может добавите этот совет в свою базу, много людей сталкиваются с этой проблемой.
Подскажите. Установлена Win 10. Я хочу присоединить установленный в VirtualBox linux на vhd диск. Подскажите как правильно присоединить. Была попытка сделать это программой EasyBCD. Выставил паузу при выборе загрузки ОС 10секунд. Но почему-то стартует Win 10, а линуксом не пахнет.
admin а если стоит Ubuntu 14.04 и не хочется трогать HDD а есть встроенный слот для 32 Gb карты можно ли на нее установить Windovs7(XP) и если можно то КАК?
Да, Windows 7 можно, в интернете полно инструкций, вот например: http://www.3dnews.ru/622660
Доброго времени суток господа!
Хочу поделится своим опытом по установке Linux второй системой.
Использовался ультрабук Acer Aspire V5-552G, UEFI, GPT, 64-bit, с Windows 10/64-bit на борту.
1. Выбор дистра Linux (Практически любой, с поддержкой UEFI и установке на GPT раздел)
Опробовал: Ubuntu, Arch, Pear OS, Elementary OS, Depin, Linux Mint…
2. Выделение свободного пространства на диске, под установку Linux (смотри статью выше)
3. Записал флэшку с помощью RUFUS в режиме «MBR для компьютеров с BIOS или UEFI»
4. Установка: Все дистры имеют графический интерфейс, проблем возникнуть не должно, выбор локали, создание пользователя (администратора), разбиение на разделы….
5. Разбиение на разделы и выбор раздела для установки загрузчика Grub! Вот оно!
Создал на свободном пространстве три раздела (нумерация может быть другой):
1. /dev/sda6/boot- 250 mb
2. /dev/sda7/корень -20000 mb
3. /dev/sda8/swap – 4000 mb (в моем случае это размер 50% от имеющейся памяти)
6. Устанавил загрузчик Grub в раздел /dev/sda6/boot, в этом вся фишка и заключалась.
Так как хотел использовать, как и раньше в Windows 7/8, хорошую софтинку, под названием EasyBSD от NeoSmart. Но увы, в Windows 10 она не сработала!
7. После перезагрузки вижу девственную Windows 10 и никакого Linux’а.
8. Что делать? Гуглю… Думаю… Читаю…
9. Алилуйя! Выбор вариантов звгрузки по F12, Гружусь и вижу
1. Windows boot manager
2. Ubuntu
3. HDD
4. USB HDD
Как же, ведь понятно было с самого начала, UEFI читает все загрузчики.
10. Выбираю второй пункт с Ubuntu и вот я с вами.
P.S. Загрузчик Windows не тронут, в любой момент можно форматнуть разделы с Linux. Вот вроде и все.
Не надо отключать Secure Boot, не надо переходить в режим Legasy mode, достаточно поклацать F12 при загрузке и ваш выбор за вами. Надеюсь кому нибудь пригодится. Сейчас на ультрабуке мирно сосуществуют Windows 10, Ubuntu Gnome and Linux Mint Cinnamon (Наиболее понравившиеся дистры из Linux).
Также стоит отметить, что иногда этого недостаточно и нужно настроить вручную доверенные EFI файлы, которые будут отображаться. На Acer E5-575G пришлось вручную указывать efi файл для Elementary OS (Select an UEFI file as trusted for executing, вкладка Security)
Пытался ставить на ноут Linux Mint 17.3 рядом с десяткой, но не получилось: после разметки при вводе имени и пароля через несколько секунд вылезает ошибка input/output error. Не знаете, в чём проблема? (диск был и в MBR и после конвертирован в GPT - не помогло)
Нашел решение - не совпадал md5. Докачал несколько МБ - заработало)))
Есть винт на 1ТБ и UEFI который я уже не люблю.... Подилила пополам - 500ГБ для вин10 и 500 оставила под убунту 16,04LTS. по какойто причине установщик убунты не видит винду - не предлагает поставить рядом с виндой. Мне кажется я уже все перепробовала, обьясните тугодуму - что я пропустила в статье?
Я бы не советовал выполнять установкк в автоматическом режиме. Не знаю почему ubuntu не увидела windows, тут может быть много нюансов, но лучше выбрать вариант ращметки вручную (самый нижний пункт) и указать точки монтирования для нужных разделов, в статье про это дело немного написано, но если что - спрашивайте.
Windows и Linux на одном компьютере - это какой-то национальный парк, в котором вместе обитают, к примеру, тигр и заяц...
Ничего нового в этой статье не увидел, очень похожа , если не скопирована с миллиона других похожих статей об установке Linux в качестве второй ОС. После "На всех современных ноутбуках, выпускаемых с Windows 8, 8.1, 10 используется технология UEFI. Это новая прогрессивная технология, которая пришла на смену устаревшей BIOS" вообще дальше можно было не читать, ибо как бы само по себе говорит о компетенции автора, но все же, ради интереса прочёл до конца. К сожалению много внимания уделено разметке дисков, причем даны довольно опасные рекомендации по сжатию тома, на который установлена сама Windows, К тому же мало чего сказано о вездесущем посреднике GRUB, который изменяет загрузочную запись Windows, что будет еще одной головной болью для неопытных в этой сфере пользователей, привыкших работать в графическом интерфейсе и не знакомых с командной строкой, что хорошо видно в последующих комментариях. Хотелось бы увидеть в этой статье о подводных камнях при установке второй системы, а также как установить Linux без посредников в виде различных GRUBов, но к сожалению ничего полезного в этом смысле здесь не нашел.
Linux без Grub устанавливать очень не рекомендуется, потому что будет еще больше проблем, но если хотите можете найти статью на хабре, там было.
Админ подскажи, установил Линукс минт рядом с десяткой. Все стало, но теперь пропал выбор ОС, после перезагрузки есть только выбор линукс. как это исправить?
Создайте пункт меню Grub вручную. Это более подробно описано в статье про мультизагрузкочную флешку.
Установил линукс и после этого нету кнопки входа в виндовс после запуска ноутбука Установи
не забывайте указать точку монтирования /boot для ESP
Кроме того, для ноутбуков(и не только) стоит рассматреть вопрос с Sequre-boot.
Sequre-boot желательно по возможноти отключать, если возможности нет, то стоит монтировать ESP в /boot/EFI.
Еси уже установлен Windows, ESP создавать заного уже не стоит, его надо примонтировать к /boot или /boot/EFI, в зависимлсти от настроек EFI.
Жду исправлений
Спасибо, подправил про точку монтирования.
Я решил вообще не заморачиваться с установкой двойной системы, а наделал флэшек с любимыми дистро.
В итоге главная система на ноутбуке - Win7. Линуксы я запускаю с флэшки под узкие задачи. Если, например, собираюсь много дизайнить в GIMP, то я однозначно запущу Iro OS с флэшки (гениальная система с улучшенным интерфейсом Gimp). Если просто новости в интернете посмотреть, то Elementary OS.
В качестве подключаемых на лету "жестких дисков" у меня выступают карточки sdhc (например, на карточку можно накачать книг по дизайну в pdf). Это из-за того, что оба главных ноутбука очень удобными кард-ридерами оснащены, а таких карточек у меня со старых времен дофига.....
В общем, в итоге получаются мини-системы, в которых есть ровно то, что нужно....На данный момент вообще не вижу смысла в громоздких системах, установленных на жесткий диск - будущее за клауд-мини-системами из серии "подключился и вышел в интернет".......Если только конечно человек не использует игры с установщиками по 20GB, которые постоянно должны быть на hdd.....
Добрый вечер. Уважаемый Admin столкнулся с проблемой, при установке Ubuntu рядом с виндой 10, точнее сказать изначально хотел вместо, а не рядом, но получилось рядом, со множеством не приятных ошибок, и не установился загрузчик. Сделал вторую пере установку, но уже с разбивкой дисков, в итоге Ubuntu запускается по умолчанию, диски отображаются на рабочем столе, но не открываются, терминал не работает, точнее не видит команды,а в винде видно только диск С, были ещё D и E, общая память 1,5Т , ОЗУ 12Гб. Сейчас винда вообще не запускается, требует настройки BIOS. Настраивал, но ничего не меняется, в общем и винда не работает и Ubuntu на 30% от своих возможных. Подскажите как мне установить Ubuntu что бы только она была, но при этом всю личную инфу забрать с винды?
Добрый день, вчера вечером благодаря вашей статье все таки решил попробовать, даже не так) пробовал уже много раз, но решил перейти на debian.
Установил его второй системой рядом с windows 10)
Спасибо за ваши труды, много полезных статей нашел на вашем сайте.
В общем, если Windows нелицензионный, то дуалбутом встанет практически любой дистрибутив Linux соответствующей разрядности. В противном случае, насколько мне известно, без проблем с Secure Boot UEFI ставятся только два - Fedora и Ubuntu. На всякий пожарный, как правильно заметил автор статьи, надо сделать резервную копию Windows на внешний носитель, а если всё таки что-то установилось неправильно, то иметь в запасе на флэшке Boot Repair, c помощью которого можно восстановить повреждённый загрузчик Windows и отредактировать GRUB2 в графическом режиме. В Ubuntu эта программа есть в репозитарии.
Добрый день.
Сделал все по Вашим рекомендациям. Установил на ноут с Windows10 на отдельный диск Ubuntu 16.10. UEFI присутствовал. В него установил загрузчик. Все это якобы. Ибо после установки Убунту так и не загрузился, а загрузился Windows. При чем поменялись настройки времени, и теперь какой то посторонний клацающий звук в динамике появился. Пробовал "восстановить загрузчик grub" через командную строку в Винде. Написало что все записалось (bcdedit...), но всеравно безтолку. Помогите найти решение. Заранее благодарен
Разобрался. Пробовал через установку Boot Repair. Подсказали на сайте http://help.ubuntu.ru/wiki/boot_repair. Сама программа чет делала делала, но в итоге при перезагрузке ничего не получилось. Но сама программа, в конце дала описание, в котором была почти такая же строка как Вы подсказывали (восстановление загрузчика через Windows). Только небольшое различие было: bcdedit /set {bootmgr} path \EFI\ubuntu\shimx64.efi. Перезапись прошла успешно. Перезагрузился, и в этот раз вылез grub с подозрительно большим количеством вариантов загрузок...но главное что там появилось Ubuntu! )
Проблема в том, что не удается создать дополнительные разделы для Linux на ОДНОМ диске! Сколпько не пытался, но количество активных разделов, которые можно создать исчерпано. Если даже Линукс устанавливать на один раздел, вместе с папкой home, то нужен еще раздел для загрузчика EFI. На этом этапе упираюсь в сообщение- невозможно создать раздел.
А у меня другая проблема. На SSD стоит десятка, а на HDD Ubuntu 16.04. Устанавливал их следующим способом: Подключил SSD - поставил десятку. Отключил его, подключил HDD - поставил Ubuntu. Подключил оба диска - все работало некоторое время, а недавно убунту перестала загружаться. Десятка грузится, загрузчик тоже, а убунту не хочет. В чем может быть проблема? Не в обновлениях ли виндовс?
установил ubuntu 16.10....не могу подключиться к Интернету ( у меня проводное подключение на компе)...Ubuntu показывает,что подключение имеется ( две стрелки вверху)...но Firefox указывает,что нет соединения с сервером...просматривал статьи по подключению к Инету...пробовал...ничего не выходит... устанавливал более ранние версии Ubuntu ( от 10....до 16.04) - результат тот же..не могу подключиться...пробовал через терминал(команда sudo pppoecnf)....после ввода пороля молчит...я не силен в компьютерах..начитался статей про то,что такая дружелюбная,простая система (???? D),малоемкая,безплатная...вот и повелся...я с Windows кое как справляюсь....а здессь с терминалом работать...)))..я же не программист...свою десятку вчера рухнул...сегодня переустановил...помогите...или выкинуть ее к чертовой матери ?! )))...я не очень молод...мне труднее новое осваивать...но хочеться не отставать от жизни...заранее спасибо...
Прикалываетесь что ли? Поздравляю, смешно получилось :D))) А попробовать дистрибутив в режиме Live перед установкой на диск видно не судьба. Мне последние вопросы уважаемых комментаторов всё больше напоминают тест на компьютерную грамотность, а еще больше на развод.
Добрый день! Решил установить Fedora 24 рядом с Windows 10 (UEFI). Толкового руководства именно по этому случаю не нашел, поэтому делал по вашему. В итоге система установилась без проблем, но после перезагрузки загружается всё равно Windows, ничего не позволяет выбрать другую систему. Так как я до этого совсем не работал с Linux, поэтому ума не приложу, что делать. Возможно, не предоставил какие-либо данные в силу своей неопытности. Прошу хоть какого-нибудь совета, ибо нигде вразумительного ответа по своей проблеме не нашел. Заранее спасибо!
Тут в общем то на эту тему уже писали, почитайте обсуждение внимательней. Попробую помочь, по пунктам: 1) Зайти в BIOS, в зависимости от модели ноутбука дейсивия разные. На моем ASUS из Windows во время перезагрузки нажимаю F2. В самом BIOS найти графу Boot - Boot Option Priorities. В ней посмотреть порядок приоритетов, должно быть примерно так:
Boot Option#1 Fedora
Boot Option#2 Windows Boot Manager
Далее сохраняем настройки BIOS и выходим из него с последующей перезагрузкой. Во время перезагрузки нажимаем "esc", после этого должно открыться меню с выбором вариантов загрузчиков
Please select boot device
Fedora
Windows Boot Manager
Enter Setup - BIOS
Выбираем нужное и радуемся.
Я вот поэтому сюда и пишу. В BIOS во вкладке Boot нет совсем никакого упоминания про уже установленную Fedora. Загружался с диска и смотрел таблицу разделов. Там написано, что на тех разделах, которые я размечал, установлен Linux.
Всем привет , admin прав - всё ставится , единственное бывает 10-ка тупит и по загрузке из grub2 и по доступу из linux, но это всё в принципе поправимо и просто нужно время. Для тех кто сомневается, у меня HDD и SSD , не UEFI даже а старый БИОС - одновременно стоят и работают под загрузчиком Linux mint 18 x64 - tot 32-x Mint, Suse 42.2, и две винды 10-ка и 8.1 .
На этом сайте можно найти ответы почти на все вопросы по Linux. B частности по совместимости с Windows 10, только в разделе Windows. У меня восьмерка, там траблов меньше. Ищите, и обрящете:-) Автору Сергею еще раз большущее спасибо за сайт.
Здрасти. Надумал установить рядом с WIN10 Linux. Сам являюсь пользователем UBUNtU с августа (уже) прошлого года. Там устанавливал с нуля (т.е. диск был чистым и я не переживал). Сейчас хочу рядом с WIN10(корпоративная не в домене. Удалось уговорить) поставить LINUX (ну, да., такой я капризный). Понимаю, что статья более чем подробная. Но для особо одаренных можно получить инструкции? 1) я создал чистую область (100Mb). 2)Нужно создать загрузочную флешку с LINUXOM, настроить биос для загрузки с флешки и продолжить установку согласно инструкциям. Я правильно понял?
Есть ли какая-либо возможность использовать при запуске загрузчик от windows вместо GRUB?
Нет, это невозможно.
Есть ноут с двумя хардами, установлена windows 10, само собой UEFI. Собственно вопрос, как лучше установить на второй хард Линукс, варианты:
1) Отключить физически на время установки хард с виндой и поставить на второй чистый хард Линукс и туда же загрузчик
2) Поставить на второй хард Линукс, а загрузчик отправить к виндовому, благо там щедро 100 МВ выделено, а занято всего 30.
Спрашиваю с позиции где меньше всего будет проблем и танцев с загрузкой после (возможной переустановки винды и (или) сноса линукса и возврата второго харада в NTFS и т д и т п.)
Зачем такие сложности? Просто устанавливайте загрузчик на раздел с Linux. Тогда сможете загрузить Windows при необходимости просто отключив другой диск. А в Grub Windows так и так будет доступна.
Данные (фото, докумениты) , которые под виндой не будут доступны из под линукса?
Будут.
Linux как раз таки видит все документы WIndows. а вот наоборот нет.
Будут только нужно будет в win10 отключить fast boot, иначе разделы винды не будут монтироваться.
А можно наоборот: рядом с Linux поставить WIndows10? Можно ссылку на почту. Спасибо.
Конечно можно, только Linux после этого загружаться не будет и вам придется восстанавливать его загрузчик. О восстановлении GRUB на этом сайте уже написано предостаточно. Можно также воспользоваться рекомендациями http://www.interface.ru/home.asp?artId=36180. Но вообще то так никто не делает, общепринято устанавливать Linux после Windows, а не наоборот. Удачи)
windows подсистема для Linux... Не, не слышали?
С установкой ubuntu 16.04.01 проблем не возникло,а вот дальше тьма.Не могу найти вменяемого рецепта как подружить ubuntu с NTFS.Менять полностью ось не хочу ибо ubuntu не заменит windows,но у ubuntu есть ряд преимуществ в отдельных задачах.Может такой вопрос уже освещался,но я этого не нашел.
На этом же сайте уже была где-то в статье подробно расписана ваша проблема. Они вроде бы и так неплохо дружат, никакого дополнительного софта устанавливать не надо, хотя он есть в репах. Просто из Винды надо выходить перезагрузкой, а не выключением, тогда всё получится.
Здравствуйте! Хотелось бы узнать.
Я установил всё по инструкции, но после перезагрузки у меня все равно запускается Win10 что же делать? В биосе смотрел, там не отображается загрузка с linux.
UEFI или BIOS?
Все проделал как вышеописано.
При установке выскочило: не удалось установить пакет grub-efi-amd64-signed в /target/.
Здравствуйте.
есть ноутбук на нём Core i3 + 4GB ram + 500 GB HDD + WiFi "N"
что бы по красоте, было сделано Core i3 + 8GB ram + 128GB SSD + 500 GB HDD + WiFi "AC"
хочу сделать так что бы разделы boot, root, swap (512mb) и системный диск Win10Pro после установки жили не тужили на SSD. А раздел home, папка User (которая виндовая) и файловая свалка "NTFS" для обоих систем жили и не тужили на HDD. сможете помочь решить эту головоломку. Естественно наличие GPT и UEFI обязательно.
Здравствуйте! Стояла 10-ка и ubuntu. Ubuntu тоже в прошлый раз не без проблем стала в связи с uefi. Сейчас диск в gparted выглядит так
sda1 - ntfs - 450mb - какое-то "восстановление" - создан виндой при установке
sda2 - fat32 - 100mb - boot - создан виндой при установке
sda3- ntfs - диск C с виндой
sda4- ntfs - d (самый важный, мой data-storage
sda5 - linux swap
sda6 - ext4 с точкой монтирования /
Загрузочную флешку делал через rufus во всех возможных вариантах, установка идет вроде нормально, но потом "
не удалось установить пакет grub-efi-amd64-signed"
Установить хочу lubuntu, раздел для загрузчика указывал и sda1 и sda2, результат один, может ли быть что lubunta не может прописать в grub потому что там остались данные о ubuntu 16.04?
Windows 10 64 bit а Ubuntu 16.04 тоже 64 битную ставить? Или можно 32 бит. Есть ли тут какая то зависимость? А может и винду надо 32 битную?
Ноут Asus x502c Intel 847 1.1 GHz , 4 Gb оперативки . Слабенький процессор ...
Сейчас стоит Windows 10 64 и Lubuntu 16.04 64 .До этого стояла Lubuntu 16.04 32 bit.Но что то криво работала-возможно дело было в флешке с которой устанавливалась Lubuntu . Флешку писал в винде руфусом.
Очень интересует данный вопрос.
Спасибо за быстрый и полный ответ.
Можно и 32 битную если хотите, и будет даже лучше, если не планируете увеличивать количество ОЗУ. Вот - https://losst.pro/chem-otlichaetsya-64-bitnaya-sistema-ot-32
При попытки поставить линукс, вылазит сообщение. Мини программа обнаружила на этом компьютере уже стоит ос в режиме совместимости с UEFI при попытке установить вторую ос, первая ос возможно не загрузится. И две варианта действий, игнорировать и продолжит. Второй вариант вернутся назад. При игнорировании сообщеня, после установки линукса убунту, или минт, в граб миню нет виндовс. Стоит виндовс 10.
Чудны дела твои, Господи) Что-то странное, причин может быть много, от неверной разбивки диска до записи установочного образа Linux на флэшку(диск), неправильной настройке UEFI Windows перед установкой Linux. У меня подобное возникало только на Fedora, Ubuntu и Mint этим не недостатком как правило не страдают.
Полезная статья и сайт в целом. Спасибо авторам!
Здравствуйте.
Стоит последняя W10 PRO.
Создал три раздела (swap, системный и /home) и с этого места можно по подробней куда и как установить загрузчик Linux.
Можно вообще ничего не создавать, выделить только место. Во время установки спросит как разметить диск, выбираешь вручную, потом выбираешь пустой раздел и разметить автоматически свободное место и всё, в самом конце установки установится загрузчик сам.
Установил Debian рядом с Windows 10, появилась проблема. Когда подключаю внешний жесткий диск при работе в Windows, потом отключаю, после этого не загружается Линукс, пишет, что не может смотнтировать корневой раздел Линукс и поврежден суперблок. Все попытки восстанавливать безрезультатны, делаю клонезилой образ раздела и только так восстанавливаю. Кто подскажет у кого такая-же ерунда и что делать, чтобы раздел линукса не портился?
спасибо всё понятно и ясно
Неожиданно возникла проблема. Есть 2 винчестера, оба размечены в GPT. На втором "десятка", на первом была Mageia 5.1, теперь ставлю 6-ю - не ставится. Раньше благополучно ставил 2 системы как на общем диске, так и на разных, с линуксом дружу со времён Мандрейка-10.
Ставил в существующие разделы - безуспешно. Потом на целевом винте снёс все разделы, создал заново ESP, /, swap, /home, после перезагрузки выдаёт L 99 99 99...
Что пошло не так?
Всем доброго времени суток.
У меня в ноутбуке 2 физических диска. На одном стояла Windows 10, а на второй я поставил kali linux. После этого при загрузке ноутбука не отображается windows, а есть только возможность в грабе выбрать линукс. При отключении диска с линуксом вообще не находит систем для запуска.
В этих делах я плохо разбираюсь: ставлю первый раз. Пробовал с установщика для винды восстанавливать mbr встроенными средствами и через командную строку. Ничего не помогло.
И что интересно, на физическом диске с виндой было 2 раздела, в одном из которыхстояла винда ( диск соответственно назывался С: ). А теперь он отображается как диск D.
Подскажите, пожалуйста, как теперь можно запустить windows
Практически после установки Ubuntu рядом с Windows в зависимости от того в каком порядке выполнялась установка нужно обновить загрузчик Grub через LIveCD с Ubuntu заходите в терминал:
# sudo su
# sudo update-grub
Не помогло тогда
Смотрите внимательно данные рекомендации 4 способа востановленмя загрузчика один точно ваш:
https://youtu.be/uCXkOMwLrUc
Просмотрите не пожалеете. Всем успехов!
Думал, Линукс мало распространён из-за плохой работы. Но, попробовав установить, понял, что из-за невозможности установки. Очевидно, что установка Линукса подвластна только программистам-корифеям с приличным стажем. 🙁
Смотря какой дистрибутив ставите, если Gentoo или Arch, то могут возникнуть сложности. Остальные, наиболее распространённые устанавливаются проще, чем Windows
Все просто со второго раза))) а для начала:
Смотрю ссылки добавляют вот вам подробная инструкция рабочая
https://youtu.be/BVByKvCHRlM
https://youtu.be/OmMkAGuZxCE
https://youtu.be/uCXkOMwLrUc
Просмотрите не пожалеете.
Конкретно по этой теме, да там установка не 10-ки, но с 10-й один в один все работает, выбирайте свой вариант и изучите, возможно не один раз. Сложно две системы поначалу кажеться установить, а просто Ubuntu устанавливается легко. А две параллельные с нюансами которые очень хорошо осветил автор видео.
Всем успехов!
Форматировать свой диск или разбивать тоже лучше через Live CD/USB Ubuntu там и GPardet и fdisk через терминал. Если в GParted полный или частничный отказ на ваши желания по разбивке диска то, fdisk вас спасет.
Или если ваши привычные методы отказывают тогда зашли и поработали с одним из выше перечисленых, потом вернулись к своим привычным «акрониксам» и продолжили привычным способом.
Либо сходите пару раз туда сюда по началу и все равно получиться если не сдаваться.
ПОЛЬЗУЮСЬ Astra Linux, ВИНДУСЯТНИКАМ ГОВОРЮ СРАЗУ - ВИНДОВС "Г"! НАПИСАНО НОРМАЛЬНО,ДАЖЕ ПОЛНЫЙ ЛУЗЕР ВСЁ ПОЙМЁТ.
Здравствуйте. Скажите пожалуйста, почему при загрузке Win появляется надпись, что надо просканировать диск, ну конечно на английском Загрузка продолжается, но этот момент просто бесит.
После удаления разделов диска, на которые устанавливался linux, windows перестал загружаться. Что делать в таком случае?
Инсталяция УБУНТУ 17.10 зависает когда инсталлируетса ГРУБ 2. Сто раз уже. Не могу разобратся. Помогите
Работал постоянно win7 и UBUNTU 16, MBR, Legacy, ноубук HP. Все было хорошо. К сожалению HP умер. Взял ACER TM. Установил также две системы, (UEFFI, GPT), win10 и UBUNTU 16 (пробовал даже UBUNTU 17и 18). Не получилось. Win10 молча устанавливается и даже не чувствует UBUNTU. Какие только пляски с бубнами и даже с турецким парабаном не пробовал, от лезгинки до гопака.
(Ну WIN 7 и UBUNTU 16 под MBR and legacy на новом ACER поставить получилось, конечно, но хочется новую систему поставить)
Для сведения:
1. выделил /boot - не пошло
2. выделил /boot/efi - не пошло
3. объединил каталог EFI c /boot - не пошло
4. Пробовал через установку Boot Repair - повесился win10
5. Да же не помню что еще пытался сотворить с этой машиной, много чего еще.
Админ, прошу решите это проблему. Пришлю 20-ти летний кизлярский коньяк Баграион.
Поставил Windows 7 на UEFI, нормально загружается. Стал еще ставить Linux Mint 18.2,
возникли проблемы. Посмотрел на раздел efi на диске, Windows при установке отформатировал
раздел efi в ntfs. Когда раньше приходилось ставить на UEFI лишь один Linux (любой), раздел
efi всегда форматировался в fat32. Ubuntu и Linux Mint хорошо читают файлы в системе ntfs,
но возникает вопрос, обязательно ли для них надо иметь на диске раздел efi в формате fat32?
Или раздел efi в ntfs для них тоже возможен?
Добрый день!
Проблема такая. Устанавливаю Ubuntu-16.04 на ноутбук рядом с Windows 10. Установлены разделы:
/dev/sda
/dev/sda1 ntfs 344252 MB 138 MB
/dev/sda3 ext4 / 25000 MB 5612 MB
/dev/sda4 ext4 /home 609999 MB 9781 MB
/dev/sda5 swap 9264 MB unknown
/dev/sdb
/dev/sda1 efi 272 MB 94 MB Windows Boot Manager
/dev/sdb2 16 MB unknown
/dev/sdb3 ntfs 126712 MB 71036 MB
/dev/sdb4 ntfs 1027 MB 675 MB
Разделы free space не указываю.
При установке загрузчика пытался установить его в следующие разделы: на /dev/sda1, потом на /dev/sda, и, наконец, на /dev/sdb1. Во всех случаях при перезагрузке сразу запускается Windows 10.
Только если я нажимаю Esc во время перезапуска, то появляется возможность запустить Ubuntu:
Boot Option Menu
OS Boot Manager (UEFI) - Windows Boot Manager ...
OS Boot Manager (UEFI) - ubuntu ...
Boot From EFI File и т.д.
При запуске ubuntu запускается GRUB, где опять же есть выбор между Ubuntu и Windows.
Вопрос: что мне делать??? Возможно ли, что мои предыдущие попытки установить загрузчик на /dev/sda1 и /dev/sda что-то испортили?
Привет всем.. Возникла такая беда.. в UltraISO создал образ ubuntu, перезапустил комп, и когда началось считывание ОС, на экране строчит ошибку одну и ту же..
0000 EDB7 0000 0000...
error idle with if= 0
Привет, удалось решить проблему?
Подскажите, как сделать, чтобы время не сбивалось во время перезагрузки операционных систем Windows - Linux, Linux - Windows
https://losst.pro/sbivaetsya-vremya-v-ubuntu-i-windows
Привет всем! Может кто подскажет? После установки Ubuntu рядом с Windows 10 на отдельный жесткий диск из Windows не видит CDROM и время в Windows не соответствует моему часовому поясу. Что делать для устранения проблем?
Добрый день !
Возможно ли установить линуху если винда 10 рабита на один диск ?
Всем привет, есть ноутбук Dell с единственным диском SSD 256 GB. Установил Windows 10, сжал диск С в Windows через Управление дисками, в итоге есть свободное место 70 GB для Ubuntu. Пытаюсь устанавливать Ubuntu с флешки, с которой уже ее устанавливал на другой ноутбук (там была только Ubuntu) и в окне где должны разделы ничего нет. Gparted тоже не видит основной диск SSD. И установщик Ubuntu даже не предложил мне что сделать с уже установленной Windows, просто не показывал этот шаг. Естественно установка дальше не идет. Подскажите, что нужно сделать.
начитался комментов выше. чесно сказать, я в печали..... такого количества совершенно безграмотных комментариев я уже давно не видел. далее по пунктам
1.Linux ставится ТОЛЬКО на gpt (GUIDE PARTITION TABLE, стиль таблицы разделов)
2.mbr не нужен, так как ограничивает число разделов жестком диске до 4.
3.записывается linux с помощью Linux'овой же команды dd. или же unetbootin (после запись этой программой закончена, надо перезагрузить комп)
4. разметка диска. вспоминаем п. 1 и 2
1.сначала загрузчик (512mb, если efi и 300 mb если обычный)
2.потом swap
3.потом корень /
4.потом /home (данные пользователя)
5.каталог /var (на конце отдельным разделом, чтобы потом корень не засорялся системными логами).
"2.mbr не нужен, так как ограничивает число разделов жестком диске до 4."
Серьёзно? А логические разделы? Не, не слышал. Но так хотелось что-нибудь написать
Немного дополню вышесказанное. Всё прекрасно работает как с MBR, так и с GPT. Единственной проблемой стало то, что не устанавливались накопительные обновления Win10 (у меня лицензионная Виндоус). К сожалению, в большинстве гайдов этот момент проигнорирован. А решается всё элементарно: с помощью DISKPART (встроенная утилита) необходимо пометить создаваемый Windows раздел с загрузчиком как активный.
Ну и пример разметки для MBR:
sda1 - загрузчик Windows, имеет метку "Зарезервировано системой" (это его необходимо сделать активным)
sda2 - раздел для установки Windows
sda3 - корневой раздел Linux
sda4 - расширенный раздел
sda5,6,7... и т.д. (кстати, любой из логических разделов может быть отформатирован в NTFS и Виндоус сможет адекватно с ним работать)
Все сделал согласно инструкции, загрузчик поместил в раздел efi. Устанавливал Ubuntu 16.04.5, установка прошла успешно. После перезагрузки появился загрузчик винды без всякого намека на установленную Ubuntu 16.04.5 и существование загрузчика grub...
Что мог сделать не так?
Создал загрузочную флешку с ubuntu 18.04, выбрал пункт install ubuntu в грабе, на моменте выбора языка, установка зависает намертво, сделать ничего невозможно. Не сталкивались с подобным?
Установил Центос 7, после установки исчезла винда в меню загрузчик. как вернуть теперь винду 8.1? центос 7 запускается без проблем
Ну, какбы рядом с лицензионной 10-кой на ноут поставил Минт, он по виду как виндоуз, классического вида, и как убунту дебиановский, удобный. Вроде всё ровно встало. После, при запуске выбираешь на чем работаешь, тока прикол, время на полдня разные, и винда со со временем начала долго грузиться, когда запускается рабочий стол, появляется командная строка и думает, минут 5-10, потом всё на места встаёт и пользуешься. Т.е. вначале перекур, а после время поправляешь.
Виндой редко пользуюсь, так что терпимо. 10-ка жрёт трафик как лошадь, без остановки, и нельзя остановить автообновление, как в 7-ке, а мобильный интернет дороговат и мало. Да и антивирус нужен, обновлять его. Потому и в Минте сижу, эконом. Почти всё для повседневки есть.
Постоянно виснет загрузка убунту, ноут с ссд и hhd, на ссд винда 10. В чем проблема не могу понять постоянно зависает. По этому методу сделал, все установилось загрузилось, потом когда просят сделать перезагрузку зависает, принудительно отключаю питание, ноут распознает две ОС, когда нажимаю загрузить убунту опять зависает. Можете что-нибудь подсказать?
после первого запуска виндовс 10, она затирает загрузчик линукс
В названии статьи - ошибка. Здесь описывается ни "УСТАНОВКА LINUX РЯДОМ С WINDOWS 10", а только про разметку разделов дисков. Весь интернет забили хламом, который только формально подходит под требуемое название, которое ищут пользователи, а по факту - куча рекламного спама с пустой водой по содержанию статьи. Да, здесь содержатся сведения, относящиеся к установке, но это не инструкция "УСТАНОВКИ LINUX РЯДОМ С WINDOWS 10".
Дочитал до фразы "Я не буду здесь подробно рассматривать, как установить Linux, все это уже подробно рассмотрено в моих статьях отдельно для разных дистрибутивов. Рассмотрим только несколько аспектов разметки диска." Дальше читать смысла не увидел. Обман чистой воды. Автор, как статья называется и что ты написал в приведенной выше мной фразой )))))))))))))))))) бесстыдство. Ради лайков и денег всё продадите. Ужас.
По работе требовалась поставка ноутбуков с установленной ОС Window и параллельно с Astra Linux. Откусил раздел от винды на 25 ГБ, на него установил Astra Linux. После в Astra в терминале набрал update-grub, загрузчик увидел виндовс и добавил, все хорошо добавилось, есть выбор загрузки какой ОС, спасибо за совет.
Хорошо и детально автор всё по полочкам разложил, немного по другому сделала, разрешила Убунте самой найти для себя место рядом с Виндос 10, т.к. жесткий диск изначально не был поделен, хотя места на нём много, аж 1ТБ, то бишь выбрала установить убунту рядом с виндос. На другое не рискнула, не для меня. Всё отлично установилось и работает. правда убунта заняла первую позицию, времени переключить хватает.
Добрый день, автор. Как-то пыталась установить Ubuntu, но с дуру отрезала аж 100Гб от диска D. Как теперь сделать эту не распределенную память поменьше?
Только после сей установки линукс загрузить невозможно - тупо продолжает грузиться windows boot manager - grub вообще не показывается... Пробовал ставить grub как в sda, так и в esp sda2.
Высвечивается ошибка когда пытаюсь загрузиться в Ubuntu. 2 раза
[Firmware Bug]: ACPI region does not cover the entire command/response buffer.
[mem 0xfed40000-0xfed4087f flags 0x200] vs fed40080 f80
Гугл советует обновить биос, но че-то ссыкотно. Неужели проблема в биосе?
Проторчал около недели, пытаясь установить линукс вместе с виндой, потом просто линукс без винды. Результат - ноль. Вывод для себя : линукс - специально изобретенная кем - то чернуха, выводящая из равновесия. Вернулся к старой доброй Windows и очень счастлив.
На ноутбуке установлена win10_64. Хочу поставить второй системой Alt linux simply 8.2_64.
С флэшки она ставится, но хочется на постоянно ее установить.
Причем - загрузчик grub чтобы стоял на разделе linux (/).
Но чтобы после перезагрузки скопировать код загрузчика
# dd if=/dev/hda4 of=/home/linux.bin bs=512 count=1
- надо же загрузиться в линукс, а виндовс ее не видит...
Вопрос: как загрузить Linux с загрузчиком на разделе диска hda4?
И в каком файле win 10 прописать код grub (раньше в win XP это был файл boot.ini )?
Подскажите пожалуйста, такая ситуация: На ноутбуке стоят 2 ssd диска на первом виндовс 10 родная с ключом. на второй ssd решил поставить linux( пробовал и минт и кубунту и еще пару разных дистрибутивов результат один), при ручной разметке указал на втором ссд корневой раздел, хоум раздел, а загрузчик указываю в раздел загрузочный винды на первом ссд (100 мб который).
Ставлю линукс.После установки перезагрузка появляется меню с выбором загрузки линукс или виндовс. Запускаю линукс, после того как поработал выключаю комп (или перезагружаю не важно).
При повторном включении меню выбора операционки не выходит а появляется ошибка
"minimal bash like line editing is supported for the first word tab".
Если зайти через F2 в UEFI выбрать загрузку линукс то опять после стартует меню до повторной перезагрузки и опять такая фигня и это с любым линуксом так.Можно как нить решить эту проблему?
Стояла винда10. Установил дополнительно elementaryos. Всё на одном диске. Появилось меню загрузки Grub. В списке есть elementaryos и винда 10. Но когда я выбираю загрузку виндв, на пару сёк появляется курсор в левом верхнем углу и снова возврат в меню. Elementaryos грузится.
Загручик устанавливал раздел который отделяла винда 10 при установке. В другой раздел пробовал, но тогда только виндовый загрузчик был.
Ноут 2006. Обычный биос не uefi
Помог способ от сюда https://forum.ubuntu.ru/index.php?topic=312807.0
у меня вопрос, у меня винда стоит на ммс, а ubunta хочу поставить на хард отдельный, с него же у меня грузится винда, хотя стоит она на ммс. подойдет ли мне данная инструкция или надо чтобы винда и линукс были на одном жестком?
Чушь потому как не работает! Линукс нихрена не ставится рядом с виндой! "Раздел efi, как правило, создается с файловой системой fat32 и занимает около 30 Мегабайт памяти" сам же фото прилепил на котором видно что 114 МБ. И верно 100МБ и весит где то!
Может уже отвечали, смотрел бегло. Установил Линукс (АЛЬТ 8 СП) на Виндовс 10. При установке в устройстве, куда будет ставится загрузчик, выбрал "жесткий диск". В результате Виндовс грузится один, как раньше, а Линукса не видит. Потом при переустановке выбрал EFI, - появилось меню с Линуксом и Виндовс, но при заходе в Виндовс спрашивает имя пользователя и пароль, зачем и что это? Можно ли поднять Линукс без переустановки и вообще, как правильно было ставить его, что бы было 2 системы при загрузке и все работало бы?
Главное не ставить глючный и тормозной Mint да и винда его затирает при обновах ставьте Ubuntu
Нужно такое же но с 11
>>Главное не ставить глючный и тормозной Mint да и винда его затирает при обновах ставьте Ubuntu
Наркотики - это плохо, пнятно?
grub (линуксовый загрузчик) нужно ставить на отдельный раздел, а при возможности - на отдельный диск с линуксом. В таком случае винда никогда ничего не затрёт.
Ну и как бы уже давно существует такая полезная вещь, как WSL. Устанавливается убунта прямо в windows 10.
Добрый вечер! Не подскажете, если устанавливать Linux второй ОС на второй физический диск, то загрузочный раздел можно делать на этом же диске или обязательно его создавать на диске с виндой?
здравствйте
вы пишете: "В моем примере /dev/sdb1 - это диск С в Windows, а /dev/sdb2 - D."
так это для меня главная проблема понять где тот диск "С" который линух размечает как /dev/sdb2?
а как Вы знаете какой диск в windows 10 Disk Management "C" соответствует в Linux /dev/sdb1
поясните это место попонятнее
Спасибо!!! Мне помогло.
Установка и настройка windows и linux.
Спасибо!!!! Круто!!!!
Ноут Lenovo Z565. Windows 10 Home х64, версия 1607. Задача – установить на один жёсткий диск ещё Linux Ubuntu, чтобы на одном ноуте можно было пользоваться двумя ОС. Вначале была заминка – модем TP Link не пускал ноутбук в интернет. Обновил сетевые драйвера Atheros на ноуте – и всё заработало.
1) Скачал с помощью проги Unetbootin на флешку образ Linux Ubuntu 22.04.2 (iso – файл, свежая долгоиграющая обновляемая версия) с офиц.сайта Linux.
2) Сделал резервную точку восстановления своей Windows 10 Home.
3) Вставил флешку в usb ноута.
4) Во время перезагрузки через F2 зашёл в BIOS, установил первым приоритет USB загрузки
5) Во время установки выбрал пункт "Установить РЯДОМ с Windows", язык русский, в меню загрузки Default (загрузка по умолчанию)
6) Загрузка прошла успешно, открылось окно Линукса, система попросила сделать перезагрузку. Чтобы повторно Линукс не загружался, после нажатия Перезагрузка флешку вытащил из usb.
7) Во время перезагрузки на чёрном экране надпись : No bootable device - insert boot disk and press any key (в режиме командной строки). Нажатие на любую кнопку – копировало опять эту фразу. Через час Хотел войти через безопасный режим, но эта функция и кнопка F... отсутствуют на Windows 10. Переустановка в BIOS приоритета на загрузку с SATA HDD – результат ноль. Только принудительное выключение. Создалась тупиковая ситуация. Ноутбук перешёл ко мне от другого человека, изначально на ноуте стояла Windows 7 Home, затем была переустановка на Windows 10. Установочный диск Windows 7 сохранился, а Windows 10 – нет. Пока искал где и как можно скачать DVD загрузочный диск Windows 10, обратился с этим вопросом к хорошему соседу Александру, который оказался инженером-программистом. Он нашёл в инете решение для меня.
8) РЕШЕНИЕ проблемы. Оказывается, в загрузочном секторе Windows ничего менять не надо, тем более с загрузочного диска. Изменения делаются в Линуксе. Надо было вставить опять флешку с Линуксом, приоритет USB, появилось меню загрузки, где выбрал не "Default" а "Try or install Ubuntu". Дальше появится картинка с надписями "Попробовать", "Установить". Выбрать "Попробовать". Линукс снова загрузился, после этого открыл программу Терминал, где в режиме командной строки надо было прописать три команды по очереди, для обновления и восстановления. В начале строки по умолчанию стоят кракозябры ~S , их удалять не надо. Команды получаются такого вида :
~Ssudo add-apt-repository ppa:yannubuntu/boot-repair (нажать Enter)
~Ssudo apt update (нажать Enter)
~Ssudo apt install boot-repair (нажать Enter)
После выполнения этих команд нужно запустить установленную программу Boot repair (с гаечным ключём в логотипе) и выбрать верхний пунктик Recommended repair.
Перезагрузка, вытаскиваем флешку, в Биосе выставляем приоритет SATA HDD ; F10- сохранить и выйти. Если зависло – принудительно выключить. При включении и перезагрузке через 5 сек после логотипа Windows с кнопами F2 и F12 появилось новая малюсенькая менюшка, в которой кнопами вверх-вниз надо выбрать Ubuntu (Linux), или Windows 10 (и Enter). Менюшка ждёт команды секунд 20-30, если проморгали, то загрузка по умолчанию идёт дальше на Линукс.
10) Суть проблемы "insert boot disk" и зависаниями при обновлениях на чёрном экране, судя по описанию в инете,- связано с драйвером энергосбережения Линукс на некоторых типах ноутбуков. Всё исправимо, если не паниковать, а думать. Да прибудет с Вами Сила Инета …
Александр Счастливый, Краснодар, апрель-2023.
Поставил винду и линукс на 1 ссд, возникла проблемка, второй жесткий виден только в линукс, как сделать доступ к нему и с винды и с линукс?
Много в комментах вопросов "как поднять linux на одном диске с windows" - Для чего Вам это? Нужен linux как вторая система под какие то редкие задачи, поднимаете WSL и накатите нужный дистрибутив , а может больше чем один, и спокойно работаете. Тут Вам проблем с путаницей файлов не будет, не будет таких проблем с монтированием дисков, легко обмениваться файлами между системами, куда быстрей запускать вторую систему в окно чем каждый раз перезагружаться под нужной. А хотите 2 отдельные системы, так сделайте по уму, поставьте 2 диска , один под Win второй под Unix , нет ни какой необходимости мешать все это, хотите "файлопомойку" организовать под общий доступ, так выделите ОТДЕЛЬНОЕ пространство и подмонтируйте в обе системы...
Здравствуйте, подскажите пожалуйста
Недавно был куплен ноутбук с ссд на 512, при установке винды отрезал от основного диска 50гб под Линукс, сейчас решил поставить его, но после прочтения статьи, встал вопрос:
Увидит ли установщик линукса этот отрезанный виндой диск и получится ли поставить его на этот один диск без проблем? Отрезать больше возможности нет, на винде много проектов, которые требуют места, а Линукс нужен только для небольшого количества функционала, поэтому и отрезал так мало.
И ещё, можно ли будет из линукса взаимодействовать с файлами или программами на винде (мб с помощью каких либо утилит)?
Если линукс нужен под редкие задачи, поднимите виртуалку? WSL Вам в помощь .
.ISO Записывал 2 прогами - не записывается, писал на 3х флешках, бесполезно ......
флешки потом закрыты от записи, мудохался с восстановлением флешек .....
Компьютер Acer Aspire TC-120 _ ОЗУ = 4 Гб, Проц - 3,8 3700 Mhz
Тишина - видно знатоки здесь перевелись !!!!!!!!!!
Руфус тоже не пишет, Линукс не грузится, может быть не так настроил,
а как правильно ???
Сделал запись в режиме “DD” в Руфус_4.4.2103 :
Не записалось, флешка потом закрыта от записи, в системе не значится ………