Если вы используете Windows рядом с Linux, рано или поздно может возникнуть необходимость скопировать файлы из одной операционной системы в другую. При копировании с Windows в Linux проблем не возникнет так как Linux отлично открывает файловые системы семейства NTFS, но вот открыть файловую систему Ext4 в операционной системе от Microsoft будет не так то просто.
В этой инструкции я опишу несколько способов подключения Ext4 в Windows. Вы можете либо добавить поддержку этой файловой системы в Windows либо просто извлечь из неё файлы с помощью специальных программ.
Содержание статьи
Подключение ext4 в Windows 10 и 11
1. Драйвер ext2fsd (устаревший)
Для работы с файловыми системами семейства Ext существует открытый драйвер для windows под названием ext2fsd. Программа не обновлялась с 2017 года, однако до сих пор она работает. У меня получилось успешно использовать утилиту в Windows 10, но в Windows 11 она не заработала.
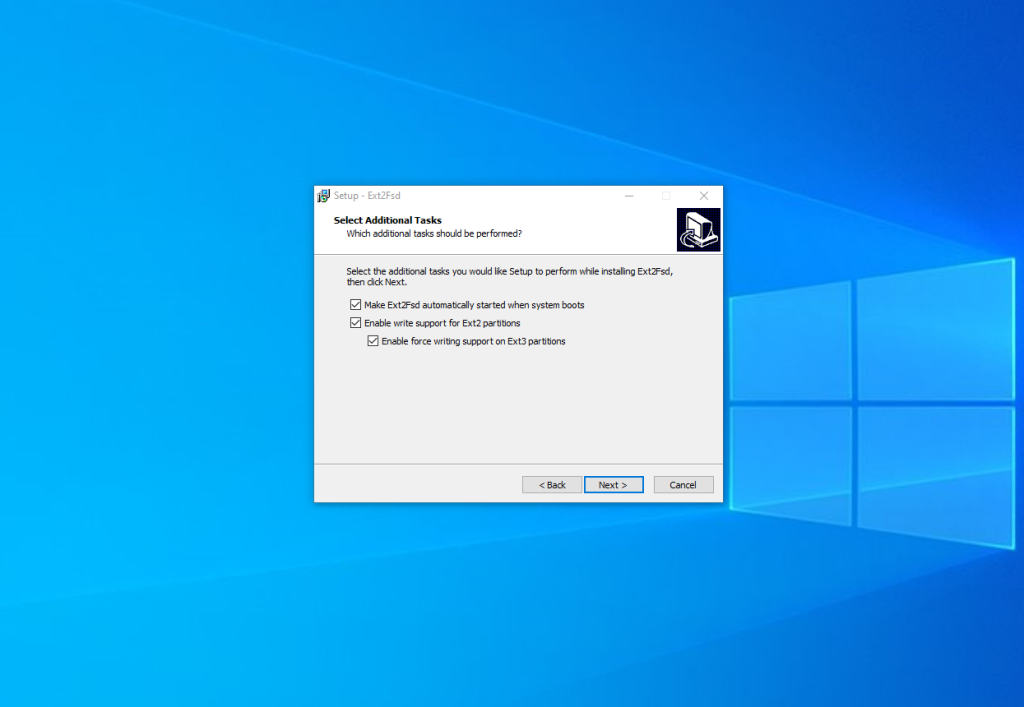
Загрузить установщик для вашей версии ОС можно на странице релизов программы в GitHub. Процесс установки не должен вызвать никаких трудностей и сводиться к нажиманию кнопки Далее в мастере установки, как обычно при установке программ в Windows. Интерес представляет только это окно:
Здесь:
- Make Ex2Fsd automatically started when system boots - автоматическая загрузка драйвера во время загрузки системы, желательно включить.
- Enable write support for ext2 partitions - поддержка записи в файловую систему ext2
- Enable force writing support on Ext3 partitions - поддержка записи в файловую систему ext3
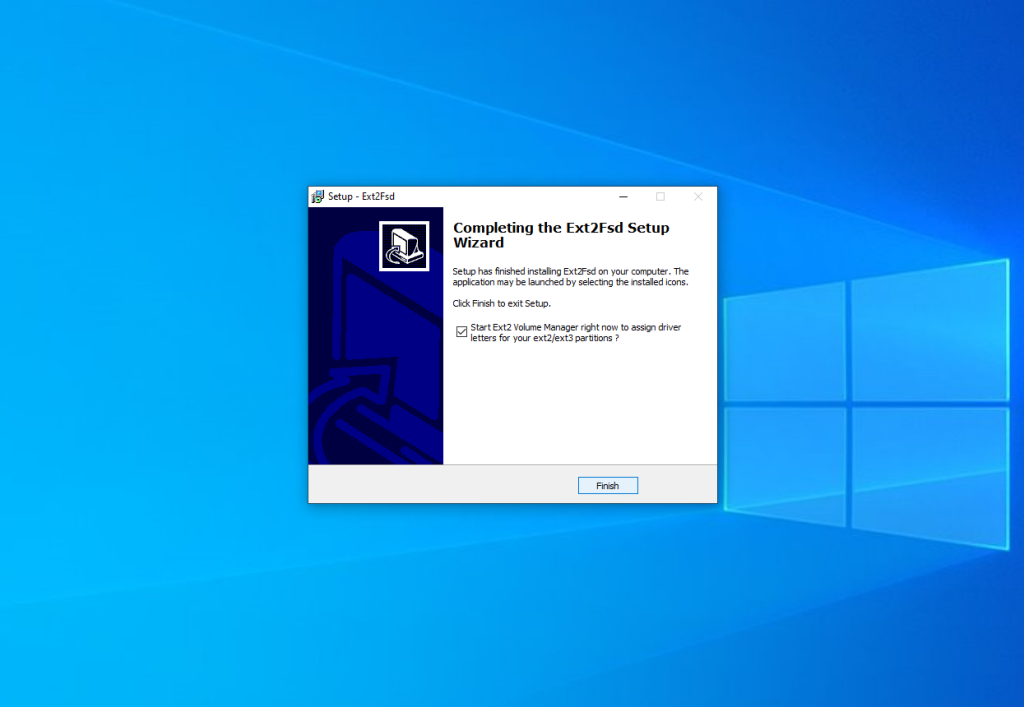
Установите необходимые галочки и еще несколько раз нажмите кнопку Далее. В последнем окне мастера установки отметьте галочку Start Ext2 Volume Manager right now to assign drive letters for your ext2/ext3 partitions для того чтобы запустить менеджер разделов:
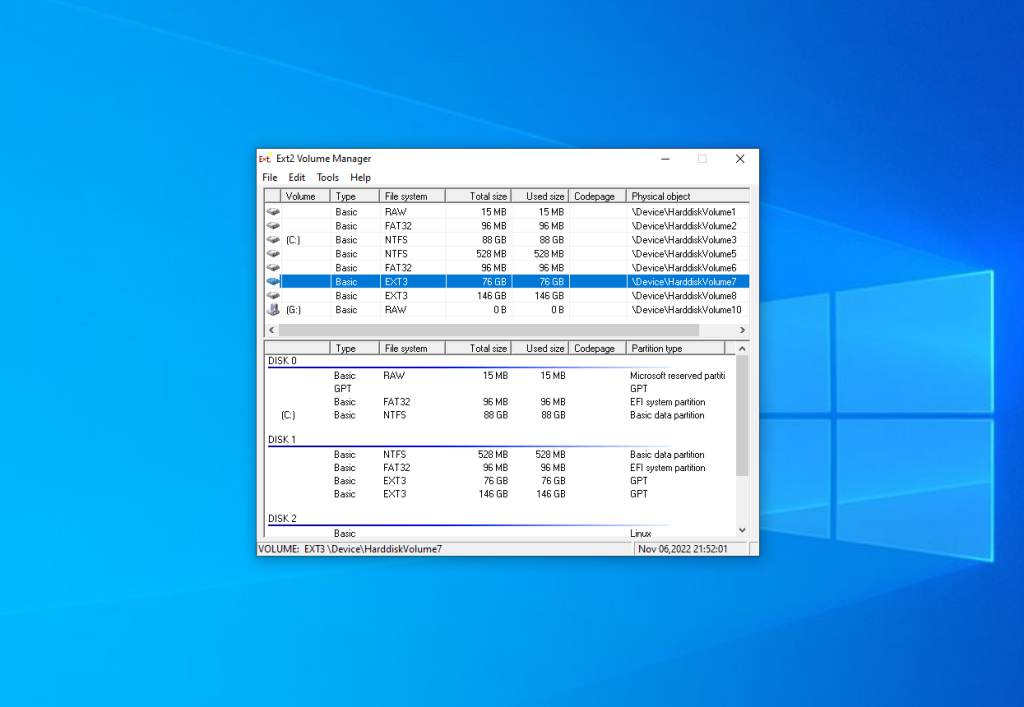
Главное окно программы выглядит вот так:
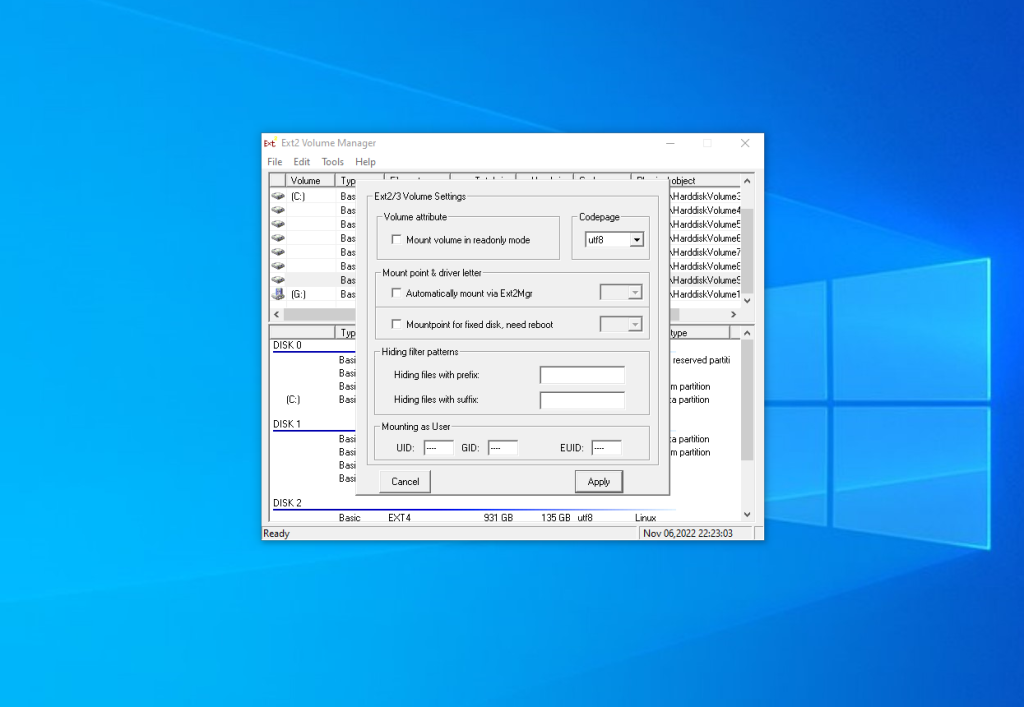
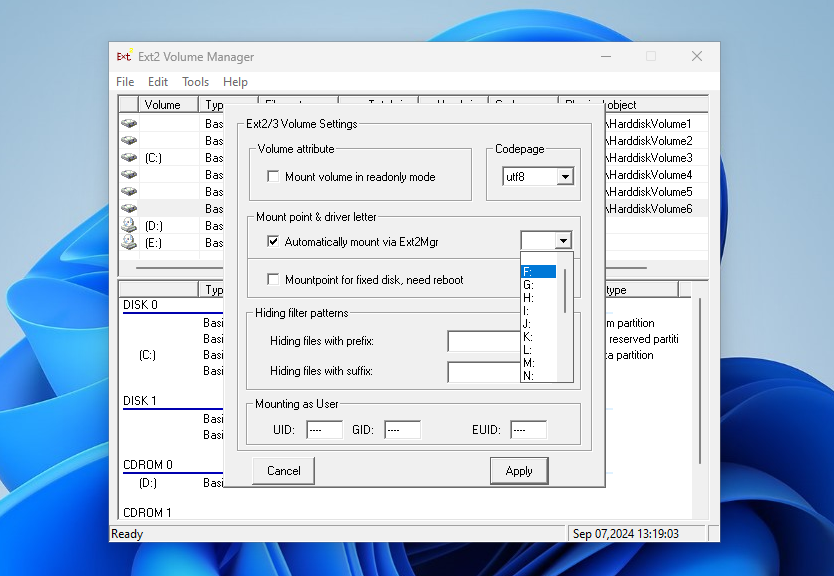
Здесь в в списке показаны все доступные разделы, их размер и файловая система. Для того чтобы примонтировать любой из разделов выполните на нем двойной щелчок:
Здесь есть два варианта монтирования:
- Automaticly mount via Ext2Mgr - раздел будет подключен сейчас, но только до перезагрузки
- Mountpoint for fixed disk - постоянное автоматическое подключение раздела при старте системы.
С права от поля способа монтирования нужно выбрать букву диска для монтирования.
Также в поле Hiding files with prefix можно указать с какими префиксами файлы нужно считать скрытыми, как вы знаете в Linux считаются скрытыми файлы с префиксом точка. Когда укажите все необходимые параметры нажмите кнопку Apply.
Обратите внимание, что окно настроек монтирования должно выглядеть именно так. Если окно выглядит иначе, значит что-то работает не так. Если программа не работает, убедитесь что нет других запущенных программ для работы с дисками или файловыми системами семейства Ext. Попробуйте переустановить программу.
Теперь открыв This PC вы увидите подключенный диск. С помощью драйвера Ext2fsd вы можете работать с вашими разделами Linux как с обычными NTFS или FAT.
2. Драйвер Ext4fsd (рекомендовано)
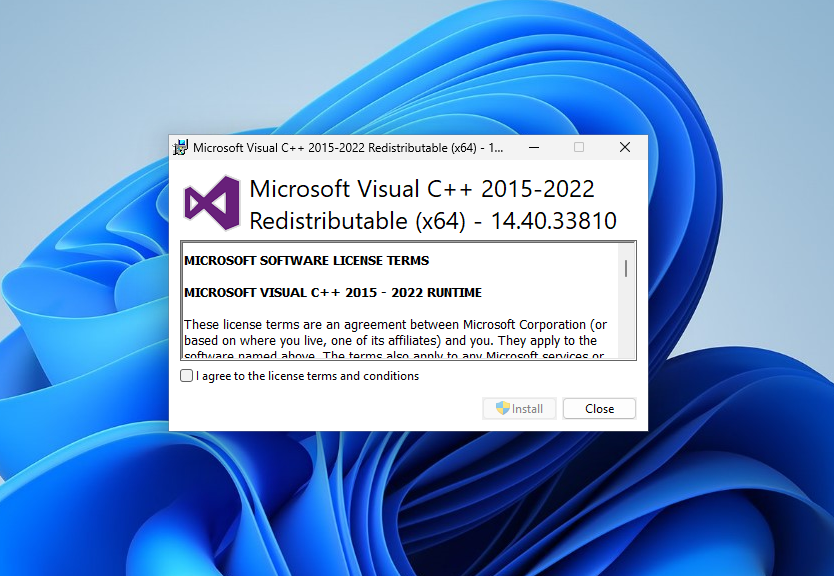
Если вы хотите использовать Ext2fsd в Windows 11, то есть решение. В начале 2024 года был сделан форк Ext2fsd и в нём реализован подписанный драйвер Ext4, который может работать в системах с Secure Boot и поддерживает больше возможностей современной файловой системы Ext4. На момент написания статьи драйвер находится на стадии тестирования, но в моем случае он полностью работает в Windows 11. Прежде чем устанавливать программу необходимо установить Microsoft Visual C++ Redistributable версии не ниже 2017 года. Например отсюда. Запустите установщик и пройдите все шаги мастера установки:
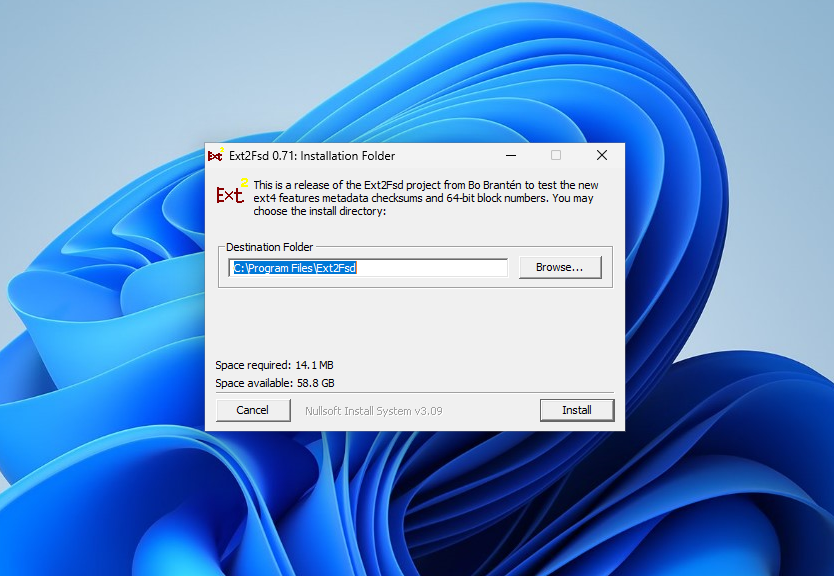
Скачать установщик Ext4fsd можно на странице Releases GitHub репозитория проекта. Установка довольно простая. Нужно нажать Install, и подождать завершения процесса.
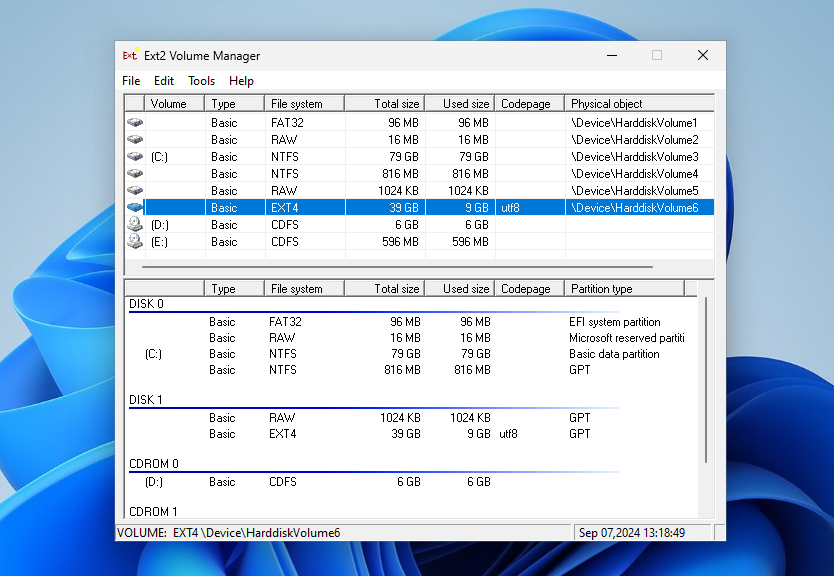
После установки запустите Ext2 Volume Manager из меню приложений системы. Поскольку это форк Ext2fsd тут используется тот же Volume Manager и настройки у него такие же. Вы можете просмотреть все доступные разделы с файловой системой Ext4 в главном окне:
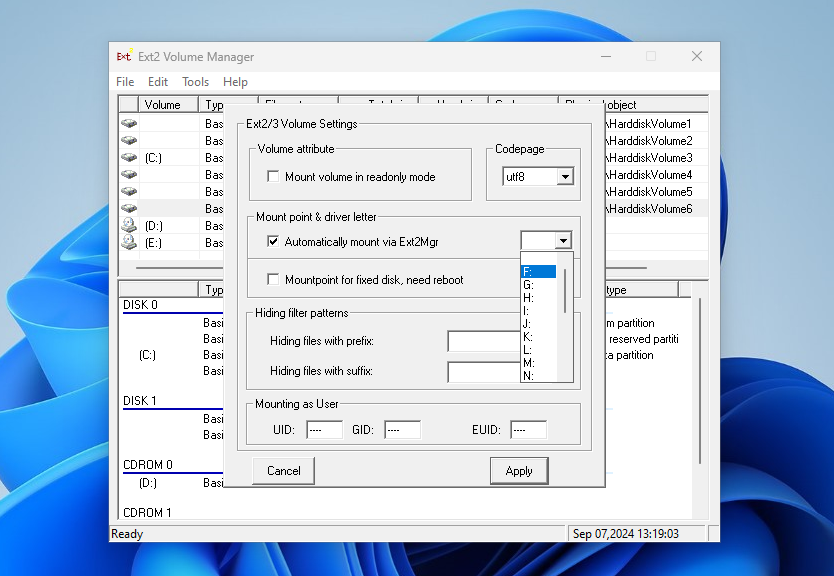
Как и раньше есть два варианта монтирования раздела. Например, поставьте галочку напротив Automatically mount via Ext2Mgr и выберите букву диска, которую хотите использовать:
После этого вы можете найти смонтированный раздел в This PC.
3. Linux Filesystems for Windows от Paragon (пробная версия)
Paragon Software - это та самая компания, которая добавила новый драйвер для работы NTFS в ядро Linux в 2021 году. Также у неё есть программа для работы с Ext4 в Windows. Это такой же драйвер Ext4 Windows как и Ext2fsd. Эта программа активно поддерживается и разрабатывается. Она имеет современный интуитивно понятный интерфейс и примерно ту же функциональность. В интерфейсе вы можете монтировать или размонтировать разделы Ext4 в режиме чтения и записи, а также XFS и Btrfs в режиме только для чтения.
Программа платная, но имеет пробную версию, которой можно пользоваться на протяжении 10 дней, а её цена для личного использования на момент написания статьи составляет около тысячи рублей.
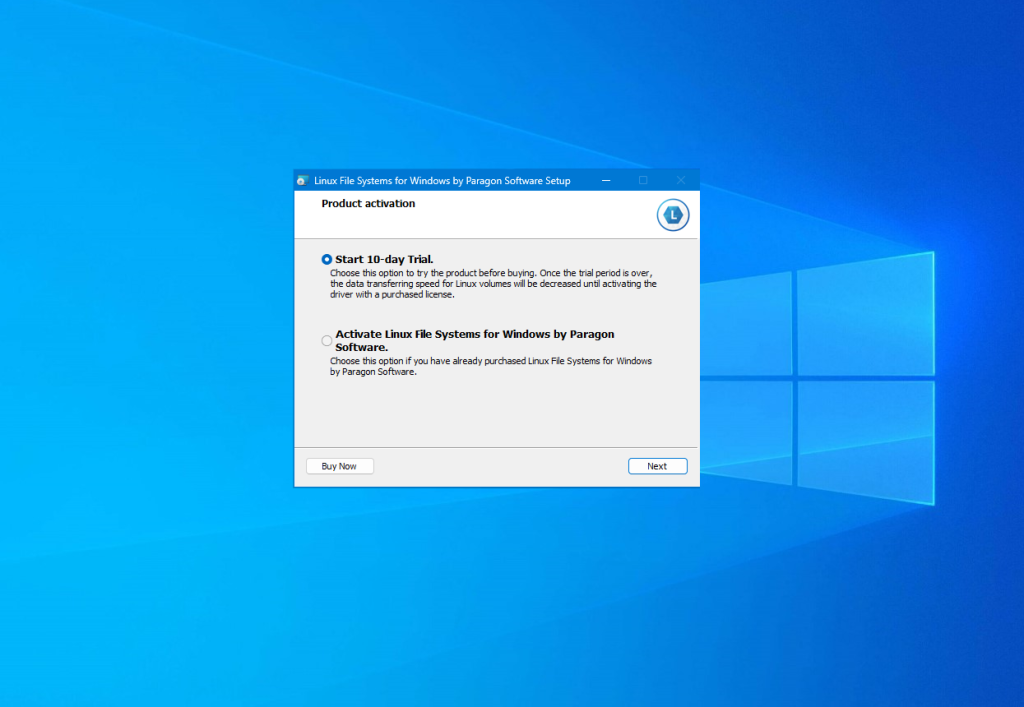
Скачать пробную версию можно изофициального сайта. В процессе установки нет ничего необычного. Достаточно просто нажимать кнопку Next. В одном из окон необходимо выбрать активацию пробного периода или активировать вашу лицензию:
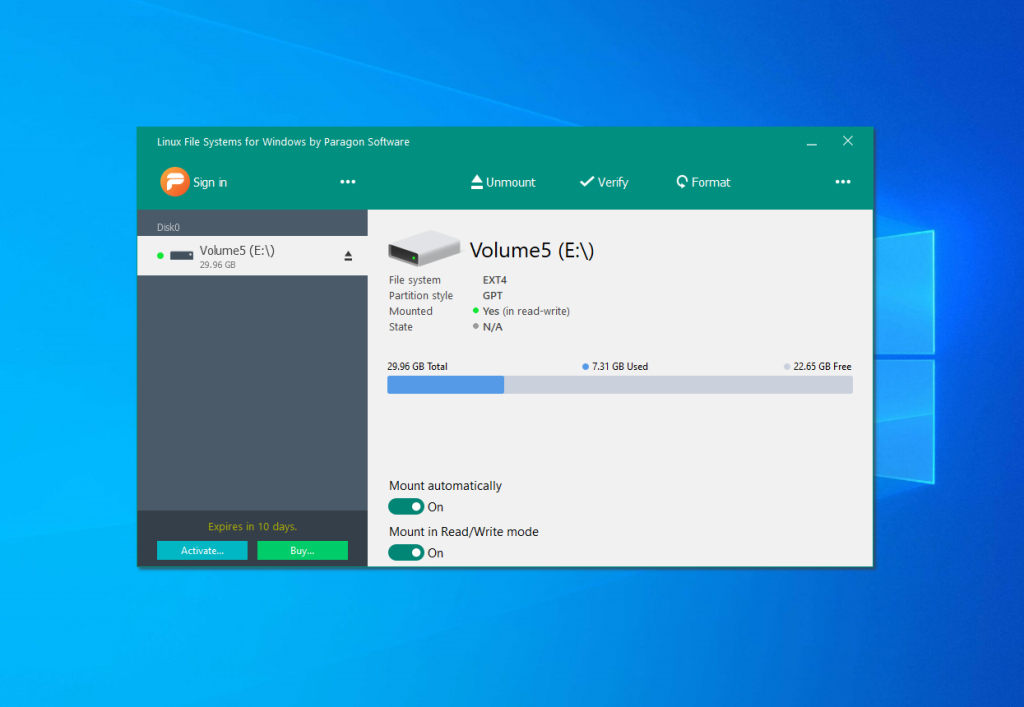
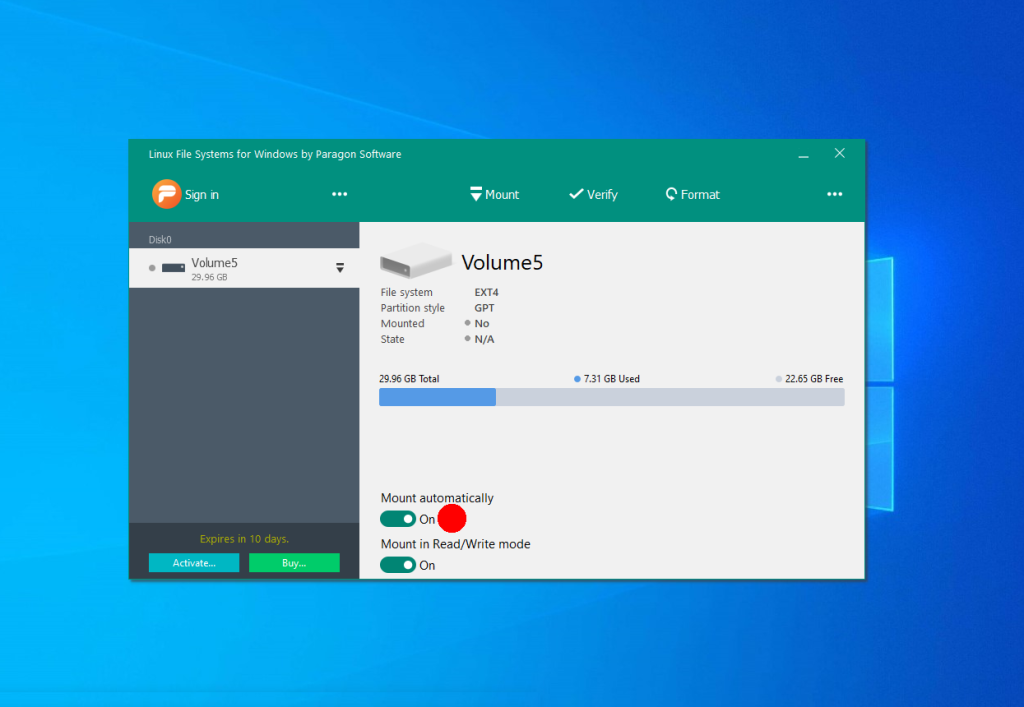
После завершения установки запустится главное окно программы. По умолчанию она автоматически примонтирует все доступные разделы с файловыми системами Linux:
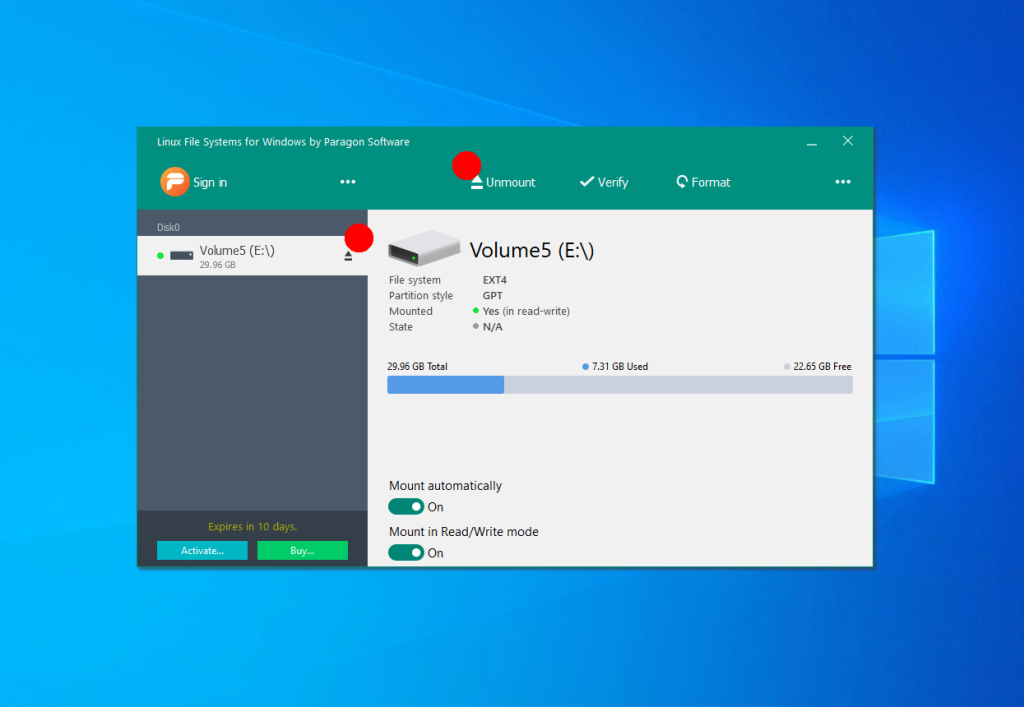
В левой части окна находится список доступных разделов дисков, а в правой подробная информация о каждом разделе. Вы можете размонтировать раздел нажав кнопку Unmount или значок стрелки возле имени раздела:
Кроме того здесь можно проверить раздел на ошибки с помощью кнопки Check или форматировать его. Если вы хотите отключить автоматическое монтирование раздела это можно сделать внизу окна:
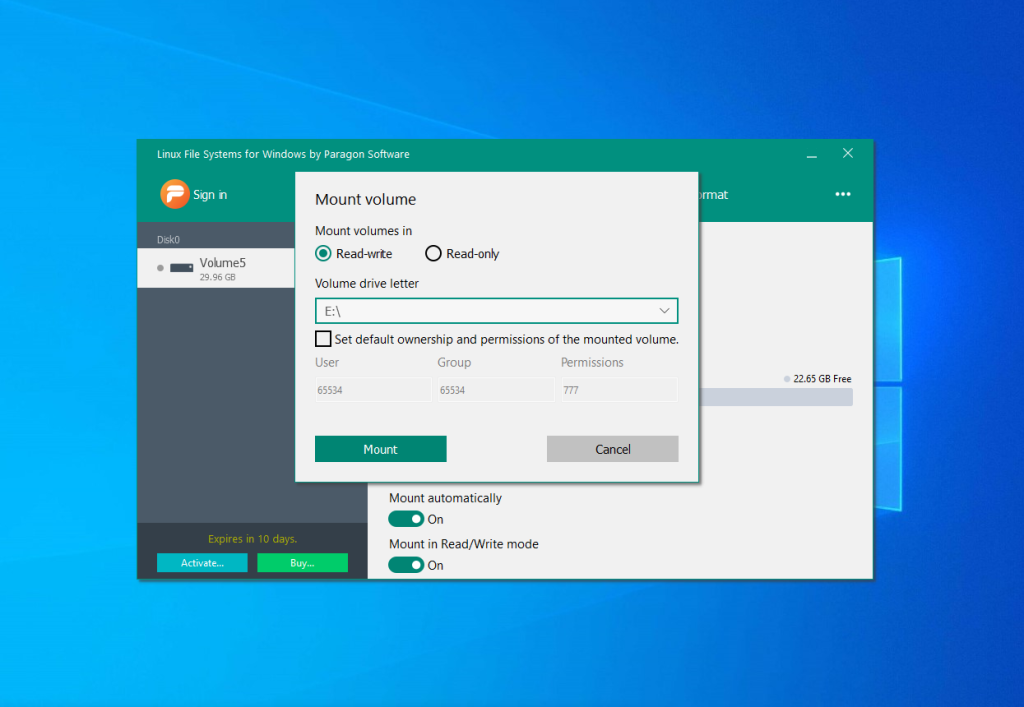
Если раздел не примонтирован, вы можете его подключить нажав на кнопку Mount. После этого программа предложит выбрать режим монтирования, а также букву диска.
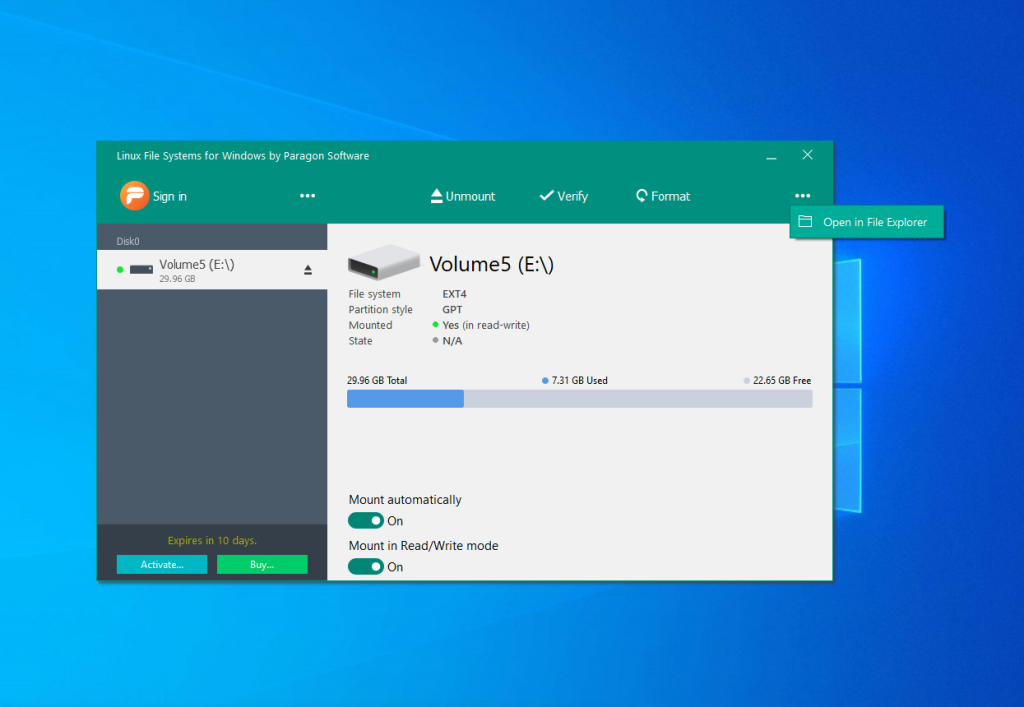
Для того чтобы получить доступ к вашим файлам просто откройте This PC и выберите нужный диск. Теперь Linux разделы доступны в Windows, аналогично тому как это было в Ext2fsd. Также вы можете воспользоваться кнопкой Open in Explorer:
Извлечение файлов из Ext4 в Windows
1. Windows Subsystem for Linux (рекомендовано)
Если вам нужно единоразово получить доступ к Ext4 из Windows чтобы забрать оттуда несколько файлов или наоборот туда что-то записать и вы не хотите устанавливать какое-либо сторонее программное обеспечение, вы можете воспользоваться Windows Subsystem for Linux. Это будет работать и в Windows 10 и 11. В случае с Windows 10 вам понадобится сборка 2004 или более поздняя.
Эта подсистема позволяет запустить окружение дистрибутива Linux в Windows. Например, вы можете запустить окружение Ubuntu, дать ему доступ к нужному диску, затем примонтировать этот диск в этом окружении и получить возможность просматривать файлы прямо в проводнике Windows.
Однако у этого метода есть недостаток. Вам необходимо передать управление целым диском на котором находится нужный раздел дистрибутиву Linux. Если этот диск системный раздел Windows, или на нём существуют другие примонтированные разделы, то ничего не получится и вам нужно будет искать другой способ. Вы можете прочитать об этой проблеме подробнее тут.
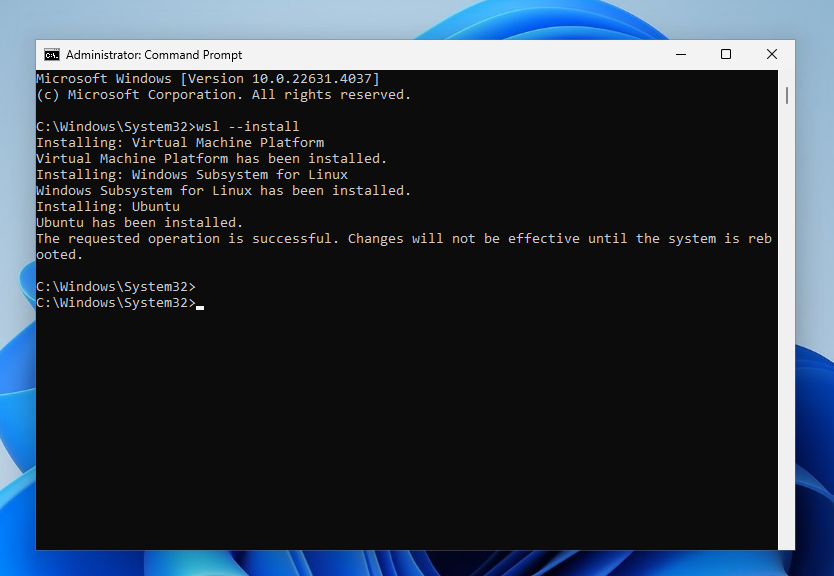
Установить WSL довольно просто. Откройте командную строку от имени администратора или PowerShell и выполните следующую команду:
wsl --install
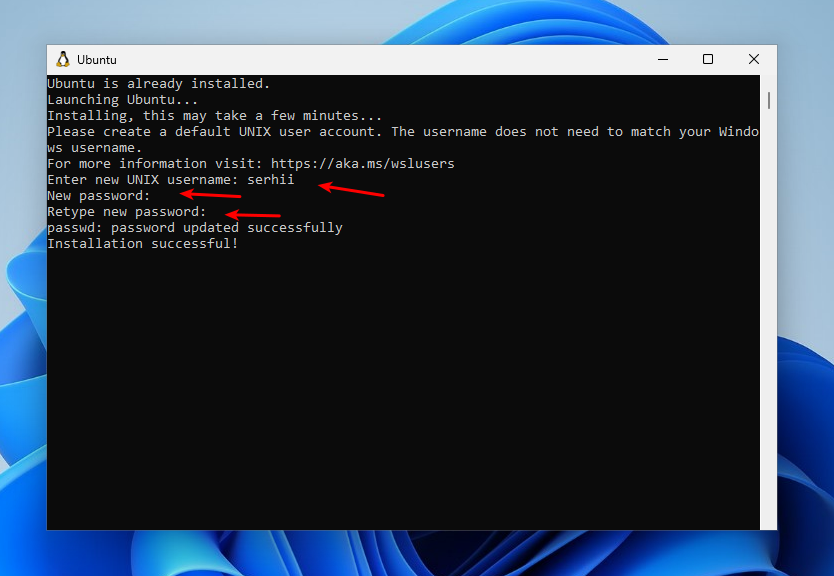
Команда активирует все некобходимые компоненты, скачает и установит окружение Linux. По умолчанию будет использоваться дистрибутив Ubuntu. После выполнения команды нужно перезапустить компьютер. После перезагрузки установка WSL продолжится и вам нужно будет указать имя пользователя и пароль для Linux:
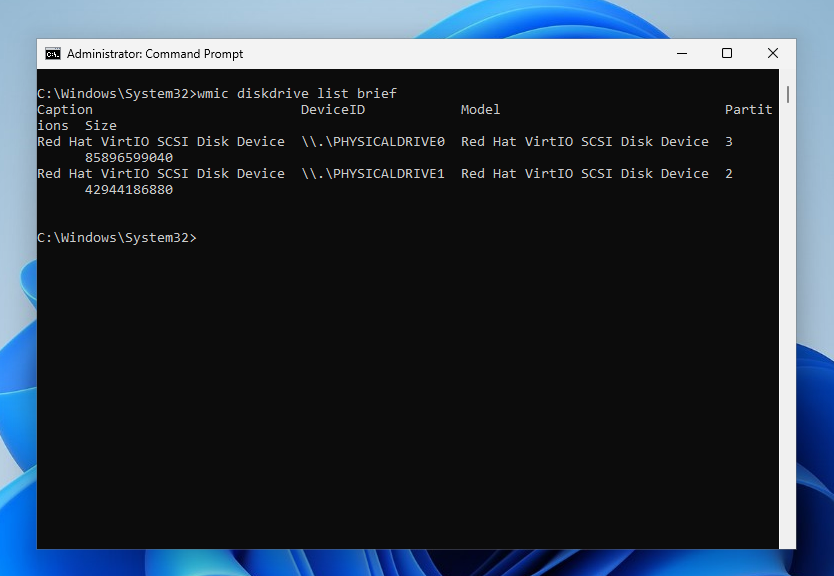
Далее нужно узнать какой диск необходимо пробросить в WSL. Список физических дисков можно посмотреть в командной строке с помощью такой команды:
wmic diskdrive list brief
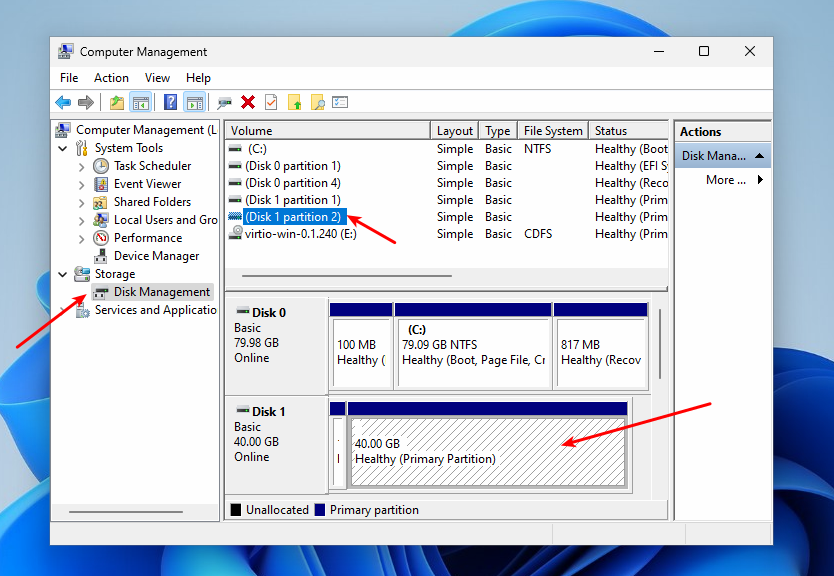
Здесь в поле DeviceID указан идентификатор диска, который вам нужен, а в колоке Size размер. В этом примере на диске \PHYSICALDRIVE0 установлена Windows, а на \PHYSICALDRIVE1 находится раздел Linux, который надо примонтировать. Я могу понять это по размеру, потому что знаю что размер диска с Linux 40Гб. Но удобнее это делать у Диспетчере дисков. Сделайте клик правой кнопкой мышки по This PC и октройте Manage -> Disk Management.
Здесь можно видеть список всех дисков и разделов, а также их размер и метки в формате удобном для чтения.
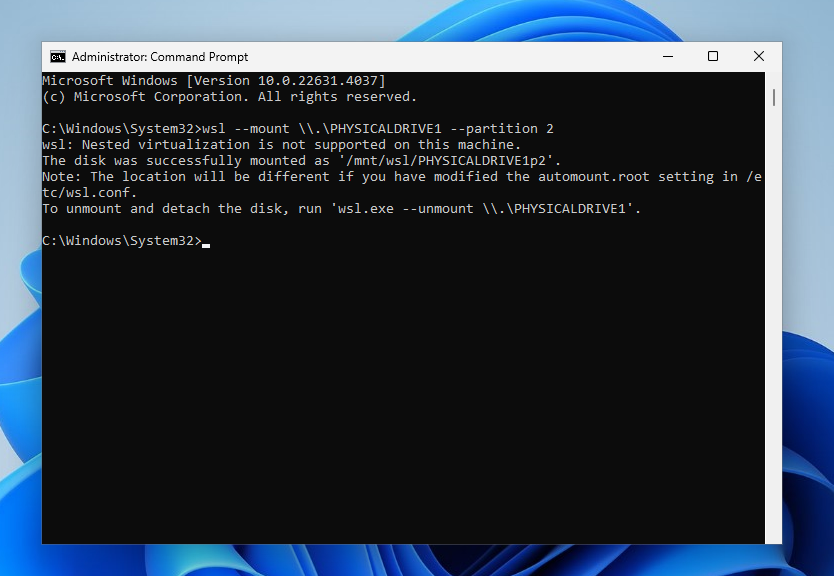
Теперь когда вы знаете номер диска и номер раздела можно использовать команду wsl с опцией mount, которая сделает всю работу за вас. Например:
wsl --mount \.PHYSICALDRIVE1 --partition 2
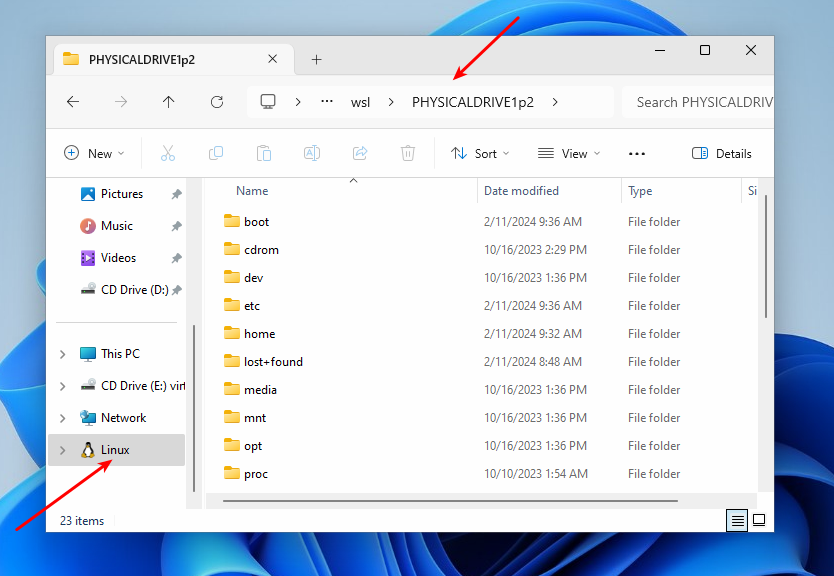
После этого раздел будет смонтирован внутри WSL в папке /mnt/wsl/PHYSICALDRIVE1p2. И более того, вы можете открыть его в проводнике. Откройте Linux -> Ubuntu -> /mnt/ -> wsl и название вашего диска.
Для того чтобы размонтировать диск выполните такую команду:
wsl --unmount \.PHYSICALDRIVE1
Если во время монтирования вы получили ошибку WSL_E_ELEVATION_NEEDED_TO_MOUNT_DISK - вам необходимо запустить командную строку от имени администратора. Если вы привыкли пользоваться командной строкой, то это один из самых простых способов открыть Ext4 в Windows.
2. Diskinternals Linux Reader (только чтение)
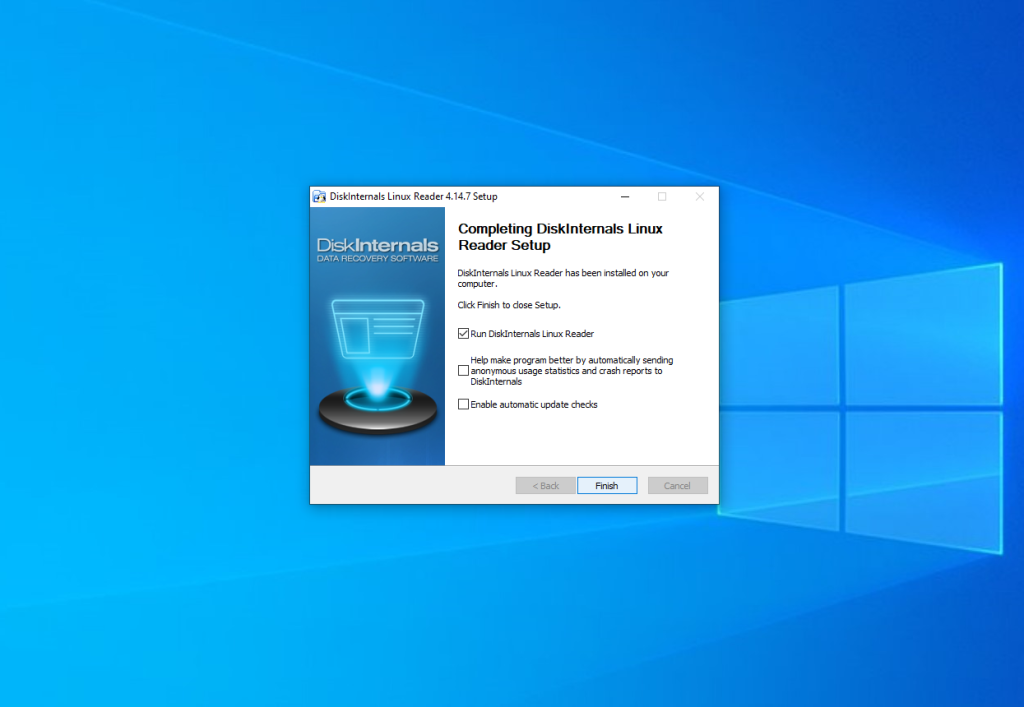
С помощью программы DiskInternals Linux Reader вы можете извлечь файлы из раздела с файловой системой Ext4 не добавляя её поддержку саму систему. Однако обратите внимание, что с помощью этой программы вы можете только копировать файлы из Linux, но не можете их редактировать. Скачать программу можно наофициальном сайте. Установка программы сводится к нажатию кнопки Далее:
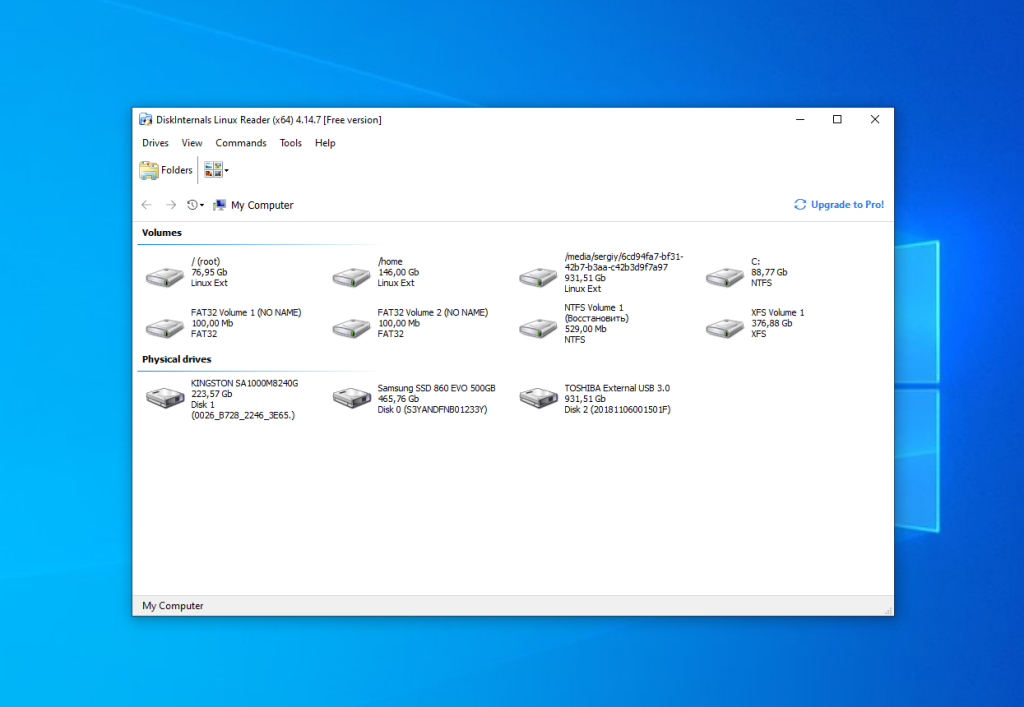
Главное окно программы выглядит вот так:
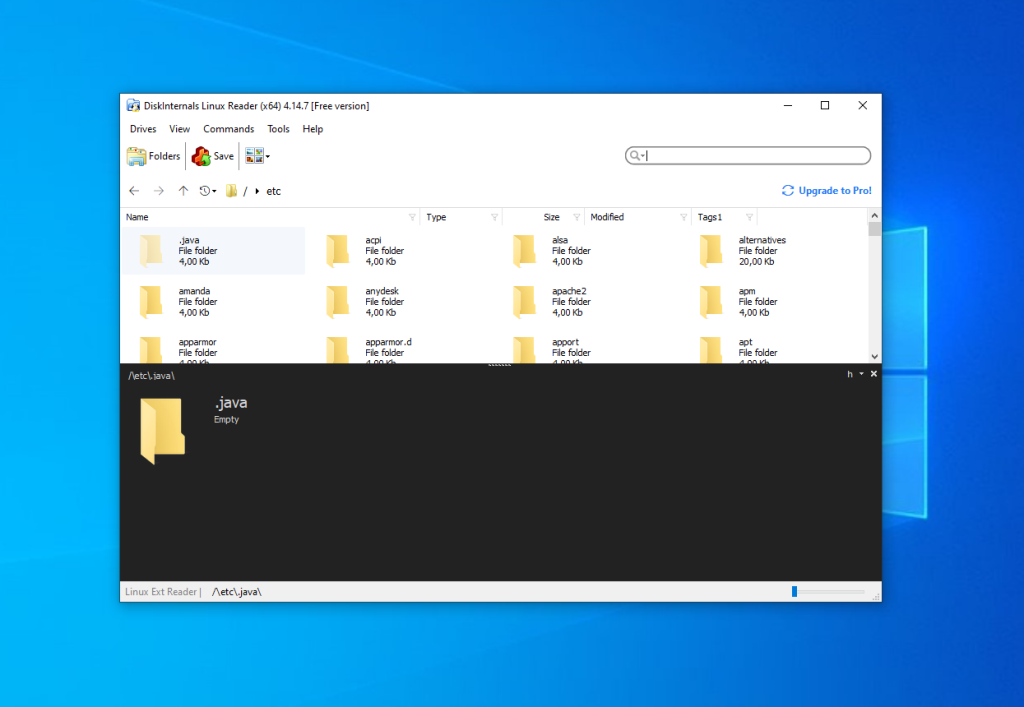
Здесь вы можете выбрать нужный раздел с файловой системой Ext4 и просмотреть все файлы, что там есть:
Тут поддерживается поиск, просто введите имя файла, который хотите найти и программа подсветит его в списке:
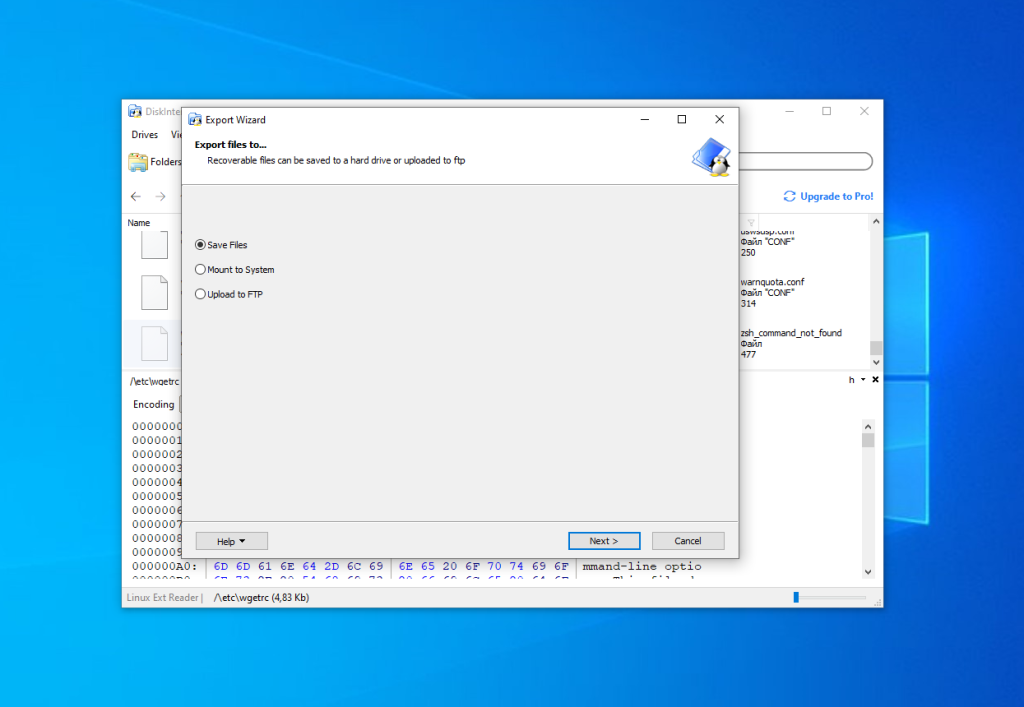
Чтобы извлечь любой из файлов или папку, кликните по ней правой кнопкой мыши и выберите Save, затем выберите пункт Save files:
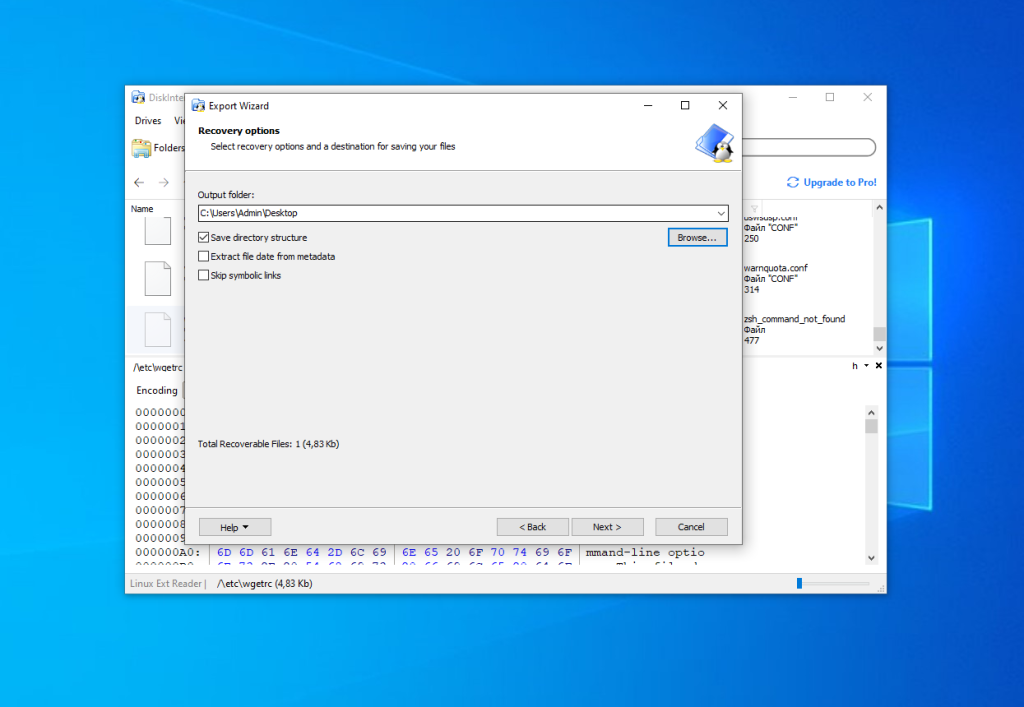
Далее выберите папку, в которую будет сохранен ваш файл:
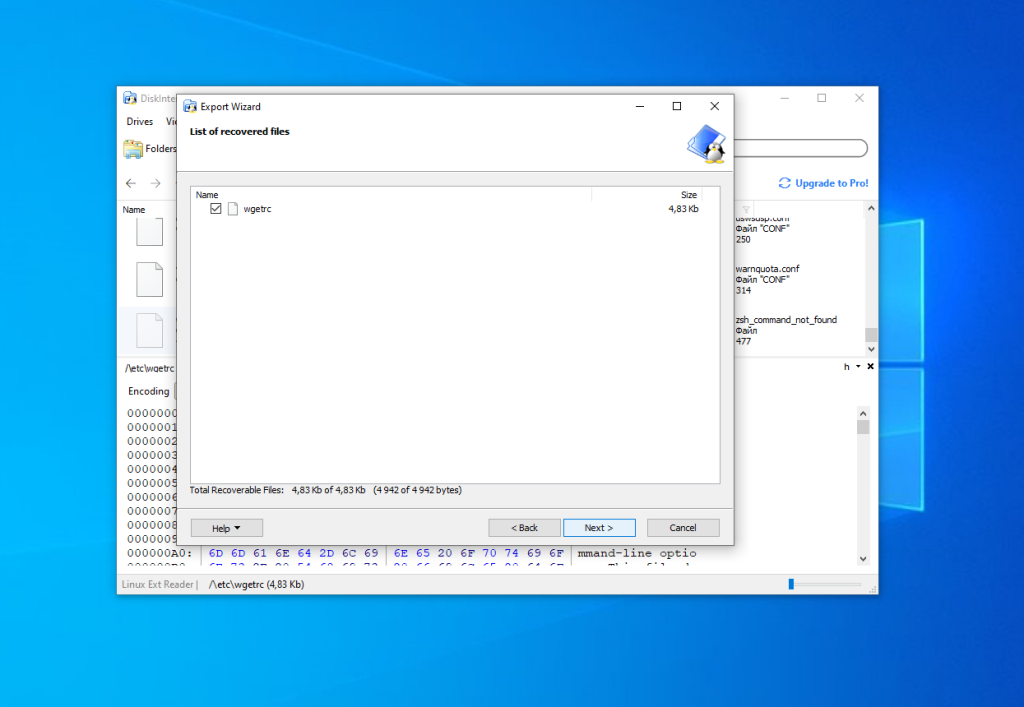
Чтобы сохранить структуру папок нужно отметить флажок Save directory structure. Затем нужно подтвердить список файлов для экспорта:
После этого дождитесь завершения процесса копирования и можете делать с полученными файлами все что нужно уже в проводнике.
Выводы
Теперь вы знаете как открыть Ext4 в Windows 10 и 11. Драйвер с открытым исходным кодом Ext2fsd всё ещё работает не смотря на то что давно не обновлялся, а если он не работает в вашеим случае, то можно попробовать использовать Ext4fsd, WSL или утилиту от Diskinternals.
Существуют и другие инструменты, не рассмотренные в этой статье. Например, e2explore, его разработка была прекращена в 2012 году и мне не удалось его запустить. Существуют также утилиты, позволяющие конвертировать Ext4 в NTFS, но будьте аккуратны с ними, ни в коем случае нельзя конвертировать корневой или домашний раздел, потому что это сломает систему.
Proton Drive — это облачное хранилище со сквозным шифрованием от компании, которая создала Proton Mail, которое может стать хорошей заменой Google Диску. Вы получаете синхронизацию между устройствами, общий доступ к файлам, онлайн редактирование текстов и даже таблиц, удобные приложения для всех платформ, но с гарантией, что ваши данные останутся исключительно вашими и никто не будет тренировать на них AI. В бесплатной версии доступно 5 ГБ места на диске с возможностью покупки дополнительного пространства. Посмотреть детали

к сожалению программа ext2fds НЕ работает на Windows 10 (версия Pro с обновлениями).
Программа ставится, запускается, но главное окно программы так и не появляется, в т.ч. при запуске от имени администратора, хотя в списке запущенных процессов она висит. При этом Windows при перезагрузках начинает задумываться по 5 минут... Опробовано с последними версиями ext2fds 0.65 b 0.66. На офиц.сайте программы указана совместимость только по 8ю версию винды.
С поставленной задачей отлично справилась бесплатная программа Paragon_ExtFS_for_Windows, диски с ext4 появились без каких-либо настроек.
По состоянию на ноябрь 2016 последняя версия драйвера нормально функционирует с профессиональной десяткой
Мне кажется тут дело в ВиндоЗащитнике. У вас включен SmartScreen? Зачастую он тормозит систему, когда пытается искать руткиты
а у меня на виндовс 10 про версия 18 03 64 бит работает все....да и вообще нареканий нет к этой проге..у меня три винды..на всех работает исправно...
ОНА ПЛАТНАЯ
Не болтай ерундой! Ext2Fsd под лицензией GPL распространяется.
Он видимо про Paragon_ExtFS_for_Windows
В винде (в моём случае - "семёрка") я пользуюсь wfx-плагином для Total Commander (подходит и для виндовской версии Double Commander) "Disk Internals Reader". С помощью этого плагина можно прочитать (только чтение !) любой линуксовский или виндовский раздел, в т.ч. "System Volume Information".
П.с.: Для использования плагина командер необходимо запускать от имени администратора.
Подтверждаю. После установки этого говна - винда с последними патчами запускается но на этом всё. Прождал пол часа - первое окно которое успеешь запустить появляется, а потом ничего не открывается. Промучался с установкой safe mode через загрузочную флешку, только потом смог удалить этот драйвер. До перезагрузки процесс манагера этого драйвера не убивался даже через process explorer, не удалялась программа стандартными средствами. Короче откровенное фуфло, не рекомендую.
Ник говорящий, ведь сказали же про совместимомть...
С LWM программа не работает
Админ, хороший сайт, отличные статьи, многократно они выручали, но ты заебал путать где нужен, а где не нужен мягкий знак! С уважением, твой читатель.
Даже не замечаль. Но сайт правда классный. Так держат!!! Мы с тобой!!!
Windows 10 home нормально работает, единственнное что нельзя исполняемые файлы запускать почему-то. Записывать/удалять файлы можно, а вот это не работает
У меня не запускается ext2fsd ни в winXP, ни в семёрках. По-моему, так у всех; программа - мимо.
У меня программа ext2fsd работает, но по ходу повредила файловую систему, linux не загружается.
Зачем устанавливать совмищалки когда раз установи linux и не мучай нижнее место
Затем, что две системы на борту, и чтобы не копировать файлы из одной в другую, а работать с ними из любой запущенной.
Сейчас при установке, если не убрать галочки, или при запуске на windows 10 (v2004) Ext2Fsd-0.69, появляется синий экран с ошибкой cash_manager. Ну а если не убрали галочки, при запуске опять ошибка с синим экраном, спасает удаления Ext2Fsd.SYS с папки windows/sistem32/drivers/
Есть более простое, хотя и ограниченное средство монтирования ext4, встроенное в механизм WSL2 в винде. С официального сайта https://devblogs.microsoft.com/commandline/access-linux-filesystems-in-windows-and-wsl-2/
Делается примерно так:
wsl --mount
Тоже не сработало.
https://docs.microsoft.com/ru-ru/windows/wsl/wsl2-mount-disk
А вот документация по функции монтирования дисков с помощью WSL2
Поставил программу, мне удалось на Windows 11 открыть образ и поменять там данные
подключаю диск на 415 гигов а комп его не видит! файловая система ext4!! там жму монитровать а он предлагает отформатировать, каловая программа не обновляется с 2017
Поставил в 2022, в Windows 11 Home. Полёт нормальный.
Поставил ext2fsd сентябрь 2022 на windows 10 - прога запускается, видит разделы, монтирует, но реально ничего не работает - попасть в разделы и увидеть файлы нельзя...
Поставил ext2fsd, всё запустилось. Вот только почему-то Винда увидела нужный раздел как ext3, а не ext4. Попробовал открыть, а система говорит, что перед использованием раздел надо отформатировать. Спасибо, поржал.
ничего не работает, не видит или не открывает
удалите статью не вводите людей в блуд
В WSL кто копипастит обратите внимание "wsl --mount \\.\PHYSICALDRIVE1 --partition 2"
С двумя \\ в начале указания диска, как на скрине. Отправил Ctrl+Enter
Спасибо, исправлено.
Парагон категоричне лайно, яке не дає видалитись (( нормального Uninstall у нього немає. п.с.: і мою проблему він теж не вирішив...
Що саме не працює з видаленням? Я видаляв через класичну утиліту видалення програм в Windows (Control Panel -> Programs -> Uninstall Program). Можливо залишались якісь тимчасові файли, але сама програма видалялась.
А в чём проблема смонтировать отдельный от ОСей диск для данных в NTFS? И складывать туда фалйы как под линуксом так и под виндой?
К чему этот гемморой и обучение людей какой-то дряни?