В предыдущей статье я рассказал, как установить Ubuntu 23.04, а сегодня хочу продолжить эту тему. После установки система выглядит довольно хорошо, но есть несколько вещей, которые можно сделать, чтобы система стала ещё лучше. Например, вы можете настроить рабочую среду GNOME под себя, включить или отключить некоторые функции и установить необходимые приложения.
В этой статье я покажу, как настроить Ubuntu 23.04 после установки. В статье будет не только информация как настроить всё в графическом интерфейсе, но и команды терминала для каждого шага.
Содержание статьи
Как настроить Ubuntu 23.04 после установки
Шаг 1. Изменение фона
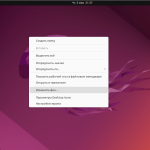
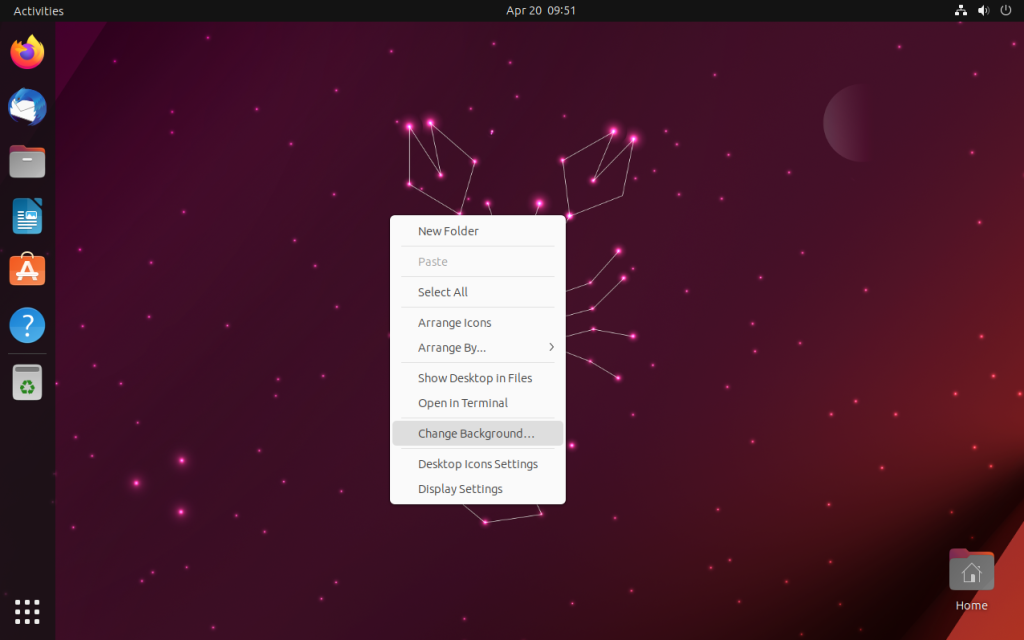
Первое, что я делаю после установки нового дистрибутива - это меняю фон рабочего стола. Для этого нужно кликнуть правой кнопкой мыши по рабочему столу и выбрать пункт Change Background (Изменить фон) в контекстном меню:
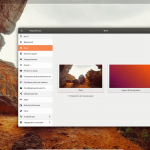
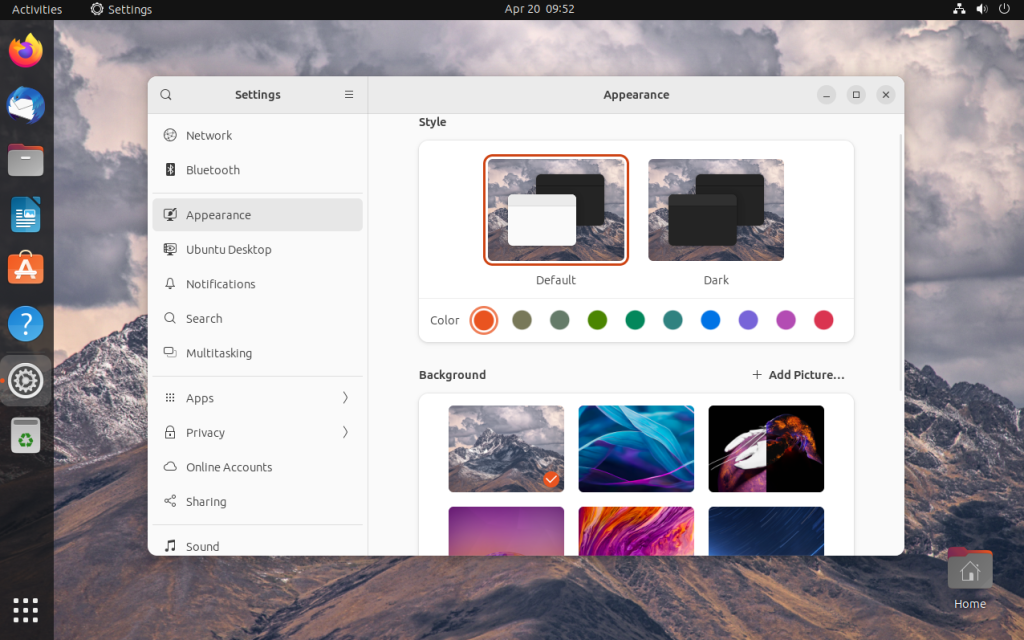
Затем просто выберите одно из доступных изображений или добавьте свое изображение из файловой системы. Например, я выбрал первое изображение:
Если вы хотите изменить обои с помощью терминала, вам нужно отдельно изменить фоновое изображение как для светлой, так и для темной темы, а также для экрана блокировки. Используйте следующие команды, чтобы установить фотографию с горами в качестве обоев:
gsettings set org.gnome.desktop.background picture-uri 'file:///usr/share/backgrounds/Copper_Mountain_by_Eduardo_Battaglia.jpg'
gsettings set org.gnome.desktop.background picture-uri-dark 'file:///usr/share/backgrounds/Copper_Mountain_by_Eduardo_Battaglia.jpg'
gsettings set org.gnome.desktop.screensaver picture-uri 'file:///usr/share/backgrounds/Copper_Mountain_by_Eduardo_Battaglia.jpg'
Шаг 2. Настройка терминала
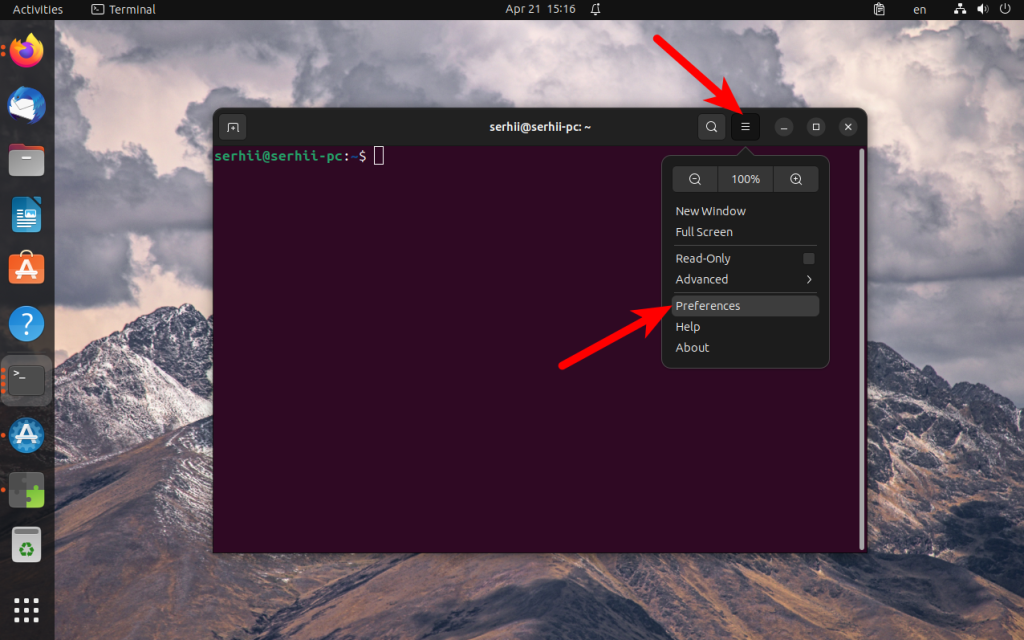
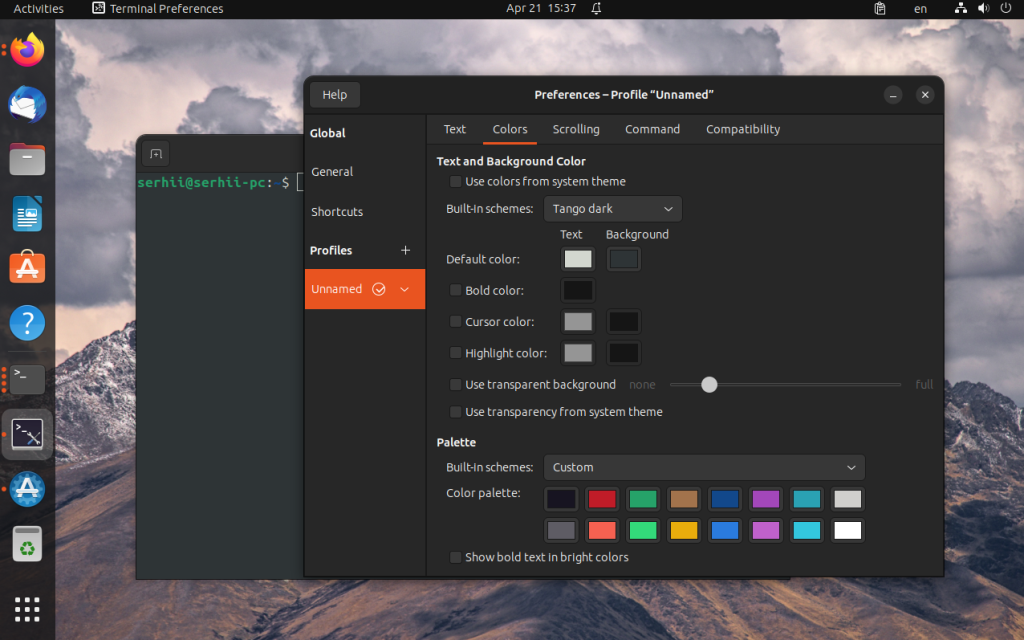
По умолчанию терминал использует цветовую схему операционной системы, и вы можете захотеть сделать его более визуально привлекательным и сочетающимся с вашими обоями. Вы можете открыть окно терминала, используя сочетание клавиш Ctrl+Alt+T. После этого нажмите на кнопку меню в правом верхнем углу и выберите Preferences (Настройки):
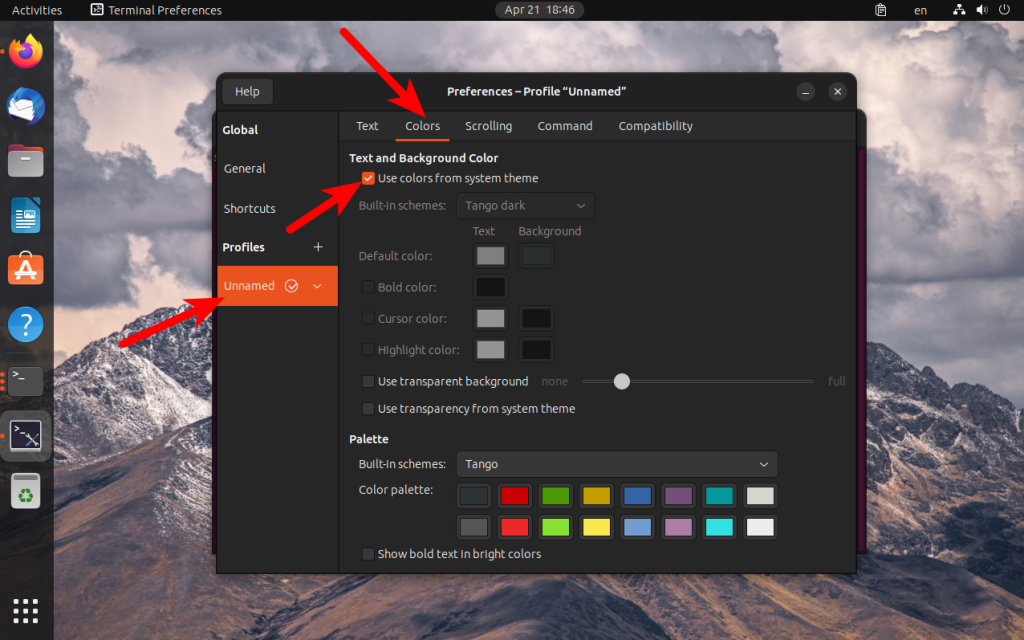
Затем найдите профиль Unnamed (Без имени) и перейдите на вкладку Colors (Цвета), после чего отключите флажок Use colors from system theme (Использовать цвета системной темы):
После этого вы можете выбрать одну из встроенных тем или настроить цвета вручную. Например:
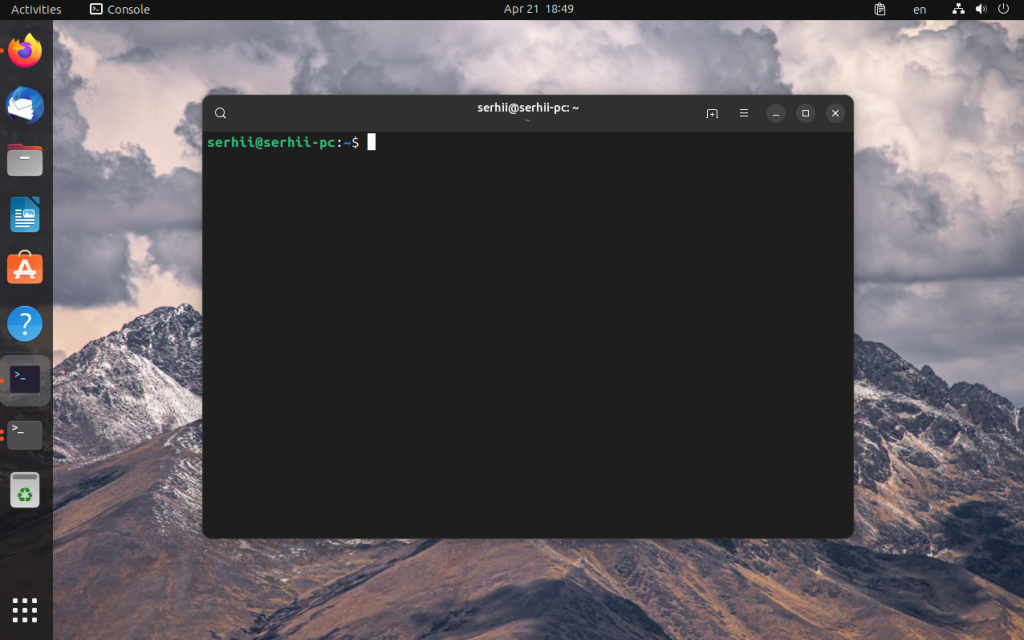
В качестве альтернативы вы можете попробовать новый эмулятор терминала от команды GNOME, разработанный на GTK4 и libadwaita, под названием Console. Он не установлен по умолчанию, но вы можете установить его в системе Ubuntu с помощью следующей команды:
sudo apt install gnome-console
Если вам это нравится, вы можете сделать его терминалом по умолчанию, используя скрипт update-alternatives. Запустите его и выберите нужный терминал:
sudo update-alternatives --config x-terminal-emulator
Здесь вам нужно выбрать /usr/bin/kgx, чтобы сделать Console терминалом по умолчанию.
Шаг 3. Тёмная тема
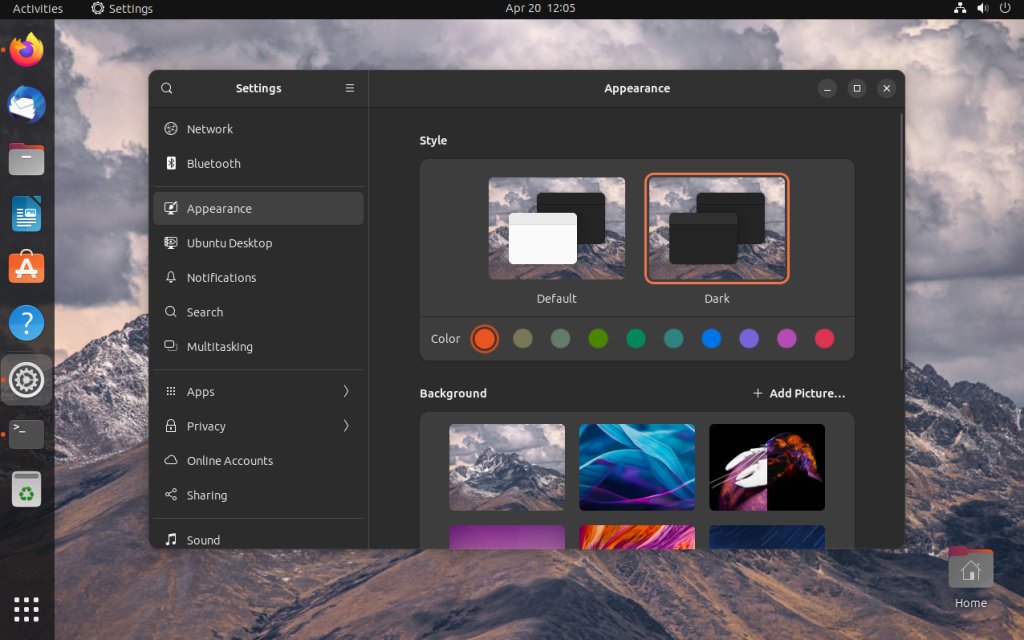
Ubuntu поддерживает тёмную тему начиная с версии 19.10. С тех пор эта функция постоянно улучшалась с каждым последующим релизом. Большинство приложений GNOME, построенных на GTK4, включая Firefox, отлично поддерживают тёмную тему. Если вы не включили его во время установки, вы можете сделать это сейчас, перейдя в Settings (Настройки) -> Appearance (Внешний вид) и изменив параметр Style (Стиль) на Dark (Тёмный):
Аналогично это можно сделать в терминале:
gsettings set org.gnome.desktop.interface color-scheme prefer-dark
gsettings set org.gnome.desktop.interface gtk-theme 'Yaru-dark'
Шаг 4. Отключение блокировки экрана
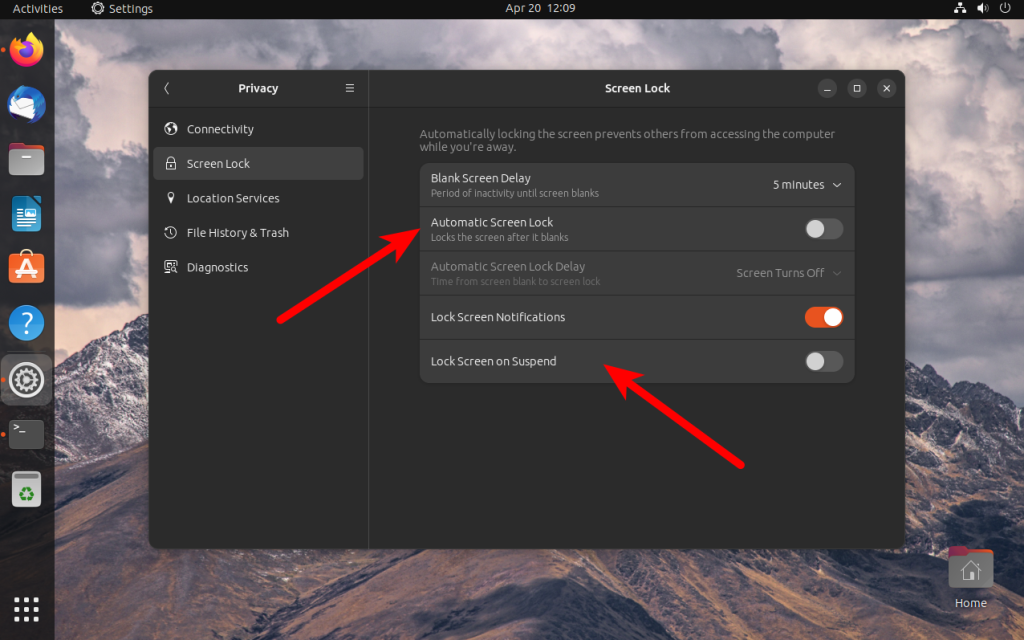
По умолчанию Ubuntu блокирует экран после 5 минут бездействия. Если вы установили Ubuntu на домашний компьютер и не хотите постоянно вводить пароль, вы можете отключить автоматическую блокировку. Откройте Settings -> Privacy -> ScreenLock и отключите Automatic Screen Lock и Lock Screen on Suspend:
Вот команды, которые можно использовать для отключения блокировки экрана в терминале:
gsettings set org.gnome.desktop.screensaver lock-enabled false
gsettings set org.gnome.desktop.screensaver ubuntu-lock-on-suspend false
Шаг 5. Включение активных углов
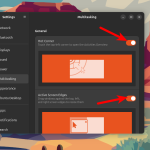
Рабочий стол GNOME уже давно поддерживает функцию активных углов, но в Ubuntu она по умолчанию отключена. Тем не менее, эта функция весьма полезна, так как позволяет открывать меню Обзор с поиском и списком окон, просто переместив курсор мыши в левый верхний угол экрана. Вы можете включить эту функцию, открыв Settings -> Multitasking и активировав Hot Corner:
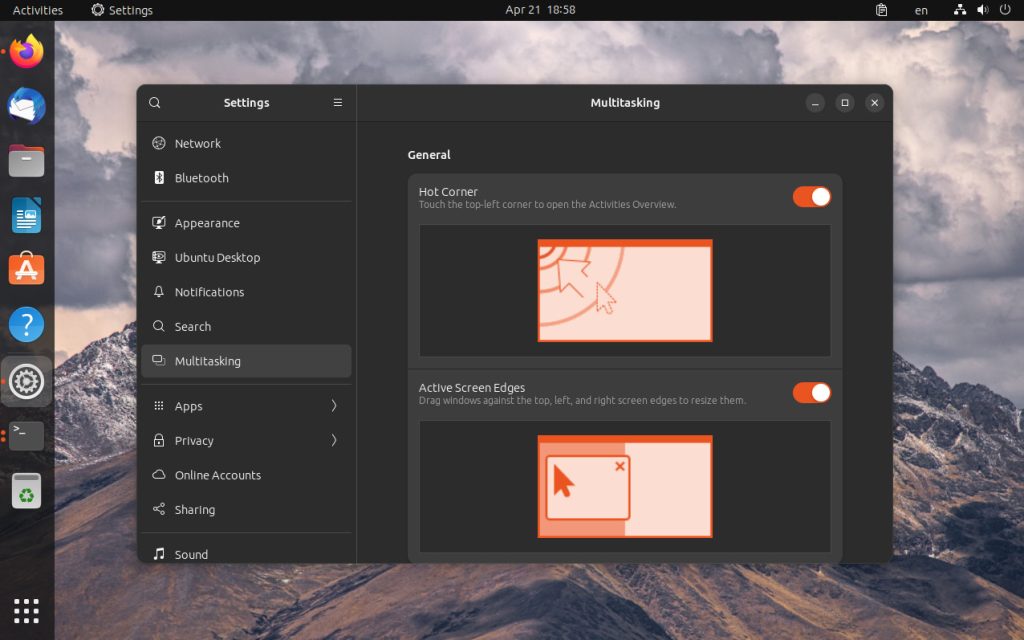
И команда терминала:
gsettings set org.gnome.desktop.interface enable-hot-corners true
Шаг 6. Срыть ярлык домашнего каталога
В GNOME долгое время были ярлыки домашнего каталога и внешних дисков на рабочем столе. Но теперь GNOME стремится к полностью пустому рабочему столу. Возможность размещать файлы на рабочем столе была отключена некоторое время назад, и я не помню, когда в последний раз использовал ярлык домашней папки, поскольку могу получить к ней доступ, запустив Nautilus. Вы можете отключить этот ярлык, перейдя в Settings (Настройки) -> Ubuntu Desktop (Рабочий стол Ubuntu) и отключив опцию Show Personal Folder (Показывать домашнюю папку):
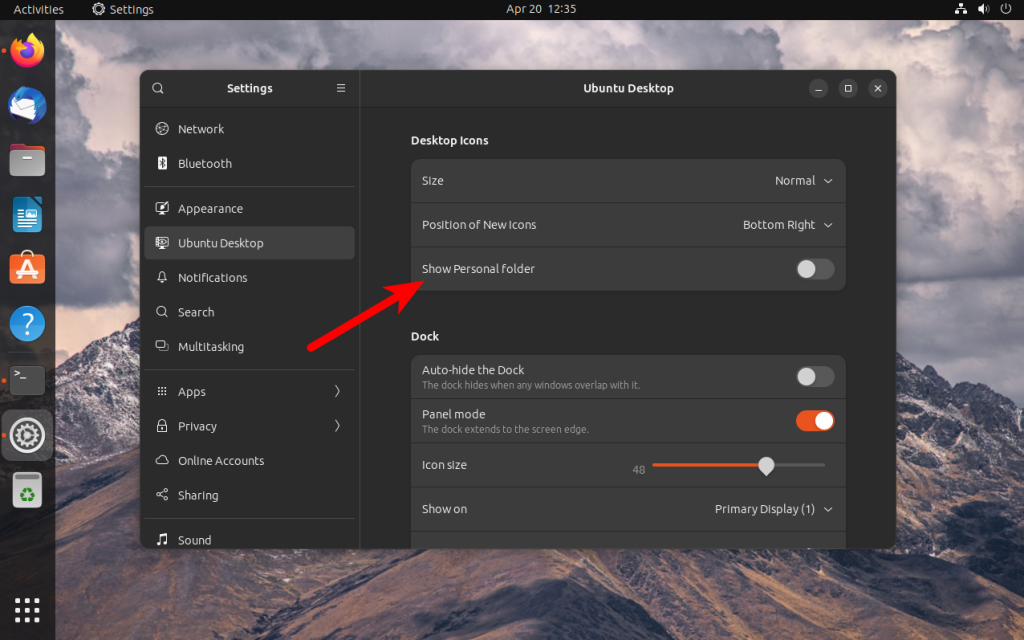
А вот команда терминала для этой же настройки:
gsettings set org.gnome.shell.extensions.ding show-home false
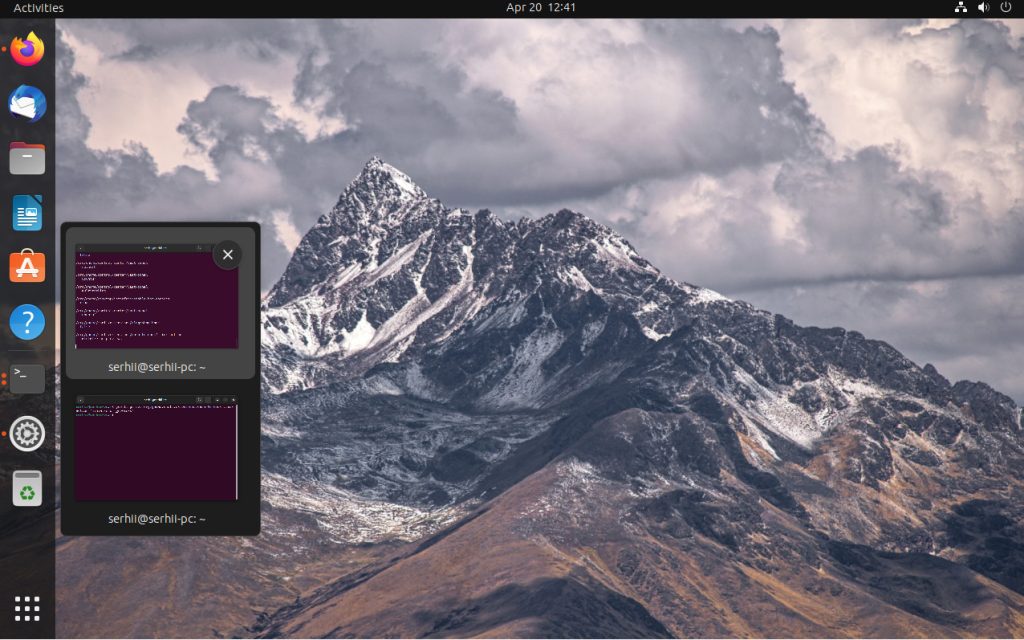
Шаг 7. Сворачивание по клику
Когда вы кликаете по ярлыку приложения на док панели, система открывает приложение. Но при повторном нажатии ничего не происходит. Вы можете настроить GNOME так, чтобы приложение сворачивалось при нажатии на его значок, если оно уже открыто. Сделать это в графическом интерфейсе нельзя, но можно использовать команду:
gsettings set org.gnome.shell.extensions.dash-to-dock click-action 'minimize-or-previews'
После этого приложение будет сворачиваться, если оно открыто. Однако, если запущено несколько экземпляров приложения, вы увидите предварительный просмотр:
Шаг 8. Центрирование новых окон
По умолчанию все новые окна открываются в верхнем левом углу. Если вы хотите настроить GNOME так, чтобы окна открывались по центру экрана, выполните следующую команду в терминале:
gsettings set org.gnome.mutter center-new-windows true
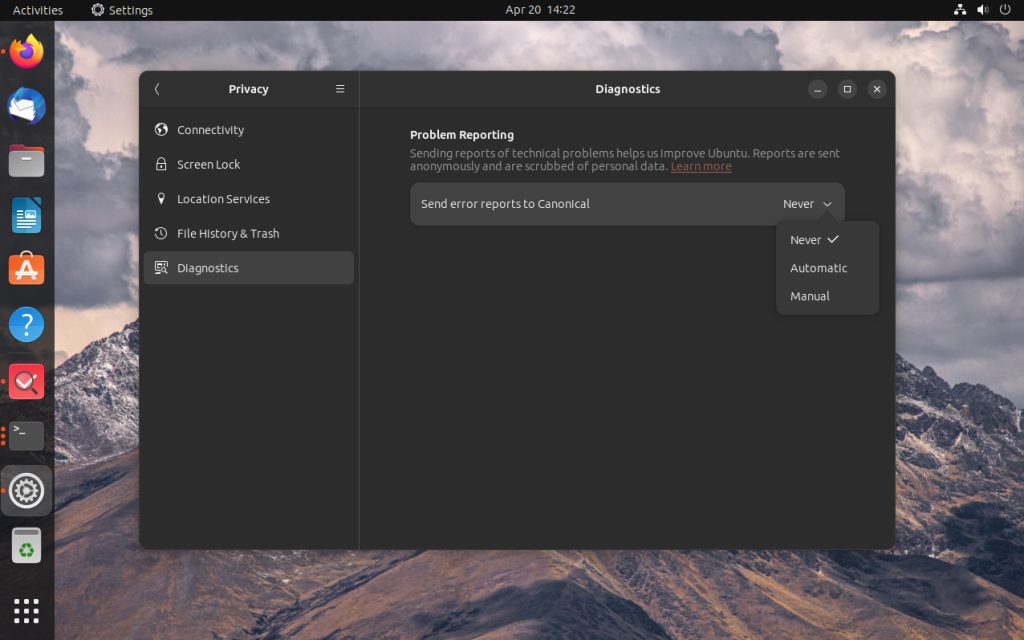
Шаг 9. Отключение отчётов об ошибках
Даже если вы отключили сбор и отправку отладочных данных в Canonical во время первой загрузки, Ubuntu может предлагать отправить отчёт в Canonical при сбое любой системной программы. Вы можете отключить это, если не планируете отправлять какие-либо отчёты об ошибках. Однако следует отметить, что лучше уведомлять разработчиков о проблемах в их дистрибутиве. Если вы всё же хотите отключить эту функцию, перейдите в Settings (Настройки) -> Privacy (Конфиденциальность) -> Diagnostics (Диагностика), нажмите на Send error reports to Canonical и выберите Never (Никогда):
Шаг 10. Настройка файлового менеджера
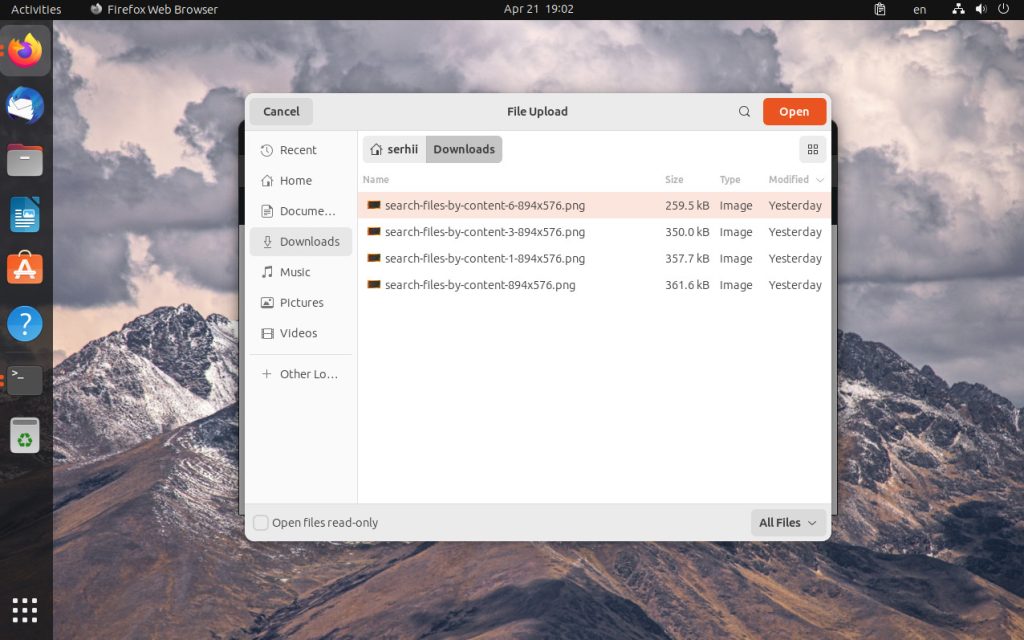
Функция предварительного просмотра изображений в файловом менеджере была удалена в GTK4. Это была очень полезная функция, но есть и хорошие новости. GNOME 44 добавляет режим миниатюр для файлового менеджера вместе с другими новыми возможностями. В предыдущих версиях был доступен только список с маленькими миниатюрами:
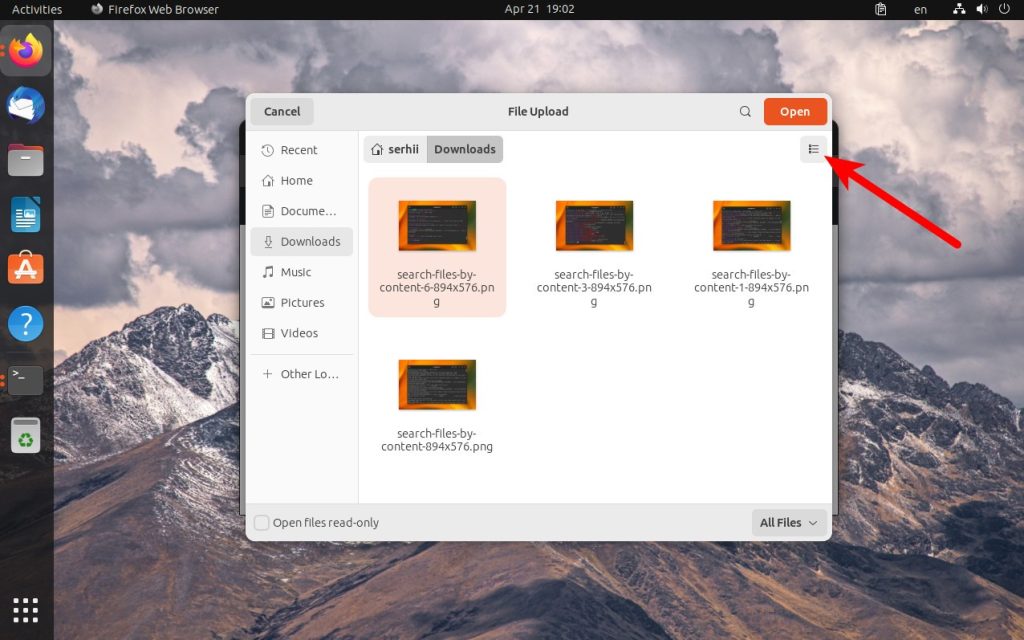
Теперь вы можете переключиться в режим миниатюр с помощью кнопки в правом верхнем углу:
Кроме того, вы можете изменить порядок сортировки элементов в списке. Я считаю наиболее удобным вариантом размещение недавно измененных файлов вверху списка. Файловый менеджер запоминает последние настройки, что-то дополнительно настраивать, но вы также можете установить эти параметры в терминале:
gsettings set org.gtk.gtk4.Settings.FileChooser sort-column 'modified'
gsettings set org.gtk.gtk4.Settings.FileChooser sort-order 'ascending'
gsettings set org.gtk.gtk4.Settings.FileChooser view-type 'grid'
Если вы не видите миниатюры в Nautilus, это может быть ошибкой, и вы можете попробовать включить постоянное создание миниатюр с помощью следующей команды:
gsettings set org.gnome.nautilus.preferences show-image-thumbnails 'always'
Шаг 11. Настройка ночного режима
В Ubuntu есть функция Night Light, которая делает все цвета на мониторе более теплыми после захода солнца. Это помогает подготовиться ко сну и создает более комфортные условия для глаз. Вы можете включить эту функцию в Settings (Настройки) -> Displays (Дисплей) -> Night Light (Ночной свет):
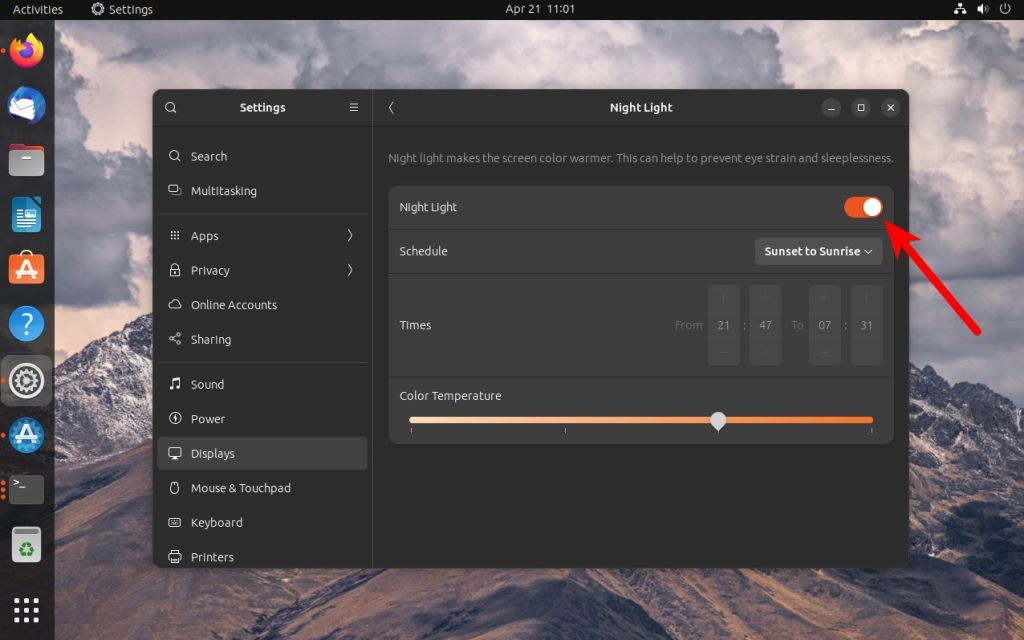
Здесь же вы можете изменить расписание и цветовую температуру. Кроме того, вы можете включить Night Light с помощью командной строки:
gsettings set org.gnome.settings-daemon.plugins.color night-light-enabled true
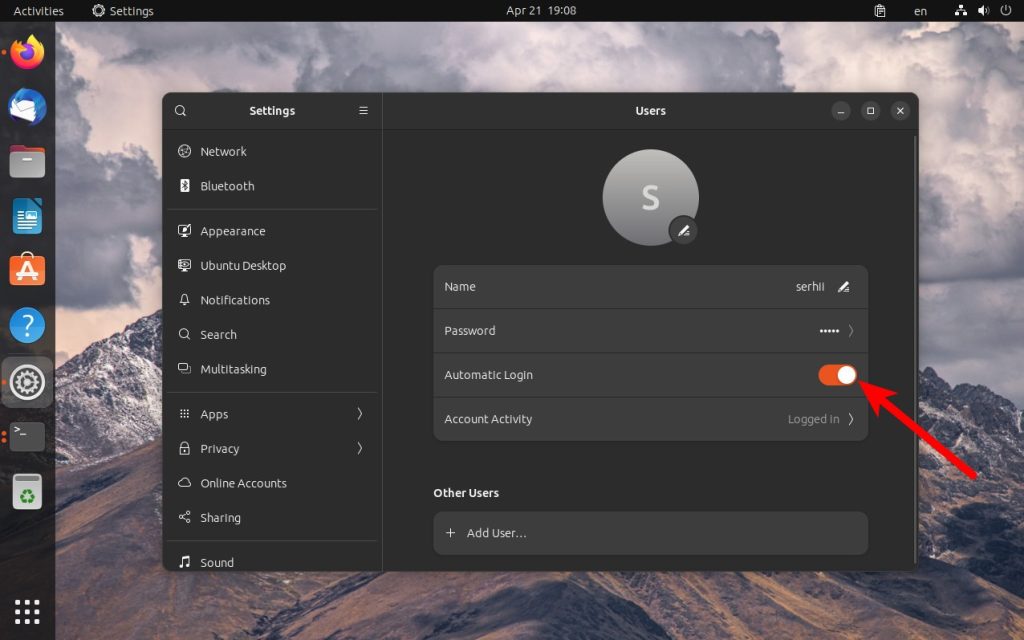
Шаг 12. Включение автоматического входа в систему
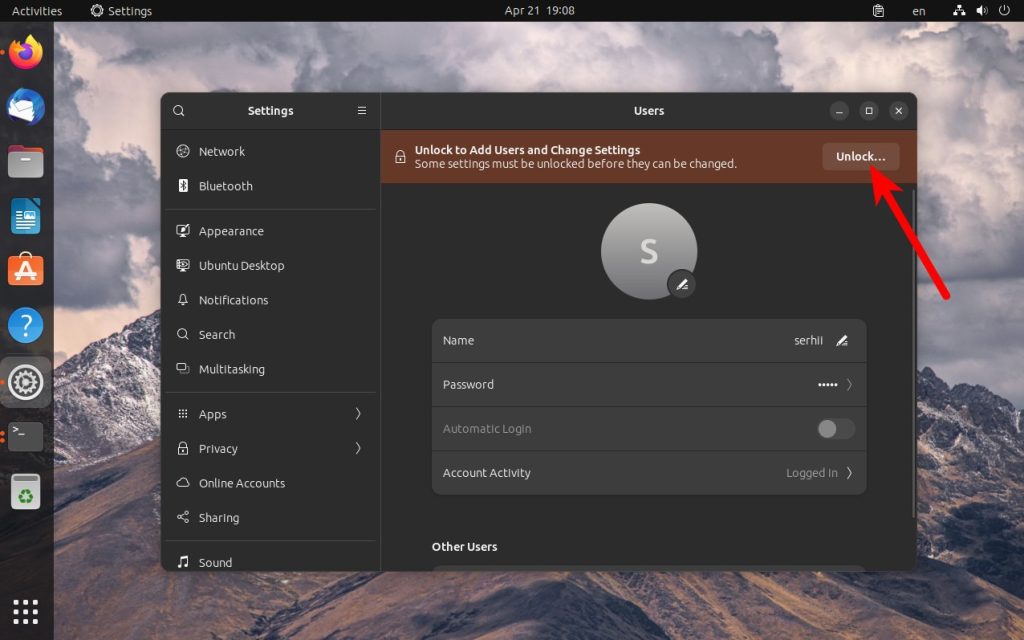
Если вы используете компьютер дома и не хотите вводить пароль при запуске, вы можете включить автоматический вход в систему. Ubuntu позволяет сделать это во время установки. Однако вы можете настроить это и позже. Сначала откройте Settings (Настройки) -> Users (Пользователи). Здесь нажмите кнопку Unlock... (Разблокировать) и введите свой пароль для внесения изменений:
Затем включите переключатель Automatic Login (Автоматический вход):
Если вы хотите включить автоматический вход с помощью терминала, откройте /etc/gdm3/custom.conf и найдите секцию daemon. Здесь нужно установить значение переменной AutomaticLoginEnable в true, а затем указать имя вашего пользователя в переменной AutomaticLogin. Например:
sudo vim /etc/gdm3/custom.conf
[daemon]
AutomaticLoginEnable=True
AutomaticLogin=serhii
Сохраните изменения и перезагрузите систему, чтобы убедиться, что всё работает.
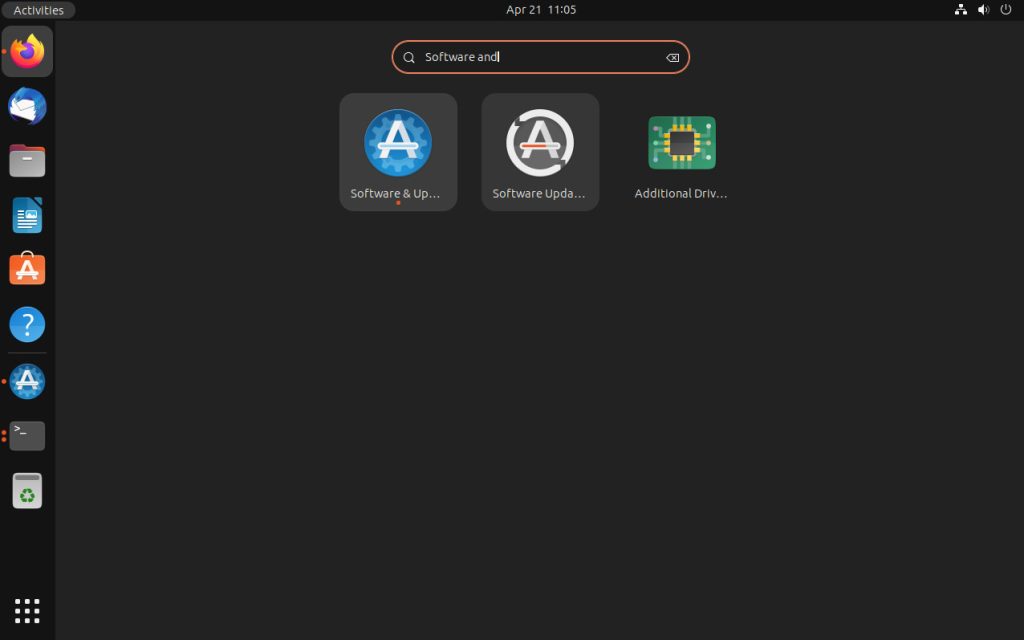
Шаг 13. Подключение дополнительных репозиториев
В Ubuntu есть несколько различных репозиториев для пакетов. Первый - это основной репозиторий, который включен по умолчанию. Также есть репозиторий universe, поддерживаемый сообществом, и репозитории restricted и multiverse, содержащие проприетарные драйверы и программное обеспечение. Если во время установки вы разрешили использование стороннего программного обеспечения, эти сторонние репозитории могут быть включены по умолчанию. В противном случае вы можете включить их в приложении Software & Updates (Программы и обновления) в главном меню (синяя иконка):
Затем отметьте репозитории, которые хотите подключить:

Также здесь можно изменить зеркало репозитория.
Шаг 14. Обновление системы
Вы можете обновить вашу систему, используя графический интерфейс. Просто запустите Software Updater из главного меню:
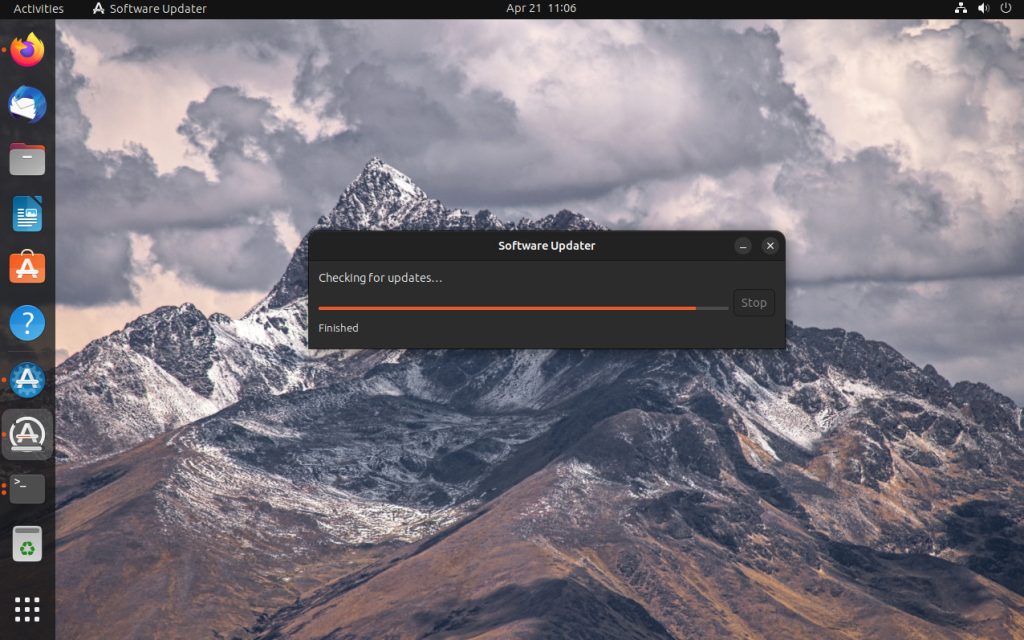
Эта утилита обновит список пакетов из репозиториев и установит последние обновления, если они доступны. В качестве альтернативы вы можете использовать терминал:
sudo apt update
sudo apt upgrade
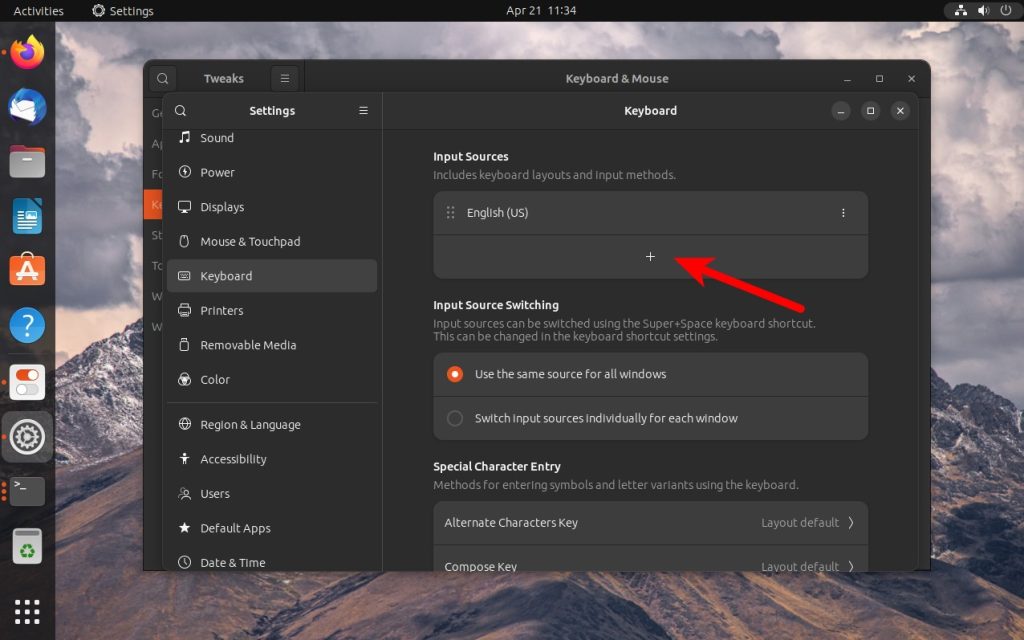
Шаг 15. Настройка раскладок клавиатуры
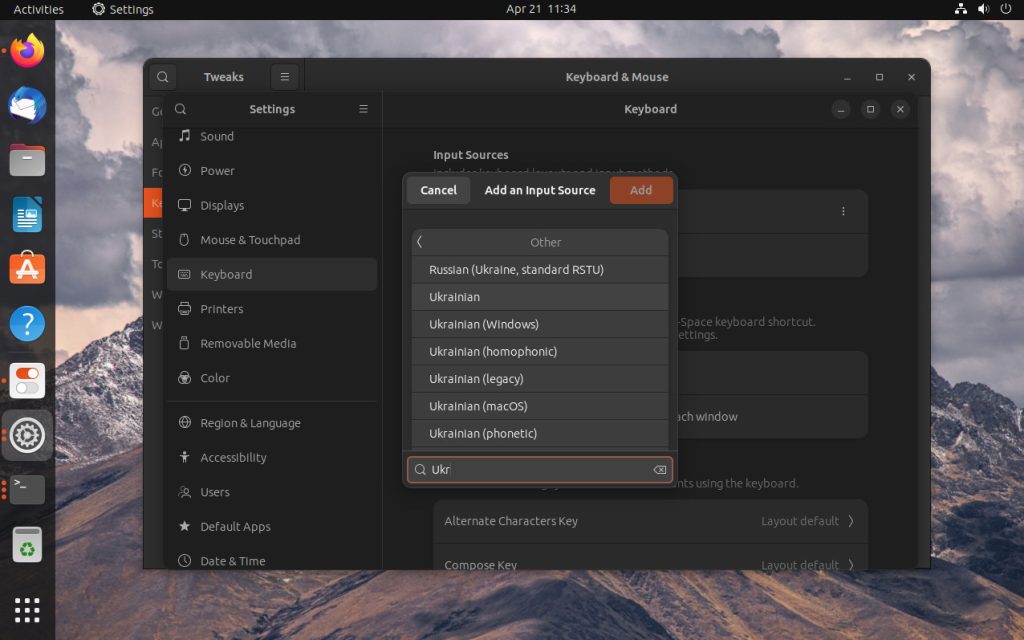
Если вы хотите добавить раскладку клавиатуры в вашу систему, откройте Settings (Настройки), а затем Keyboard (Клавиатура). Там вы можете использовать раздел Input Sources (Источники ввода) для добавления новой раскладки. Например, давайте добавим украинскую раскладку. Нажмите кнопку Плюс:
Если вы не видите нужный язык, нажмите кнопку More. После этого начните вводить название языка. Если вашего языка нет в списке, нажмите кнопку Other. В завершение выберите необходимый язык и нажмите кнопку Add:
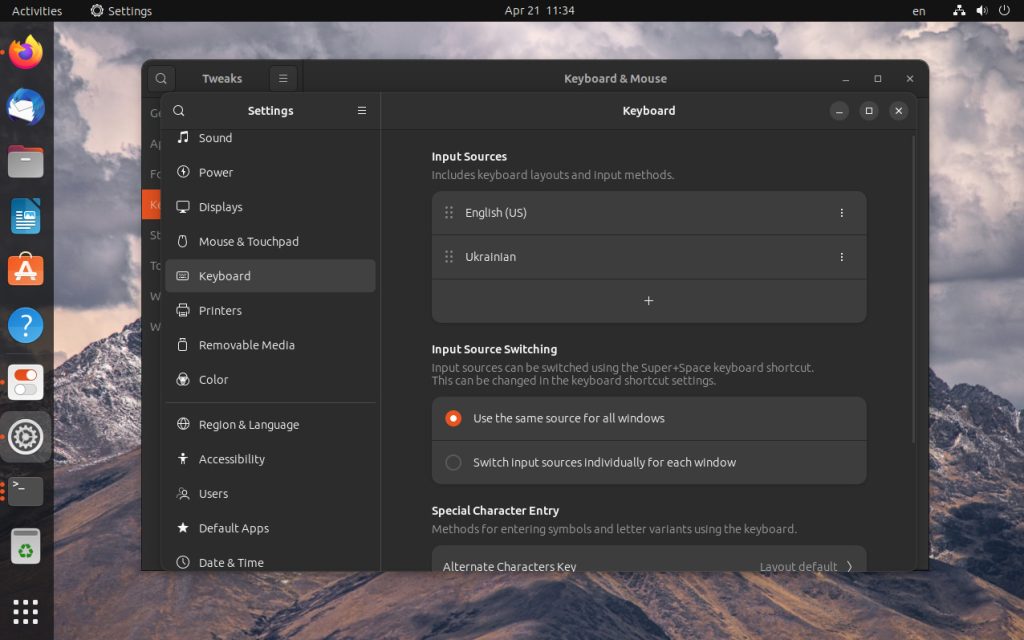
После этого новый язык появится в списке:
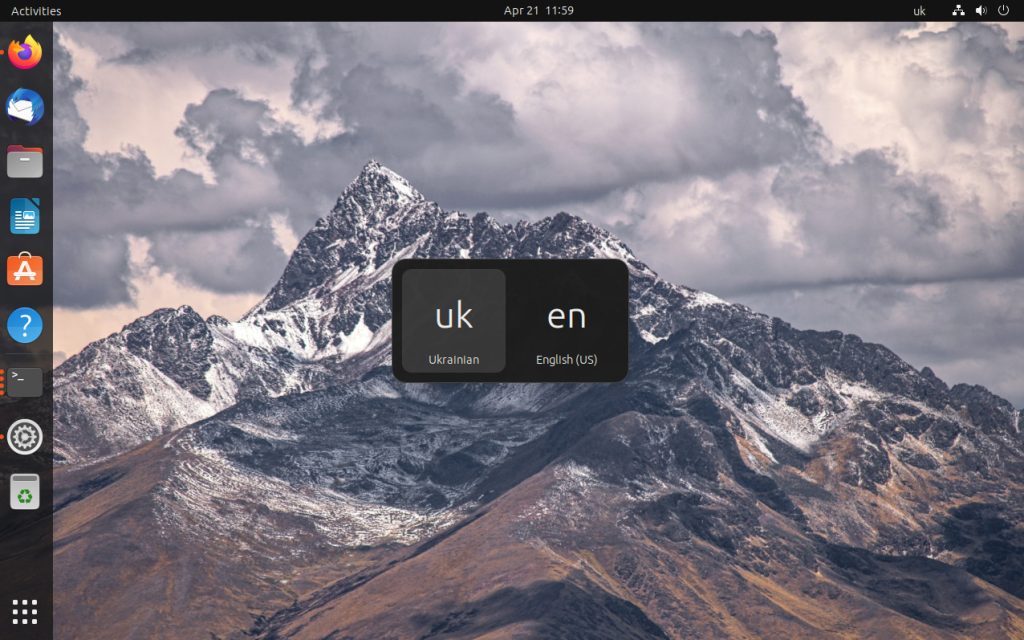
Еще одна вещь, которую вы можете захотеть сделать с раскладками - это использовать Alt+Shift для их переключения. Ubuntu, как и Windows, уже некоторое время использует клавиши Super+Space для переключения на следующую раскладку. Но многие люди, включая меня, все еще предпочитают использовать Alt+Shift. Для того чтобы это настроить используйте следующие команды:
gsettings set org.gnome.desktop.wm.keybindings switch-input-source "['<Shift>Alt_L']"
gsettings set org.gnome.desktop.wm.keybindings switch-input-source-backward "['<Alt>Shift_L']"
Преимущество использования этих команд в том, что вы будете видеть выбранную раскладку на экране так же, как и при использовании Super+Space:
Шаг 16. Сочетание клавиш для снимков экрана
В предыдущих версиях Ubuntu GNOME делал снимок экрана мгновенно при нажатии клавиши PrintScreen. Но в новых версиях открывается инструмент, который помогает выбрать область для съемки. Это требует больше действий, чем раньше, и вы можете захотеть вернуться к старому инструменту для скриншотов. Однако в этом нет необходимости. Существует сочетание клавиш Shift+PrtScr, которое можно использовать для мгновенного создания снимка экрана.
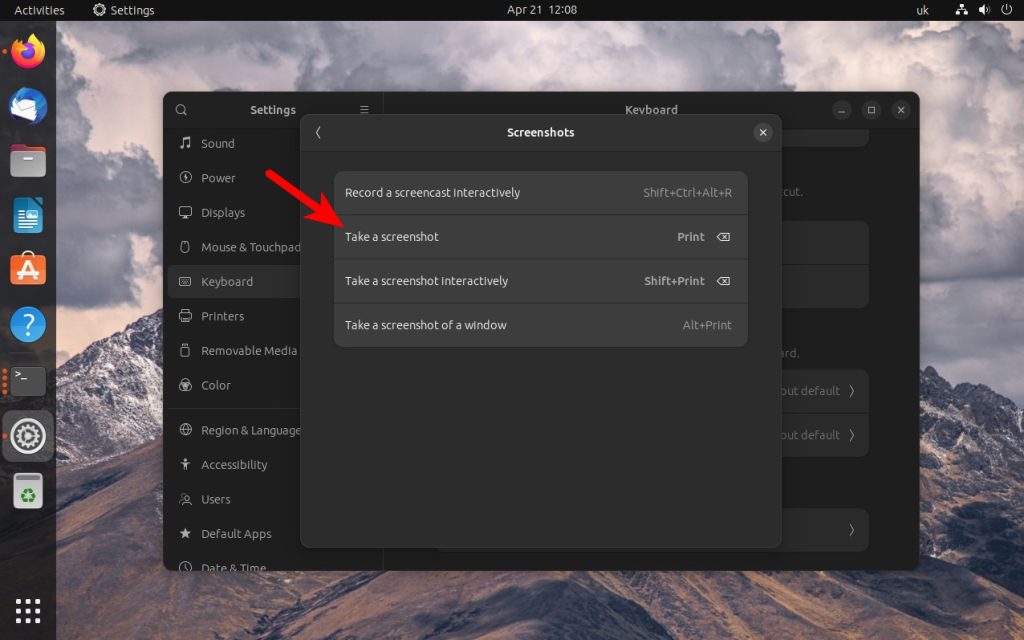
Или вы можете поменять местами действия для этих горячих клавиш. Откройте Settings (Настройки) -> Keyboard (Клавиатура) и нажмите View and Customize Shortcuts (Посмотреть и настроить сочетания клавиш) в нижней части окна:
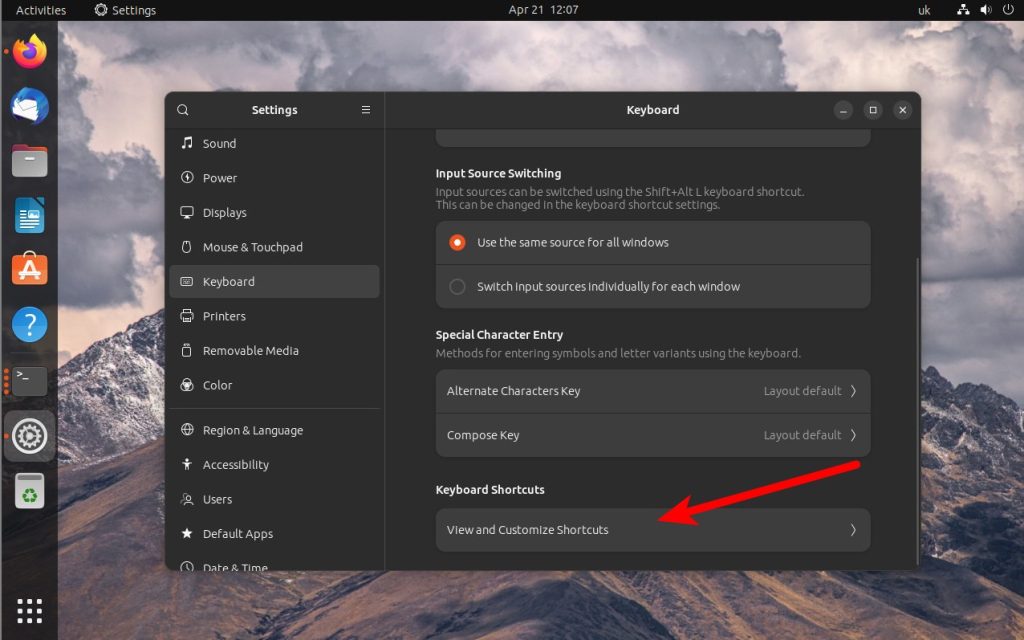
Затем нажмите Screenshots (Снимки экрана) -> Take a screenshot (Сделать снимок экрана) и нажмите Print Screen, чтобы использовать эту клавишу для создания снимков экрана:
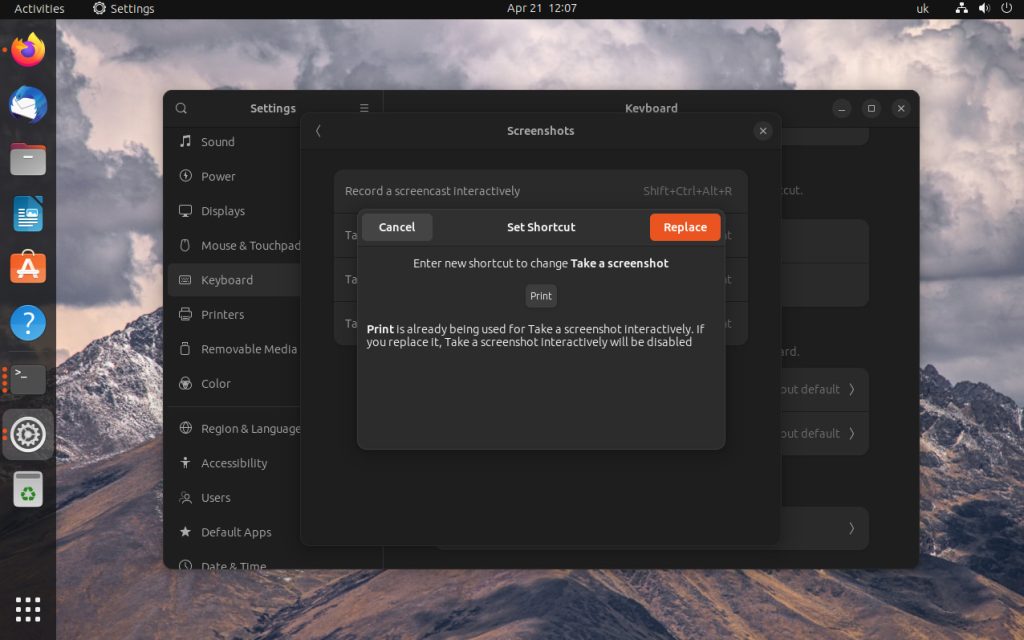
Также вы можете выбрать Take a screenshot immediately (Сделать снимок экрана немедленно) и нажать Shift+PrtScr, чтобы сохранить эту возможность.
Шаг 17. Добавление поддержки AppImage
AppImage - это формат портативных приложений, который позволяет запускать программы сразу после загрузки, без установки чего-либо. Однако Ubuntu по умолчанию его не поддерживает. Вы можете включить поддержку AppImage, установив библиотеку libfuse2:
sudo apt install libfuse2
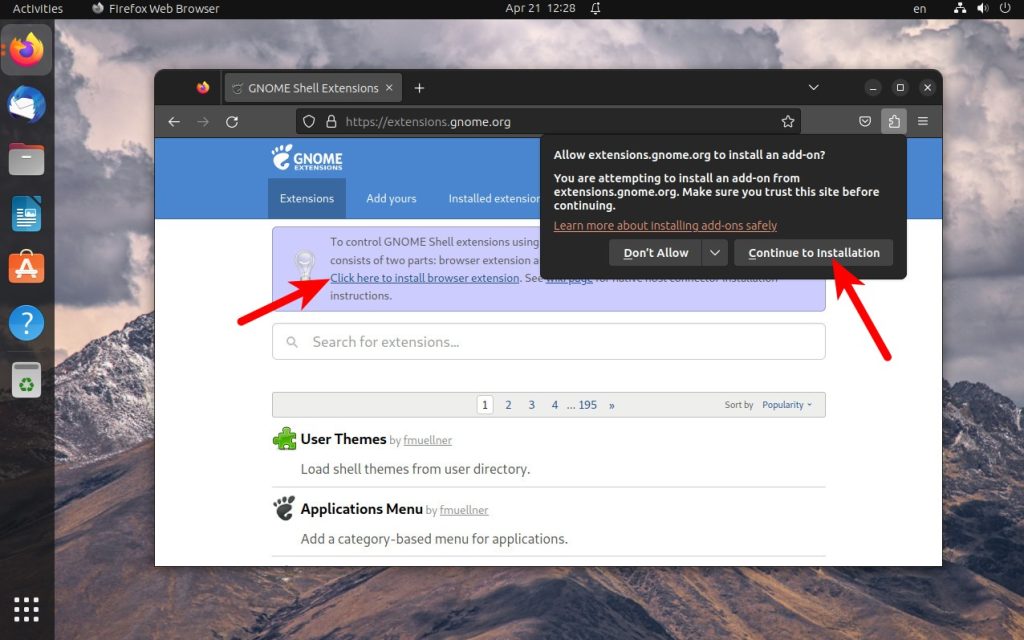
Шаг 18. Управление расширениями
Если вы хотите использовать расширения оболочки GNOME, вам необходимо установить расширение для браузера и пакет менеджера расширений. Выполните следующую команду для установки Менеджера расширений GNOME:
sudo apt install gnome-shell-extensions
Затем посетите сайт extensions.gnome.org и следуйте инструкциям по установке расширения для вашего браузера:
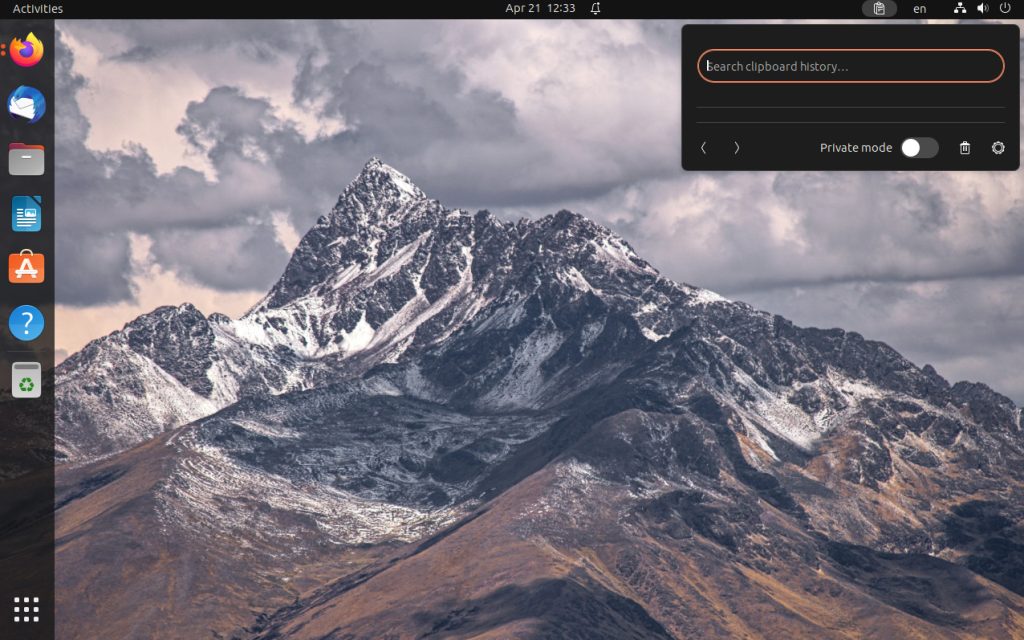
После установки расширения вы можете устанавливать расширения GNOME прямо из браузера. Просто выберите нужное расширение GNOME и используйте переключатель в правом верхнем углу, чтобы включить его. Например, Clipboard History:
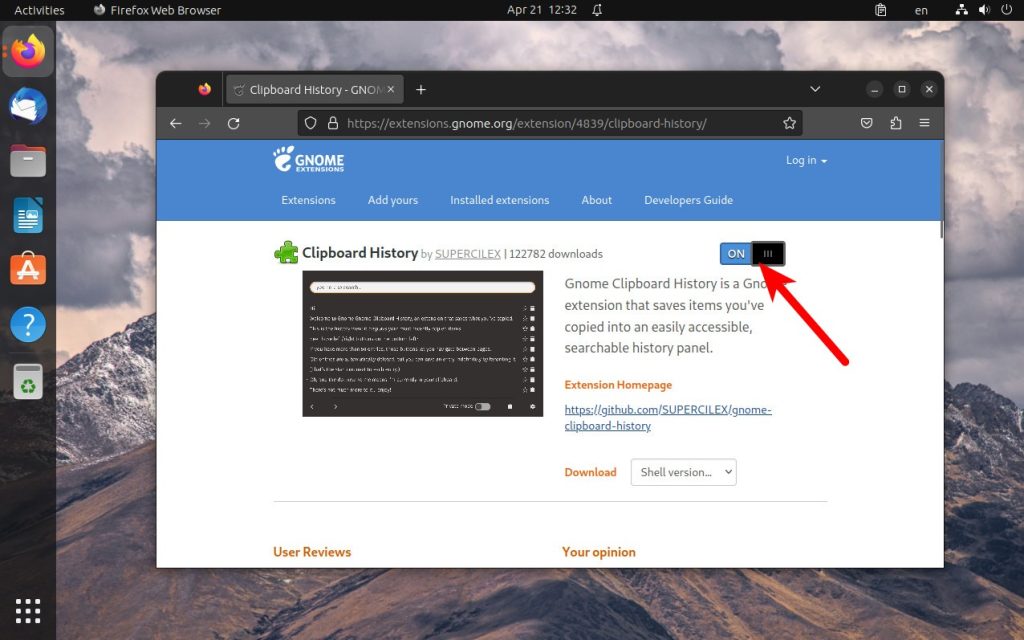
Подтвердите установку, и вы увидите менеджер буфера обмена на верхней панели:
Вы также увидите расширение в менеджере расширений:
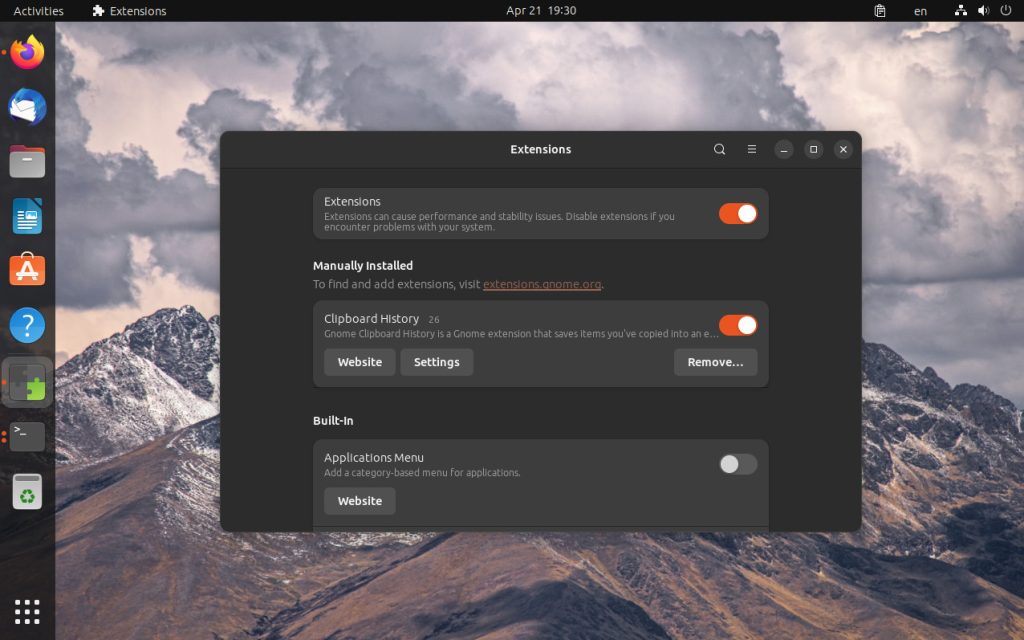
Здесь вы также можете настроить или отключить все встроенные расширения.
Шаг 19. Установка утилит для работы с архивами
По умолчанию Ubuntu не может открывать нестандартные форматы архивов, такие как rar или 7z. Если вы хотите работать с этими форматами, вам нужно установить несколько пакетов с помощью следующей команды:
sudo apt install rar unrar p7zip-full p7zip-rar
Шаг 20. Установка медиа-кодеков
Ubuntu по умолчанию поставляется только с кодеками с открытым исходным кодом. Однако вы можете включить установку проприетарных кодеков во время установки системы. Если вы этого не сделали, и теперь вам нужно открывать файлы MP3, AVI или MPEG, вы можете установить дополнительные кодеки с помощью следующей команды:
sudo apt install ubuntu-restricted-extras
Шаг 21. Установка драйверов
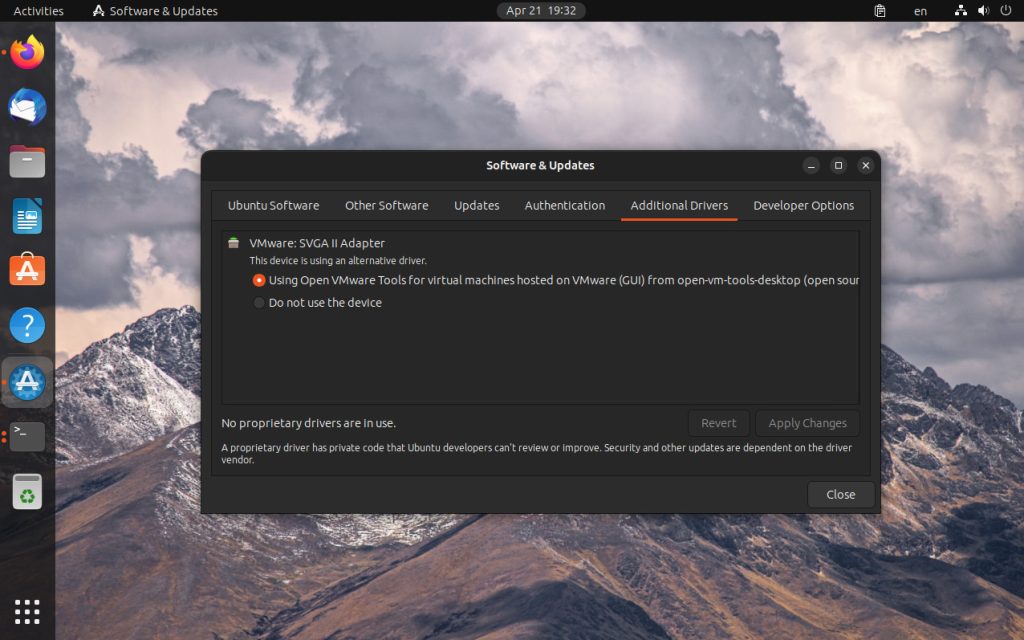
Если вы играете в видеоигры или используете компьютер для рендеринга видео, вам могут понадобиться проприетарные драйверы для видеокарты. Ubuntu предоставляет самый простой способ установки сторонних драйверов без использования терминала. Вы можете открыть приложение Additional Drivers, выбрать нужные драйверы для установки и нажать кнопку Apply Changes:
Шаг 22. Установка дополнительных приложений
Существует множество приложений, которые вы, возможно, захотите установить. Во-первых, если вы планируете использовать текстовый редактор Vim, учтите, что в Ubuntu по умолчанию установлен Vi, который не поддерживает многих функций, что поддерживаются в Vim. Используйте следующую команду для установки Vim:
sudo apt install vim
Теперь вы будете использовать Vim, даже если выполните vi в терминале. Другое отличное приложение - это VLC. Это один из лучших медиаплееров, поддерживающий множество медиаформатов. Вы можете установить его с помощью команды:
sudo apt install vlc
Обратите внимание, что в официальных репозиториях содержится VLC версии 3.0. Если вы хотите использовать новейшую версию, следует установить snap-пакет из Snap Store. Если вы работаете с изображениями, установите GIMP:
sudo apt install gimp
Шаг 23. Добавляем Flatpak
Команда Ubuntu решила прекратить поддержку Flatpak в этом выпуске. Более того, они удалили интеграцию Flatpak из Центра приложений Ubuntu. Тем не менее, вы можете устанавливать пакеты Flatpak вручную. На момент написания статьи Flatpak выглядит более подготовленным для настольных систем, лучше поддерживается и предлагает более свежие версии приложений. Вы можете установить пакет flatpak с помощью следующей команды:
sudo apt install flatpak
Затем добавьте репозиторий FlatHub:
sudo flatpak remote-add --if-not-exists flathub https://flathub.org/repo/flathub.flatpakrepo
После этого вы можете устанавливать пакеты Flatpak в терминале. Если вы хотите устанавливать приложения Flatpak в графическом интерфейсе, вам нужно установить Gnome Software и плагин для Flatpak:
sudo apt install gnome-software gnome-software-plugin-flatpak
Выводы
В этой статье я собрал наиболее полезные настройки которые желательно выполнить после установки Ubuntu 23.04. Как видите, можно сделать немало. Это основные системные настройки, которые я обычно выполняю в своей системе, поэтому вы можете не найти здесь именно то, что нужно вам. Если хотите, вы можете поделиться своими вариантами настроек для Ubuntu 23.04 в комментариях ниже.
Если вы искали альтернативу почтовому сервису Gmail, который уважает вашу конфиденциальность, обратите внимание на ProtonMail. Ваши письма автоматически шифруются сквозным шифрованием, поэтому читать их можете только вы и получатель. ProtonMail не собирает ваши персональные данные и базируется в Швейцарии, где действуют одни из самых строгих законов о конфиденциальности. Посмотреть детали